How to submit data and metadata to the portal?
This page covers the submission system documentation of the Data Resource Portal. We are collecting file and code assets from Common Fund programs to make them Findable, Accessible, Interoperable, and Reusable (FAIR) within the Data Resource Portal. To submit assets, you must be logged in and registered. Registration involves being assigned a role by an administrator. To register, please send us an email at help@cfde.R2kl7pucloudjjsqqcq.
Onboarding to the Submission System
User Roles
As a Common Fund Data Coordinating Center (DCC) you have 3 role options for your users of the submission system:
- User: These users are general users of the platform who cannot upload, approve, or view non-public files. You can have as many users in this role as you want.
- Uploader: Can submit data packages, but can't approve data packages/files. Users can see files that they submitted for their DCC, but can't approve them. You can have as many users in this role as you want.
- Approver: Can submit new packages and approve a submitted package. These users can view and manage all files that have been submitted for their DCC. You can have as many users in this role as you want.
- Read-Only: These are users who can see view all pages of the submission system but will not be allowed to submit or approve packages. They can also view all the submitted assets all their assigned DCCs. This role is to be given to the NIH and the PMs of DCCs. You can have as many users in this role as you want.
Any given person in your DCC can only have 1 role.
Onboarding Process
To do onboarding and give a member of your DCC Approver or Uploader privileges, have the PI or PM of your DCC contact the DRC via email (help@cfde.R2blbal8d5cloud7pujjsqqcq) with the following information about the concerned members:
- Name
- Role
- DCC
Please also indicate if the user has previously logged into the portal (has a user account) or has never accessed the portal (is a new user).
When the user(s) have been registered, each of them will receive an email from a member of the DRC notifying them of their registration.
Logging into the Portal after Registration
- You can log into the portal by entering the email address you were registered with into the email field here:
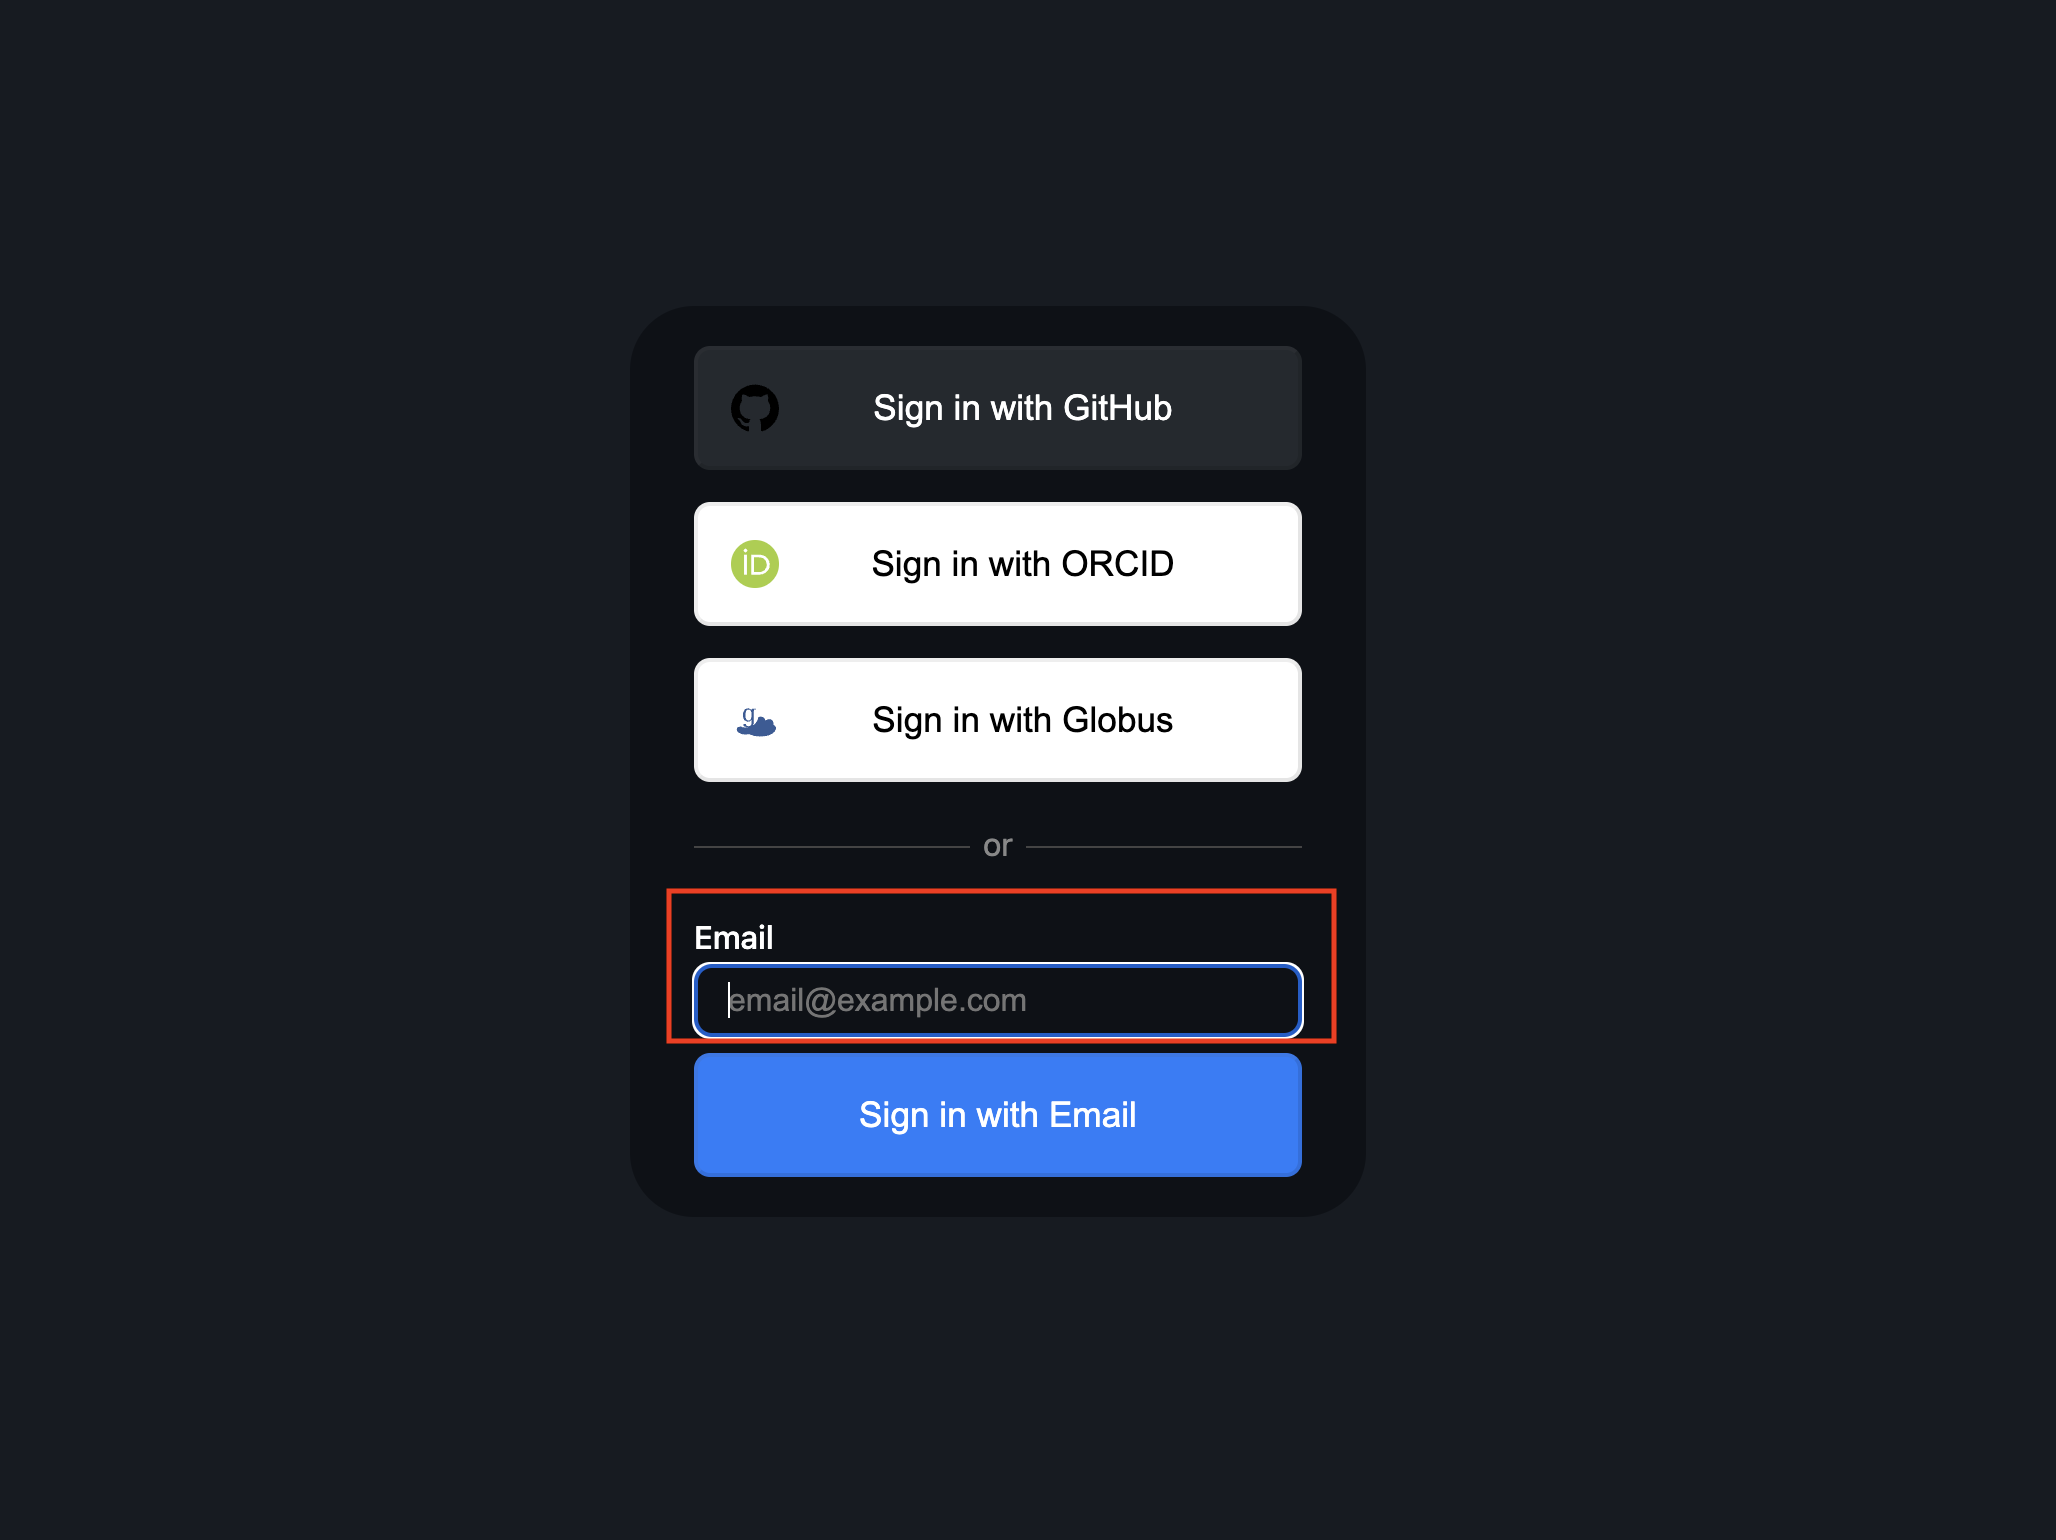 Figure 1: A screenshot of login page.
 - You will be sent a registration confirmation link to that email. If you do not find the link in your inbox, please also check your spam folder as the email may be sent there.
Verifying Account Information
Before submitting or approving assets, please go to My Account page and verify that all the role and DCC information is correct.
Go the My Account page by clicking on the user icon on the top right of the screen and click on My Account.
 Figure 2: A screenshot of Data Portal showing navigation to My Account page.
If your email is missing (you logged into the portal using ORCID):
- If you were registered with your email, log out of the portal and sign in with the email you were registered with.
- Otherwise, please enter your email and press save changes or the enter key. Please note that your email can only be saved once so be careful to ensure that it is accurately entered.
File Types
XMT
XMT files are text based files which contain a collection of sets of a given entity type. The 'X' in XMT stands for the entity that the sets contain For example, .gmt files are XMT files that contain a collection of gene sets while .dmt files are XMT files that contain a collection of drug sets. On each row of the XMT file, the first column contains the Term associated with the set while all other columns contain the set entities.
XMT file format is as follows:
<set_label>	<description (optional, can be left blank)> <tab separated entities>

# example
(S)-Methylmalonate Semialdehyde		ALDH3A2	ALDH7A1	ALDH6A1	HIBADH	ALDH1B1	ALDH2	AOX1	EHHADH	ALDH9A1	HADH
Note that if description is left blank, the set label and entities are separated by two tabs.
C2M2
The Crosscut Metadata Model (C2M2) is a collection of files coded in the frictionless data package format. The collection of files are a zipped set of TSV files containing metadata standardized to a set of known ontologies. Please explore the C2M2 technical wiki for more information about how to prepare your metadata into C2M2 compatible files. Please also see the C2M2 section in the Documentation page of the CFDE Workbench portal on how to create C2M2 files.
KG Assertions
A knowledge graph is a network that illustrates the relationship between different entities which may come from different datasets. A knowledge graph consists of three main components: nodes, edges and labels. Nodes are the entities represented in the knowledge graph e.g GO Ontology terms. Edges characterize the relationship between nodes e.g. co-expressed with. Knowledge graph assertions are files which contain information about the nodes and edges that could be used to create a knowledge graph. For example, a KG Assertions file for nodes would contain columns which define information about each node: id, label, ontology_label. A KG Assertions file for edges would contain columns that comprises the necessary information about each edge: its source and target nodes, the labels for these nodes and their relationship.
Attribute Table
Attribute tables are files containing tables that describe the relationship between two entities with one entity type on the rows (e.g genes) and another on the columns (e.g tissue types). The intersection of a given row and column is then a value defining nature of the relationship between the row entity and the column entity e.g. the qualitative score of similarity between a given gene and a given tissue type.
The recommended extensions for each file asset type are:
- C2M2:
.zip - KG Assertions:
.zip - Attribute Table:
.h5or.hdf5 - XMT: .(x)mt e.g
.gmtor.dmt
Code Asset Types
ETL
Extract, transform, load (ETL) is the process of converting the DCC raw data into various processed data formats such as the C2M2, XMT, KG assertions, attribute tables, and database tables. The ETL URL should point to the DCC GitHub repo containing the scripts that process the data by the DCC to generate these processed datasets.
API
It is expected that each DCC will have a URL to a page that documents how to access each DCC data and tools via APIs. Moreover, APIs should be documented in a standard format and the recommended standard is OpenAPI. In addition, it is recommended to deposit these API into the API repository SmartAPI.
OpenAPI: The OpenAPI specification provides a formal standard for describing REST APIs. OpenAPI specifications are typically written in YAML or JSON.
SmartAPI: This is a community-based repository for depositing APIs documented in the OpenAPI specification. It features additional metadata elements and value sets to promote the interoperability of RESTful APIs.
Chatbot specifications: A manifest file located at the API's base url: .well-known/ai-plugin.json containing metadata and OpenAPI specifications which can be used to develop a chat plugin for large language models. These plugins allow the large language models to function as specialized chatbots that have access to the exposed API endpoints described in the manifest files and can call these APIs based on user input. See ChatGPT plugins documentation for more information on how to develop chatbot specifications. ai-plugin specs template
Learn more about generating an OpenAPI or SmartAPI specification on the Documentation page. Example: exRNA openAPI link
Playbook Workflow Builder (PWB) Metanodes
A PWB metanode is a workflow engine component implemented by defining the semantic description, typescript-constrained type, and functionality of a node in the network of PWB workflows. See Playbook Partnership documentation and Documentation page for more information about developing and publishing metanodes. The form requires a GitHub link to a script describing a Playbook metanode. Example: PWB Metanode created by the Metabolomics DCC
Entity Page Template and Example
The Entity Page Template and Example are links to:
- A template used to create the landing page displaying the datasheet about a gene, a metabolite, and protein, a cell type, or other entities from a DCC.
- Example of a template from GTEx: https://www.gtexportal.org/home/gene/GENE_NAME).
- The example URL provides a valid URL to an existing entity page that presents a single view of a given entity.
- Example live entity page from GTEx: https://www.gtexportal.org/home/gene/MAPK3
Models
Models are resources that aren't quite apps but are being developed by DCCs and useful for a variety of tasks. These models range from mathematical models of biological systems to foundation models for biology. A link to the model should be provided, ideally the link is a DOI, and/or in a standardized public repository like HuggingFace for machine learning models. Example: ABC Transport Model
Apps URL
An Apps URL is a link to a page(s) that serves a listing of bioinformatics tools, workflows, and databases produced by the DCC. Example: LINCS Apps URL
Asset Approval Status
Not Approved
This is the first stage of approval. All assets that are just uploaded or submitted by a DCC uploader will first be placed in this category. The asset will be tagged by the icon on the Uploaded Assets page, icon which represents that the file was not reviewed by the DCC approver or evaluated by the DRC.
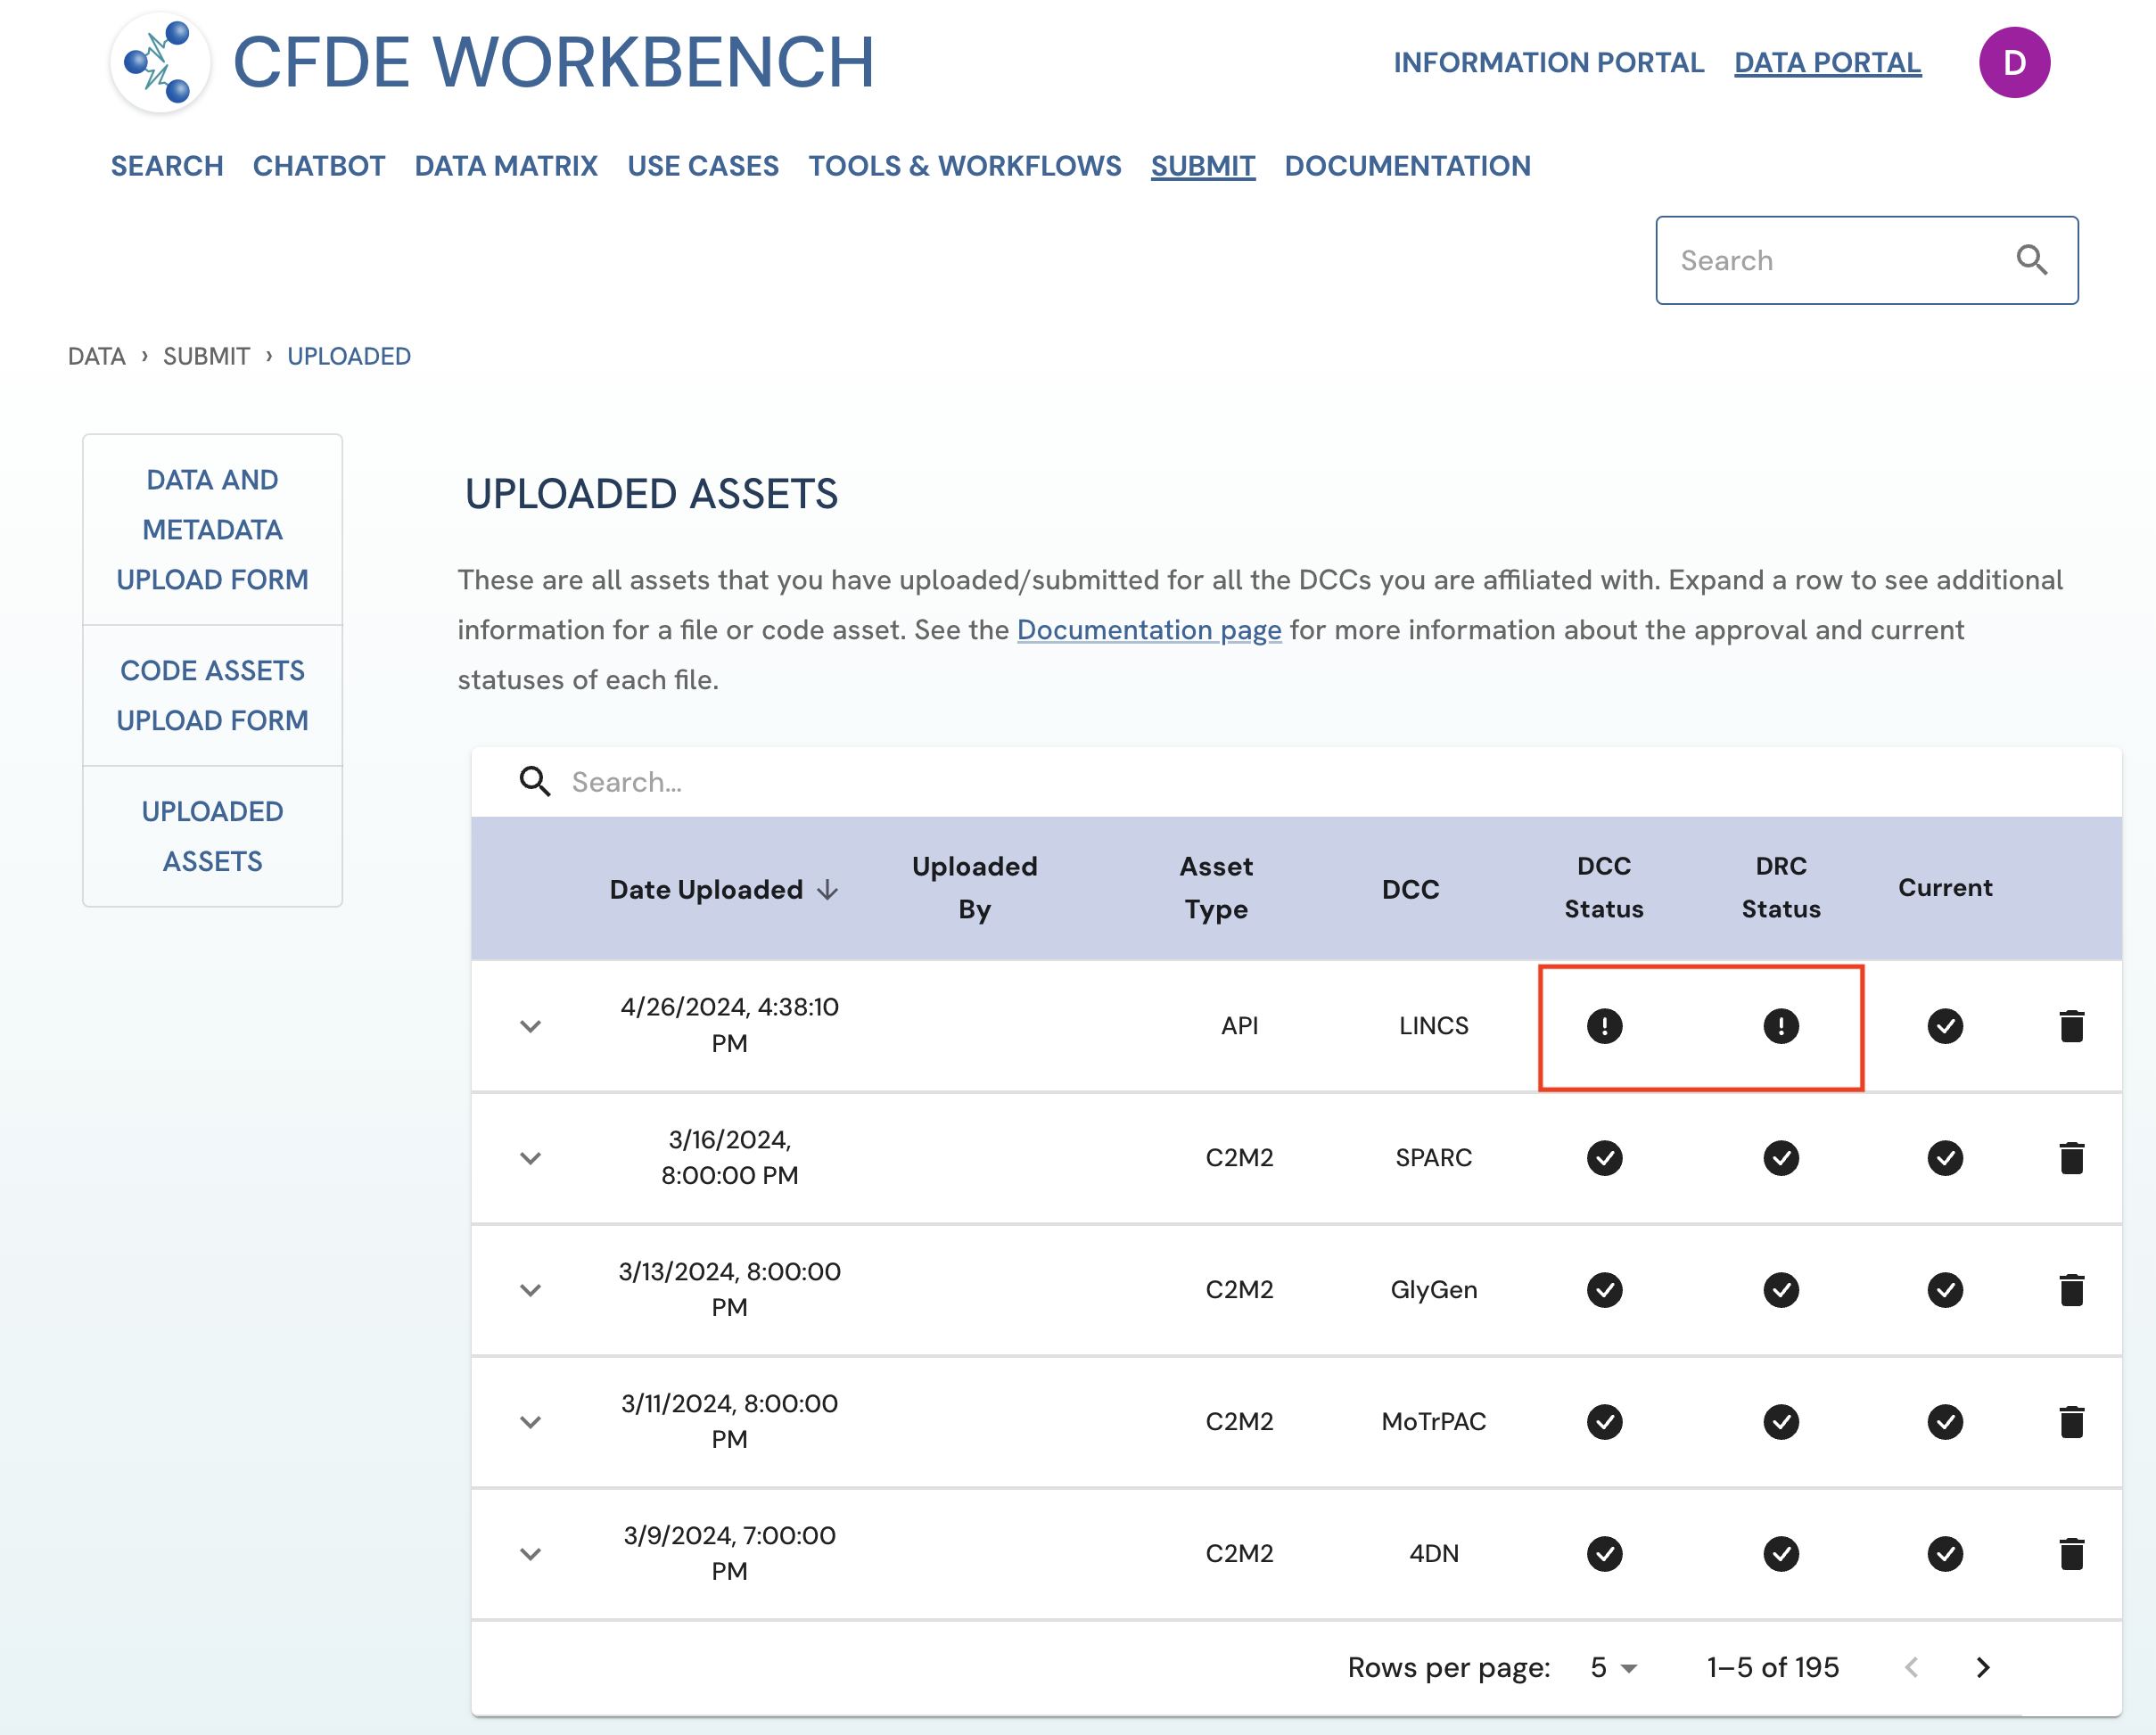 Figure 1: A screenshot of Uploaded Assets page showing a submitted asset without DCC or DRC approval. View of Uploader User
DCC Approved
When an asset has been approved by a DCC approver (appointed by each DCC), the status of the asset will be updated to 'DCC Approved' which is tagged by the icon under the DCC Status column on the Uploaded Assets page.
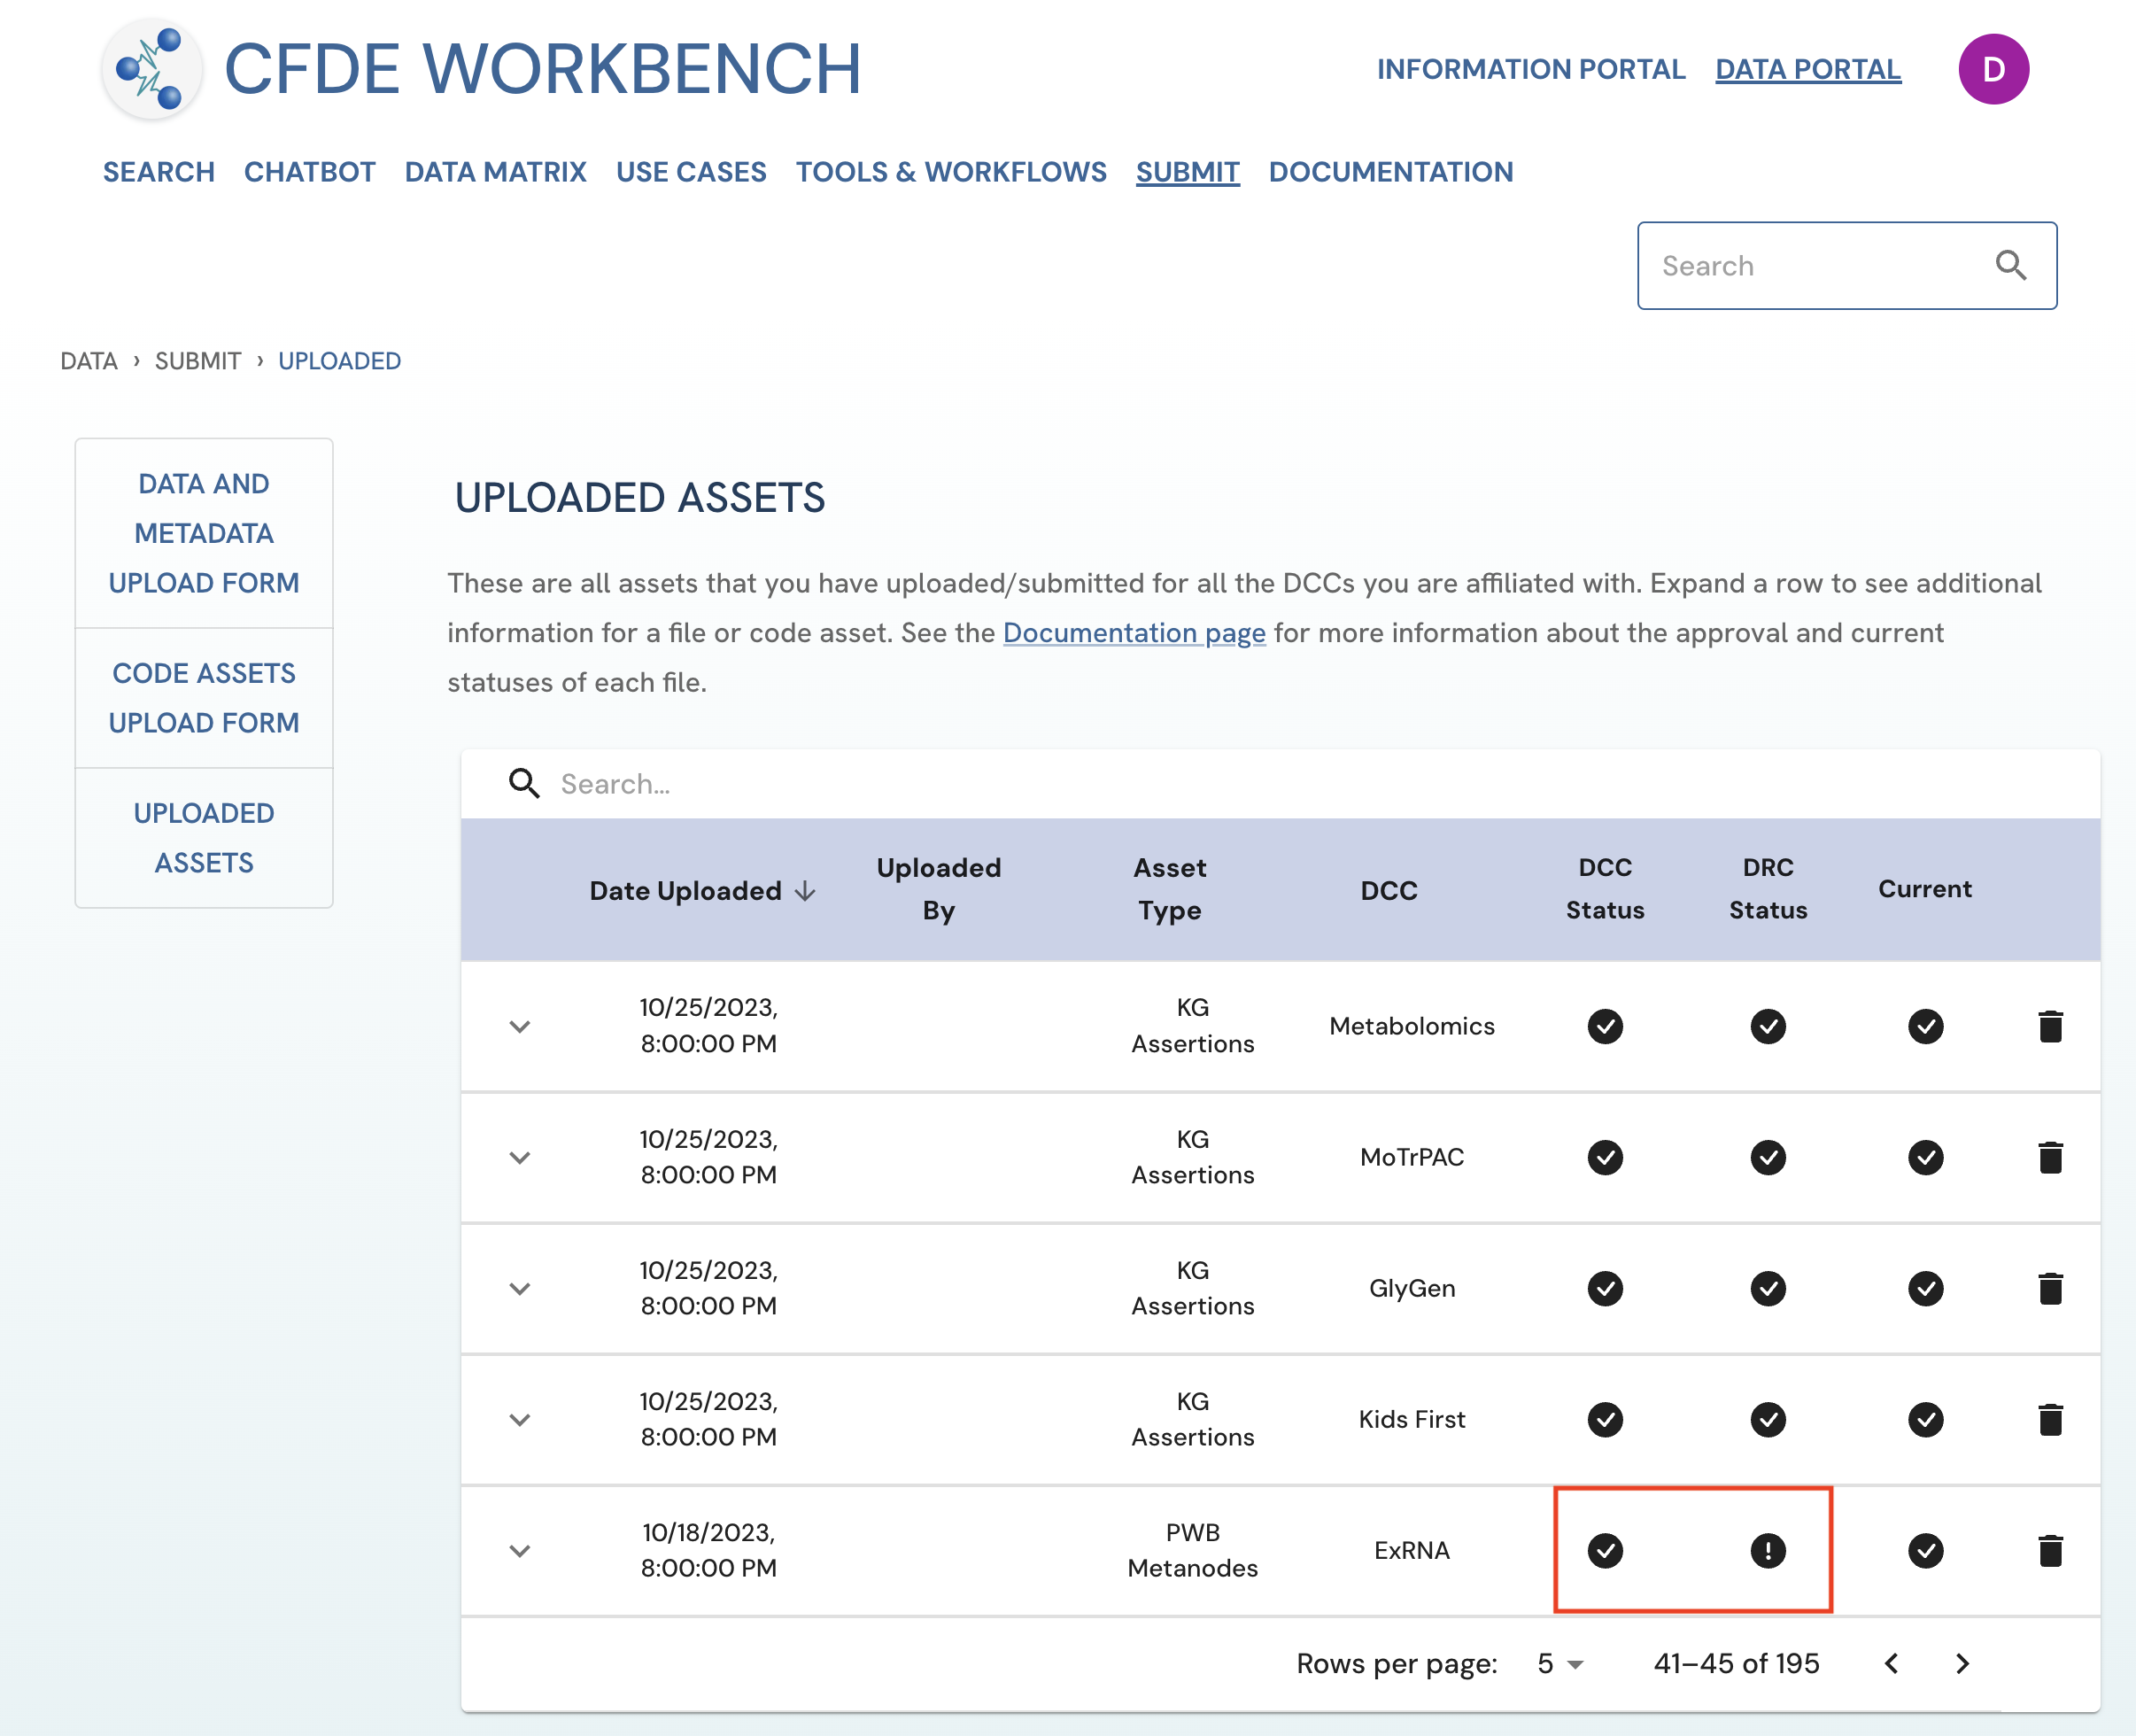 Figure 2: A screenshot of Uploaded Assets page showing a submitted asset with DCC approval but without DRC approval. View of Uploader User
DRC Approved
When an asset has been approved by an appointed DRC approver, the status of the asset will be updated to 'DRC Approved'. This status is tagged by the icon under the “DRC Status” column on the Uploaded Assets page. Please note that DCC and DRC approval status are independent of each other.
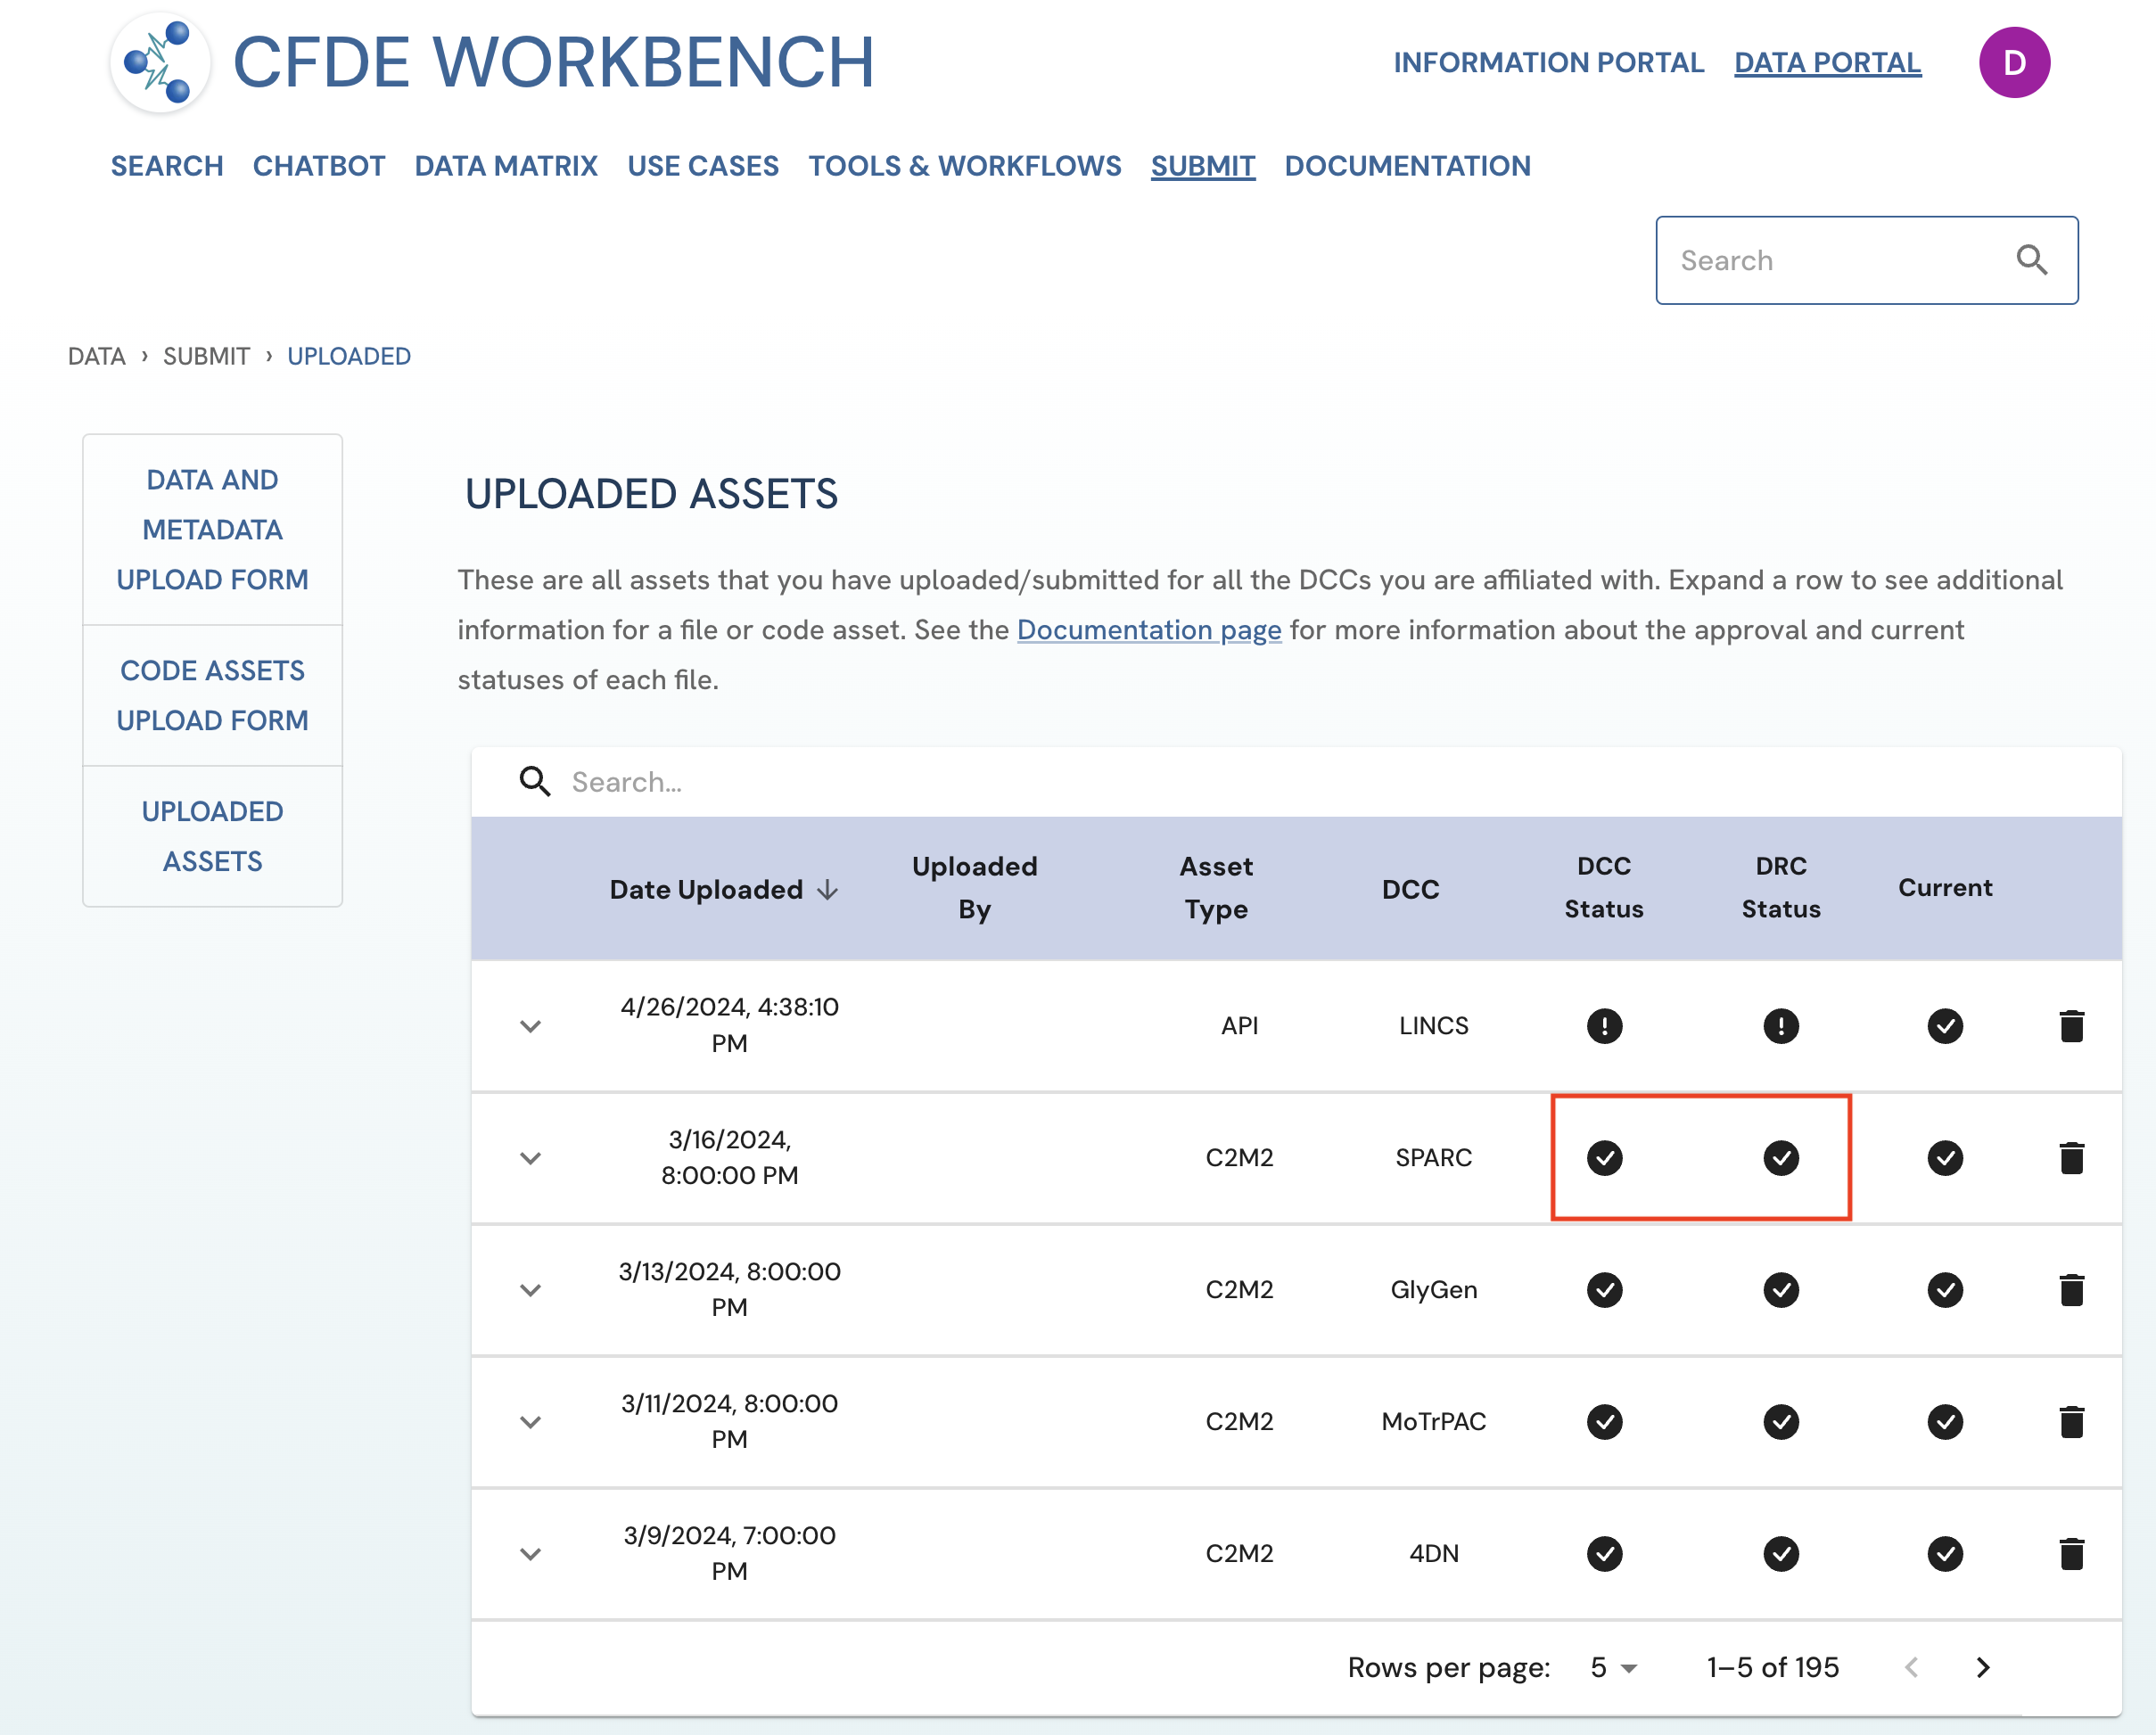 Figure 3: A screenshot of Uploaded Assets page showing a submitted asset with both DCC approval and DRC approval. View of Uploader User
Current vs Archived Status
Current
An asset tagged by the icon under the 'Current' column on the Uploaded Assets page is considered the current version of that file type for a given DCC.
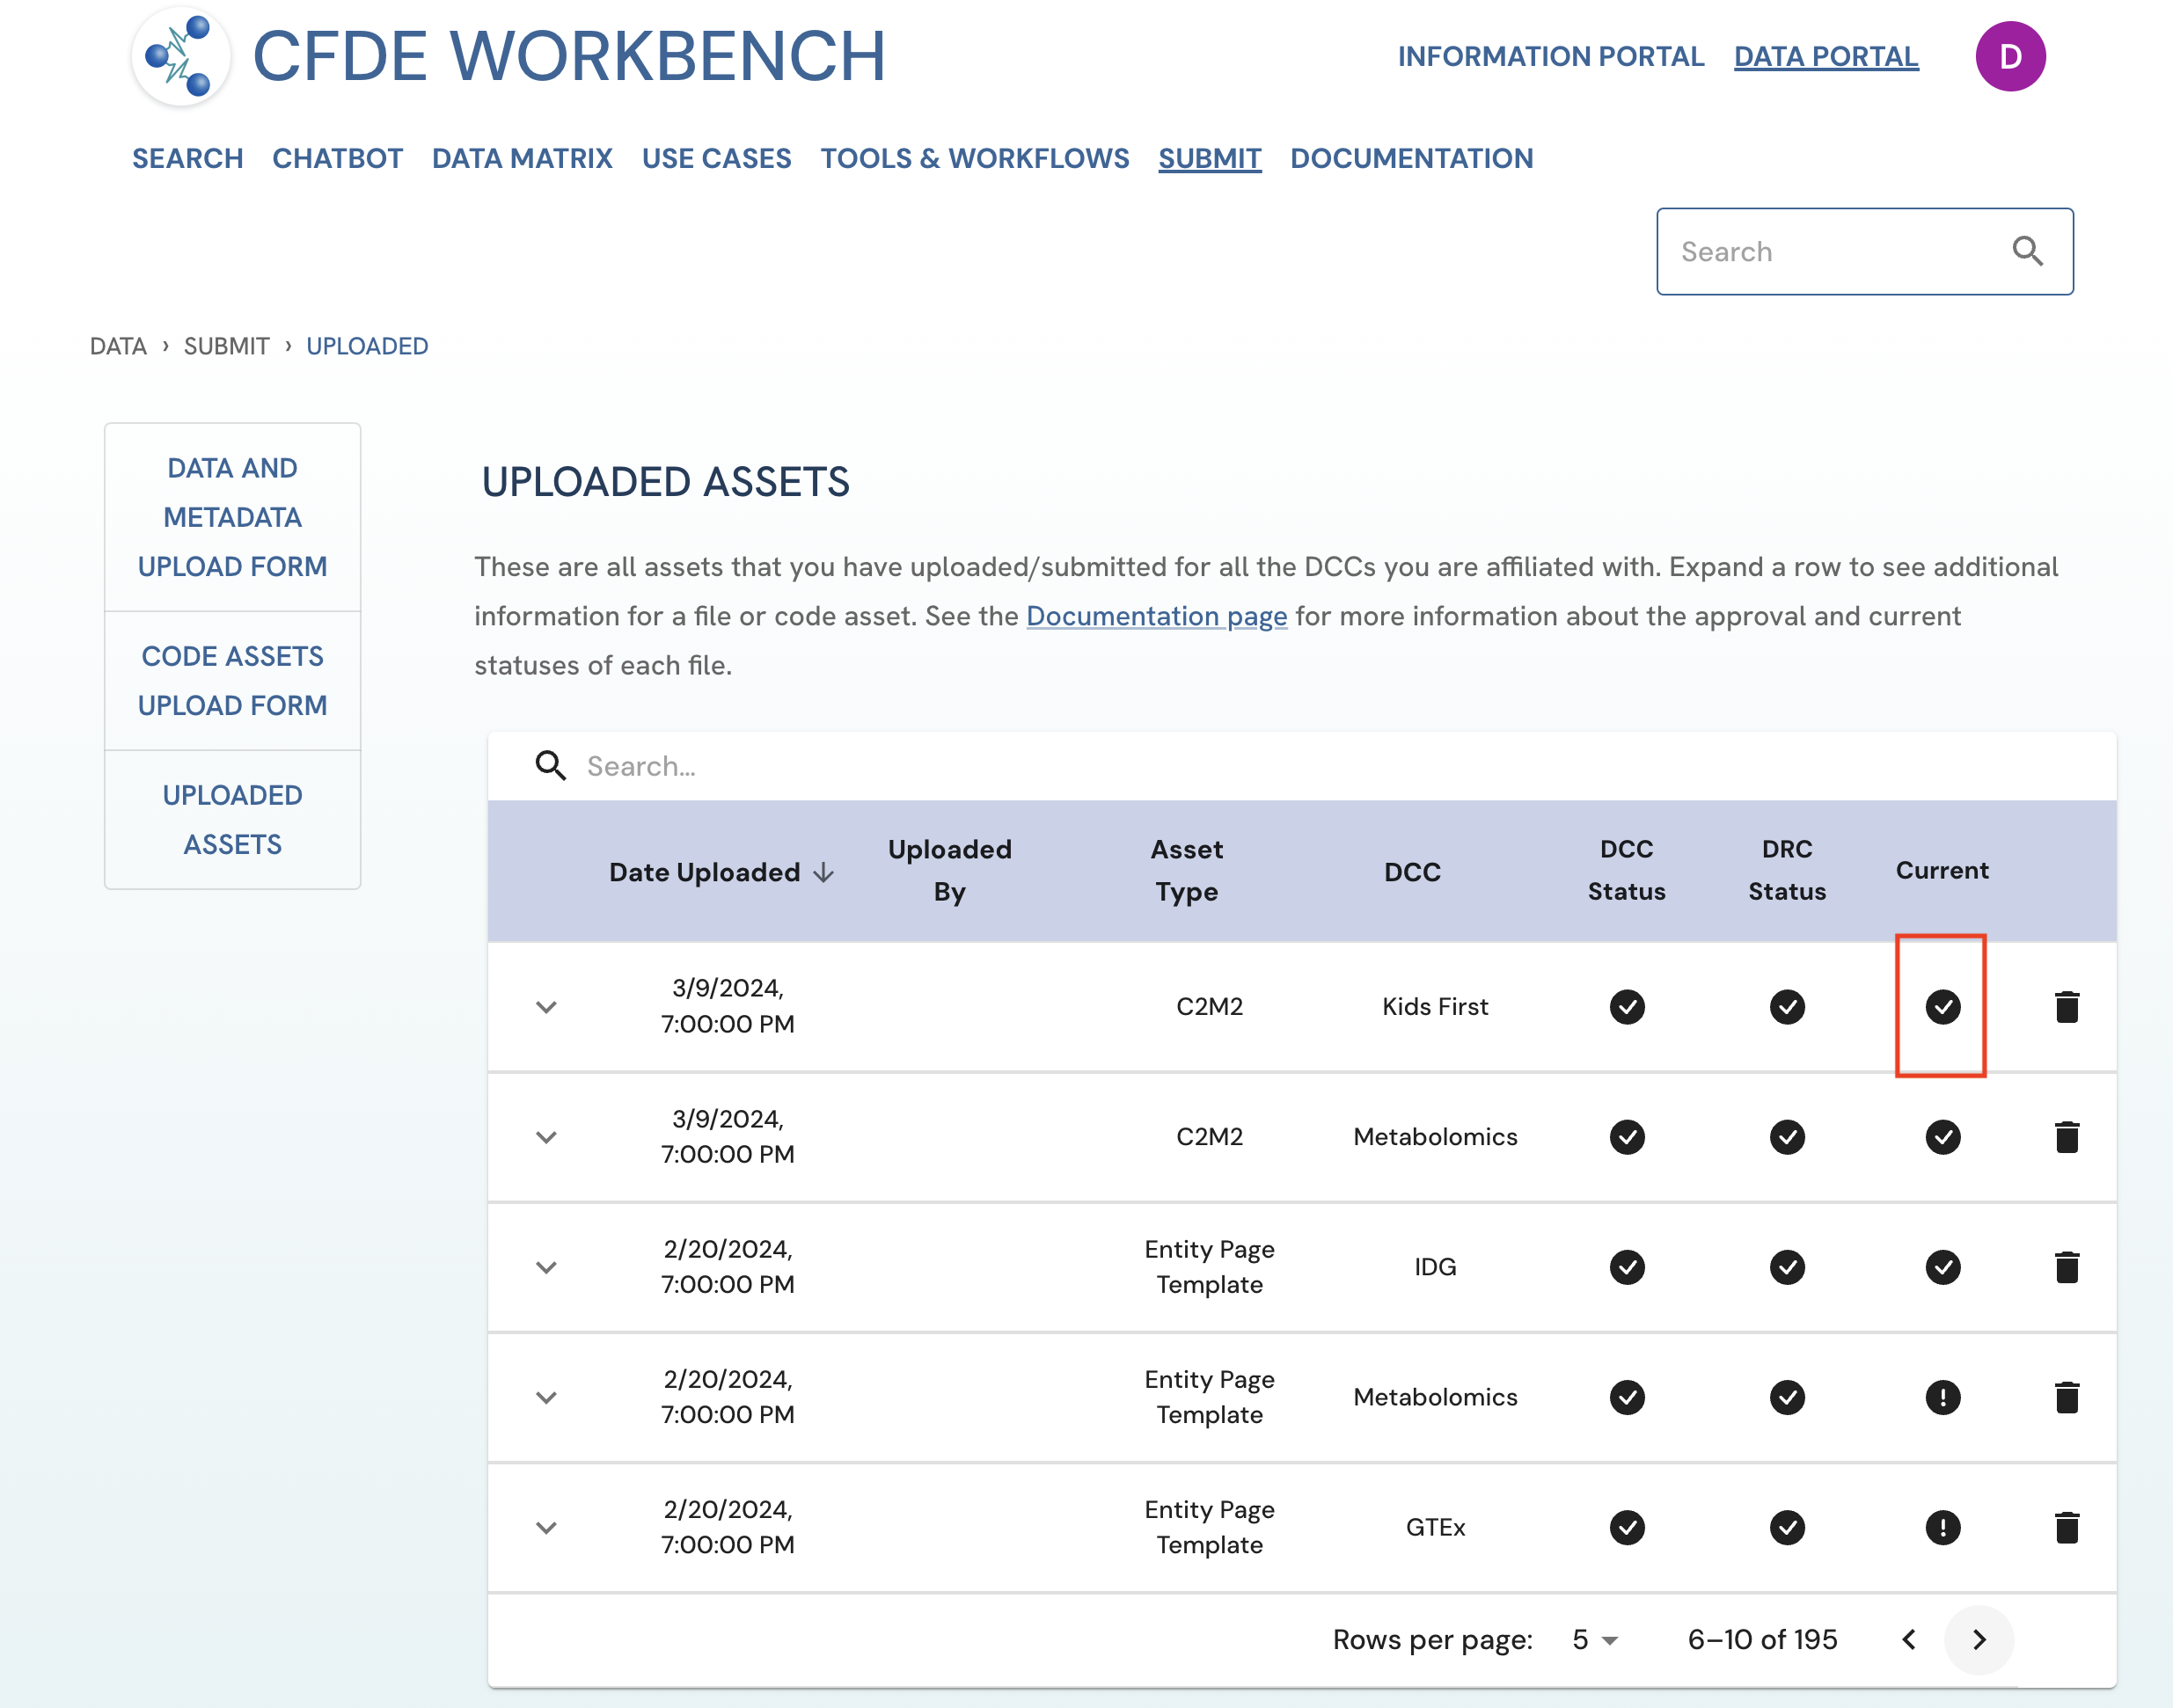 Figure 1: Screenshot from the Uploaded Assets page highlighting the current asset checkmark. The screenshot is from the viewpoint of an uploader user.
An asset tagged by the ! icon under the 'Current' column on the Uploaded Assets page is considered an archived asset. Please note that both DCC and DRC approvers can change the current status of an asset.
Archived
An asset tagged by the icon under the 'Current' column on the Uploaded Assets page, is considered an archived version of that asset type. Please note that both DCC and DRC approvers can change the current status of an asset.
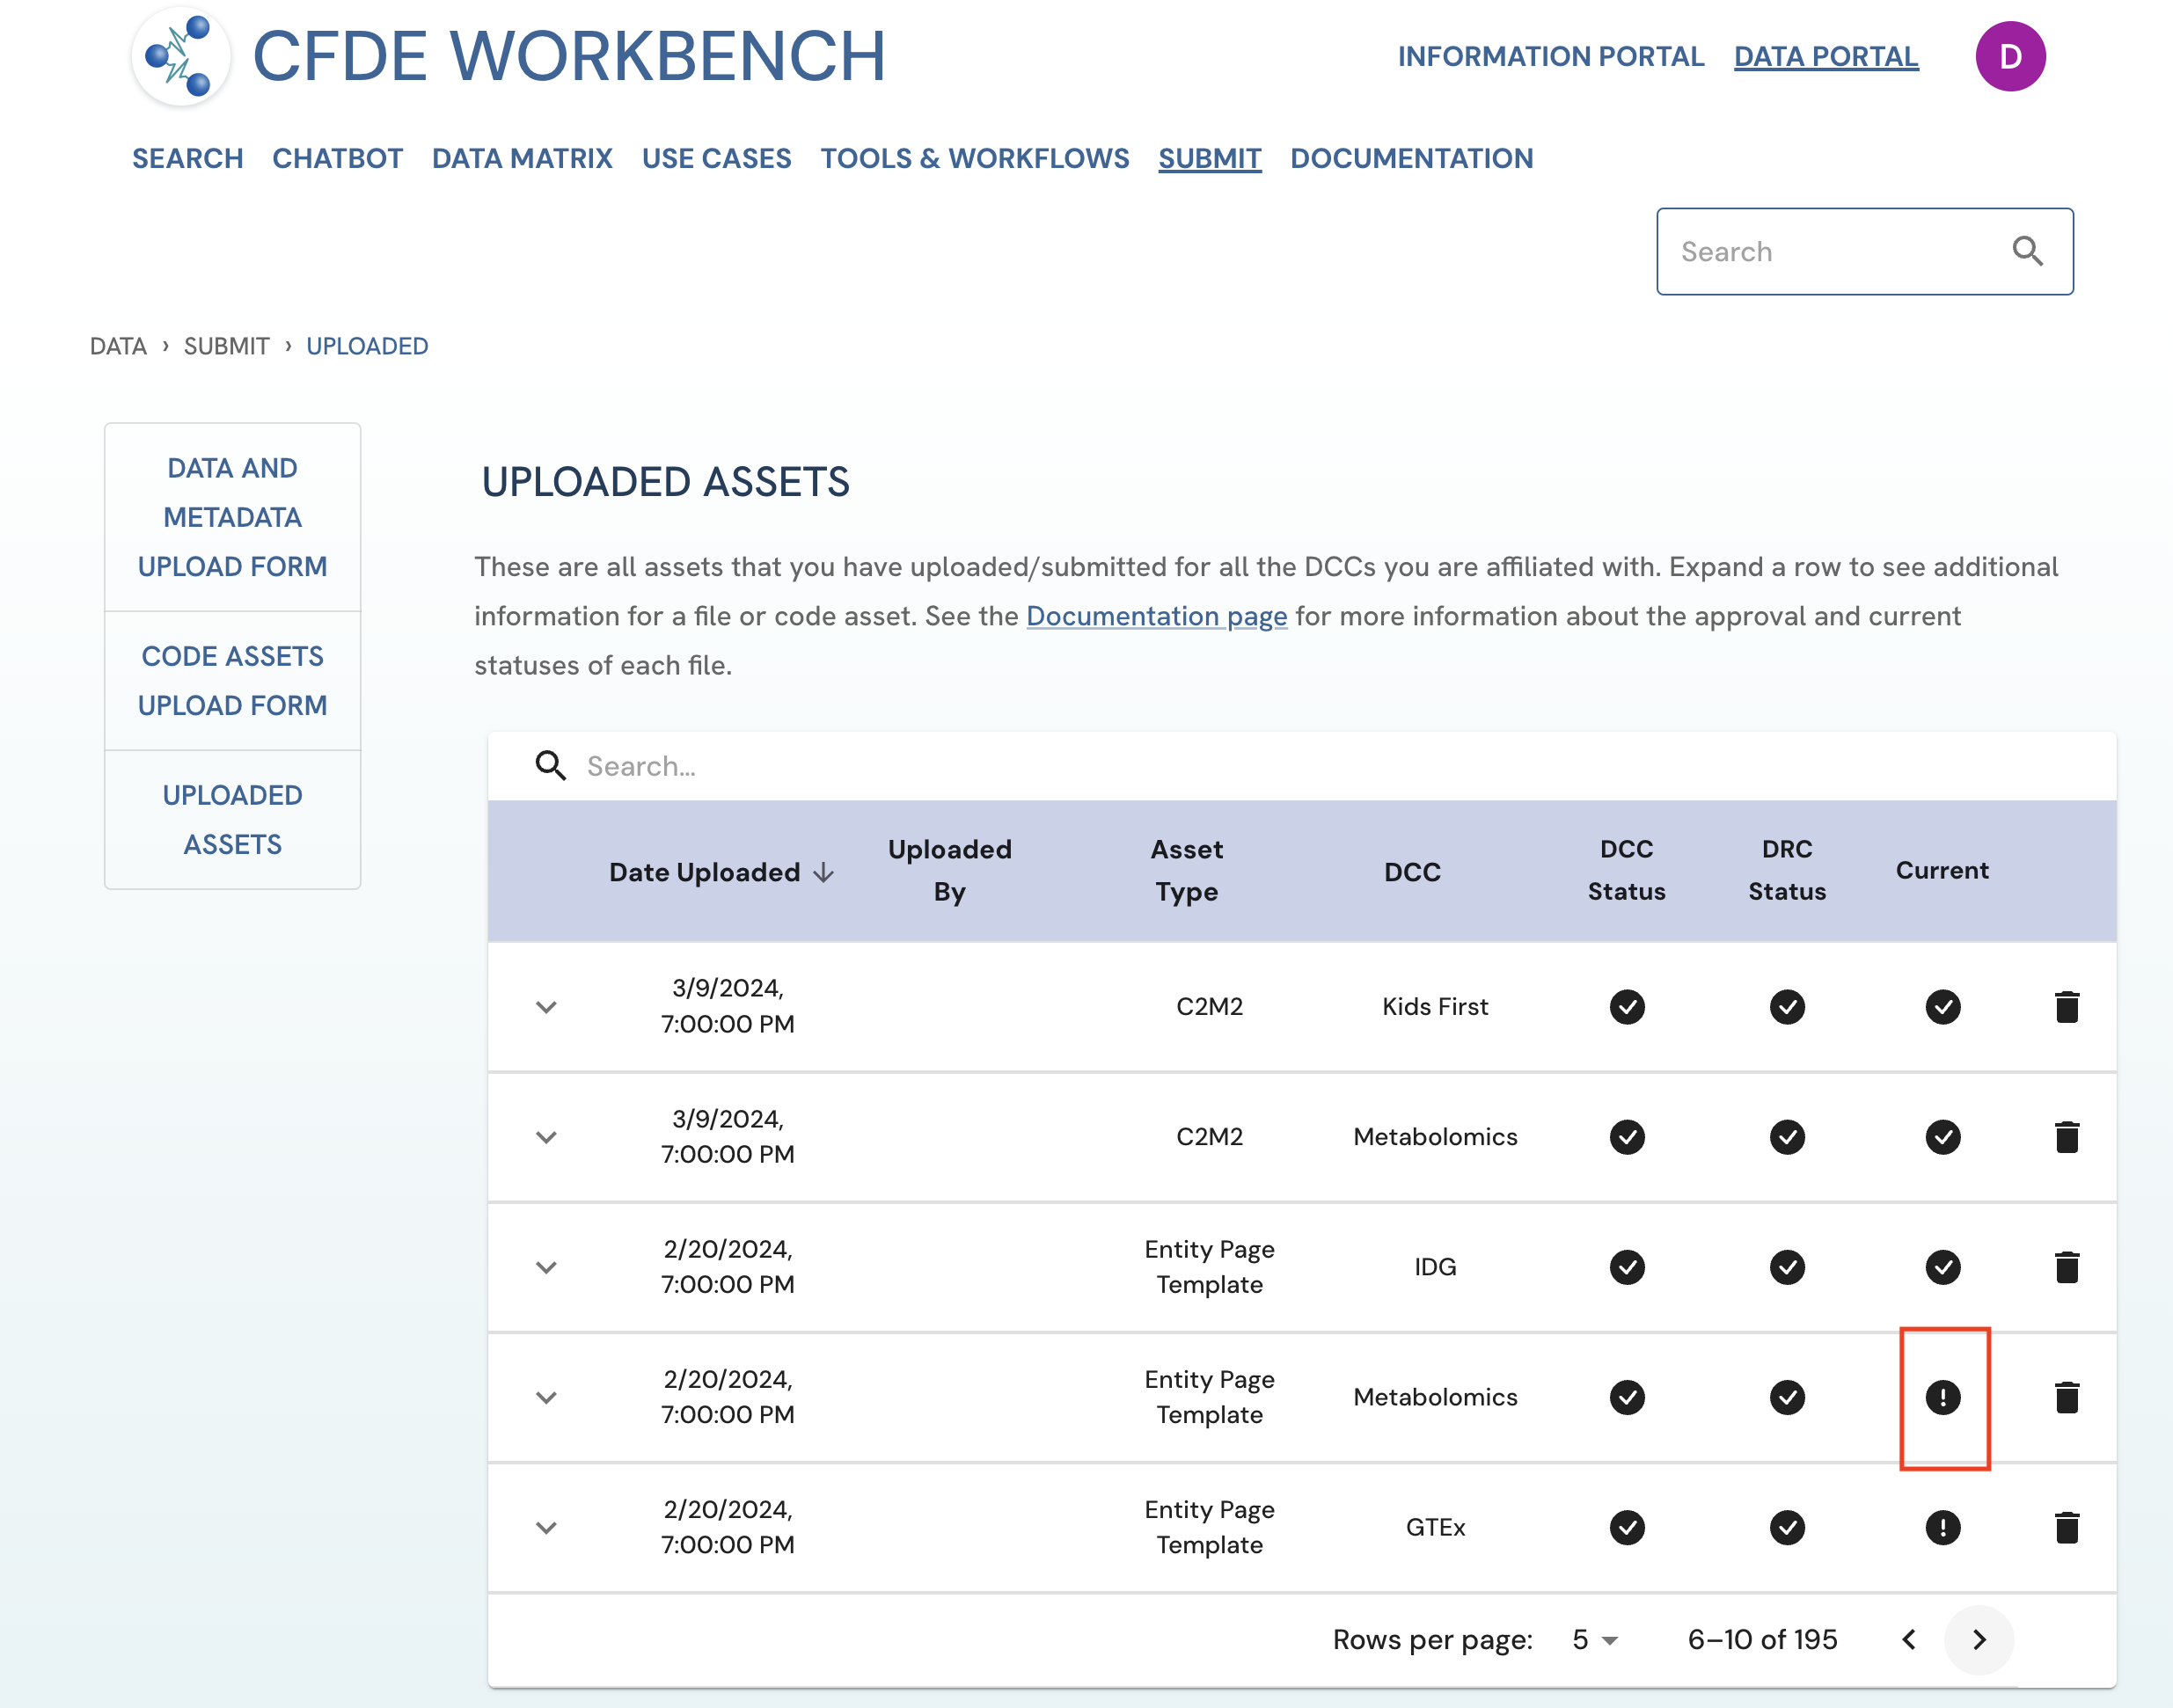 Figure 2: Screenshot from the Uploaded Assets page highlighting the archived asset checkmark. The screenshot is from the viewpoint of an uploader user.
Data and Metadata Upload Form
-
Go to the Data and Metadata Upload Form OR Click on the "Submit" tab in the navigation bar or in the footer and click on the "Submit and Manage File/Code Assets" button.
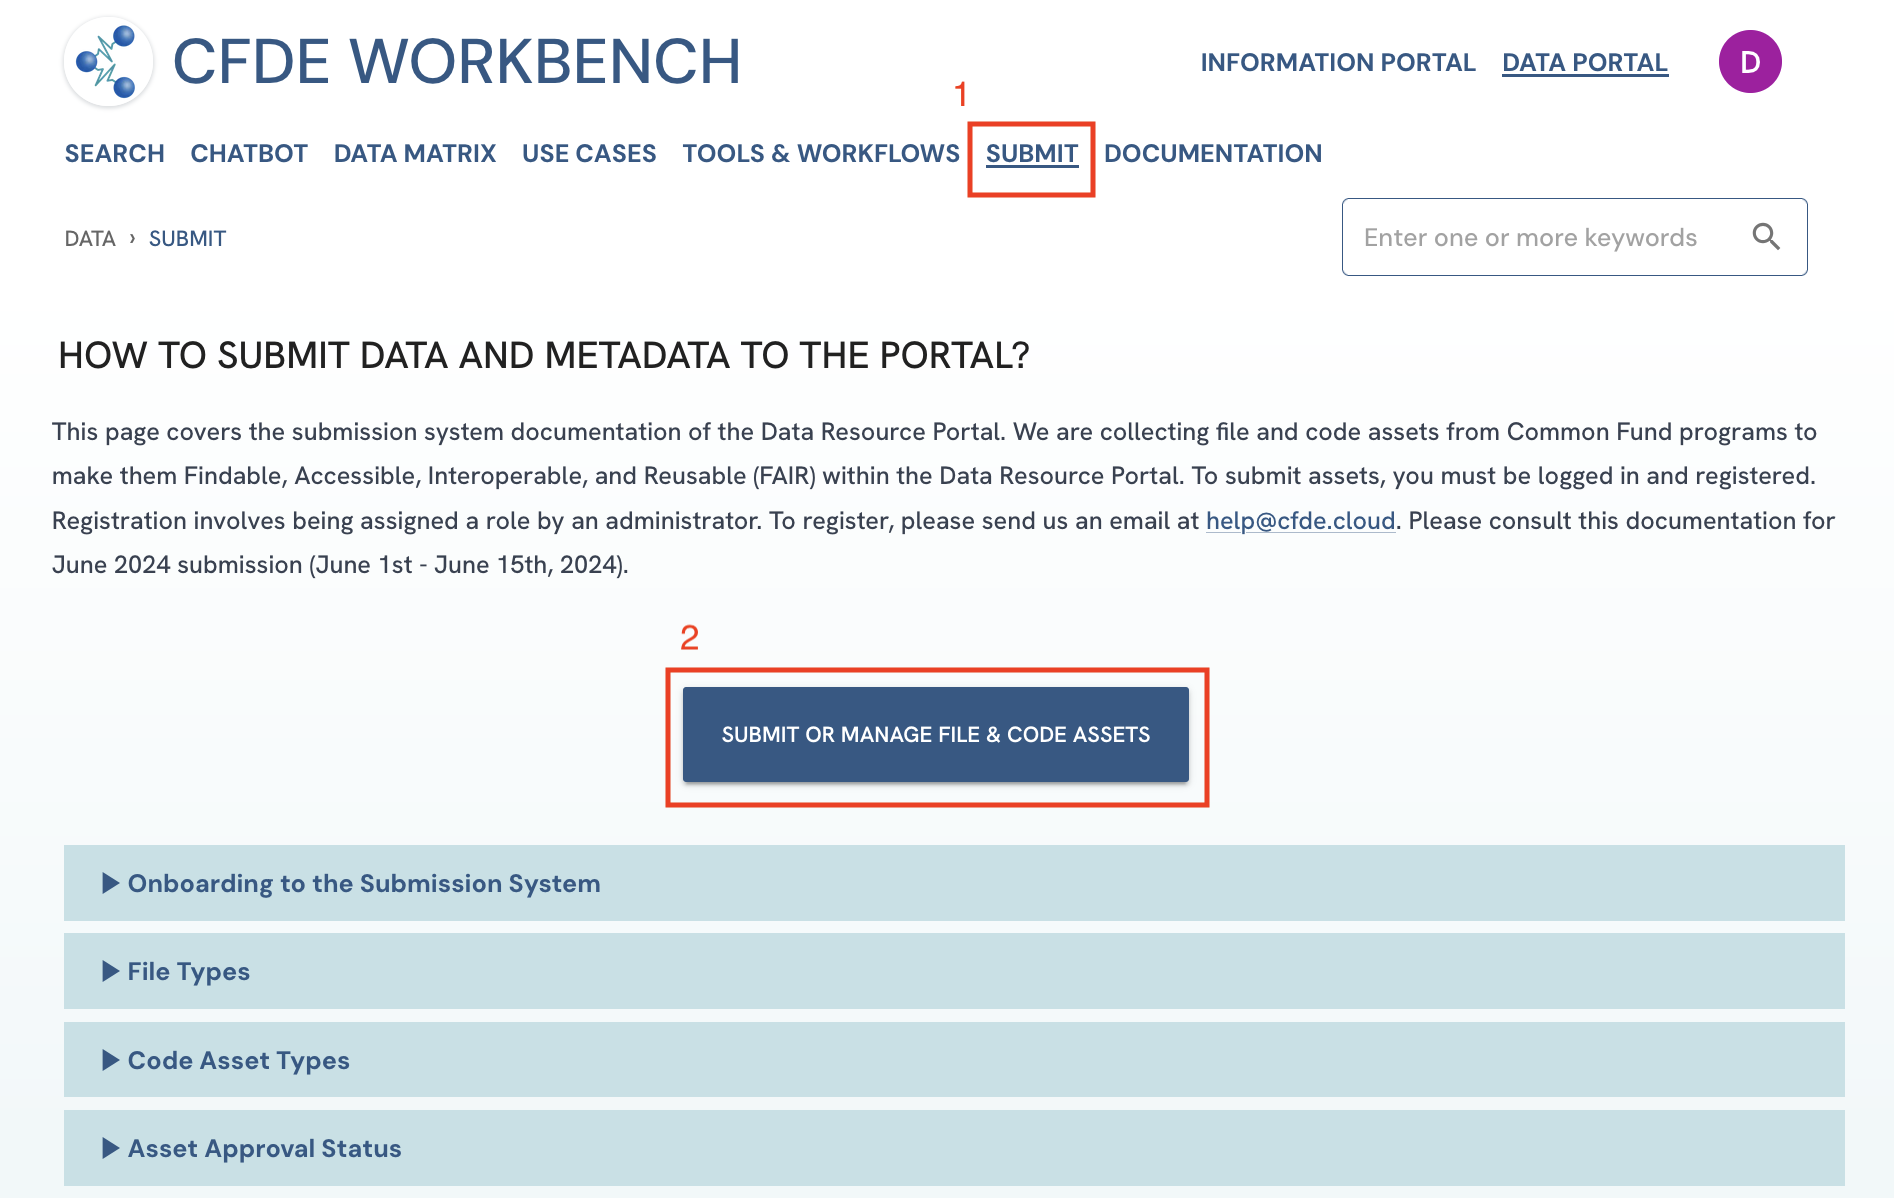 Figure 1: A screenshot of Submission System showing navigation to Data and Metadata Upload Form.
 -
On the Upload Form page, upload your processed data by either dragging and dropping it in the upload box, or clicking in the box or on the "Choose File" button.
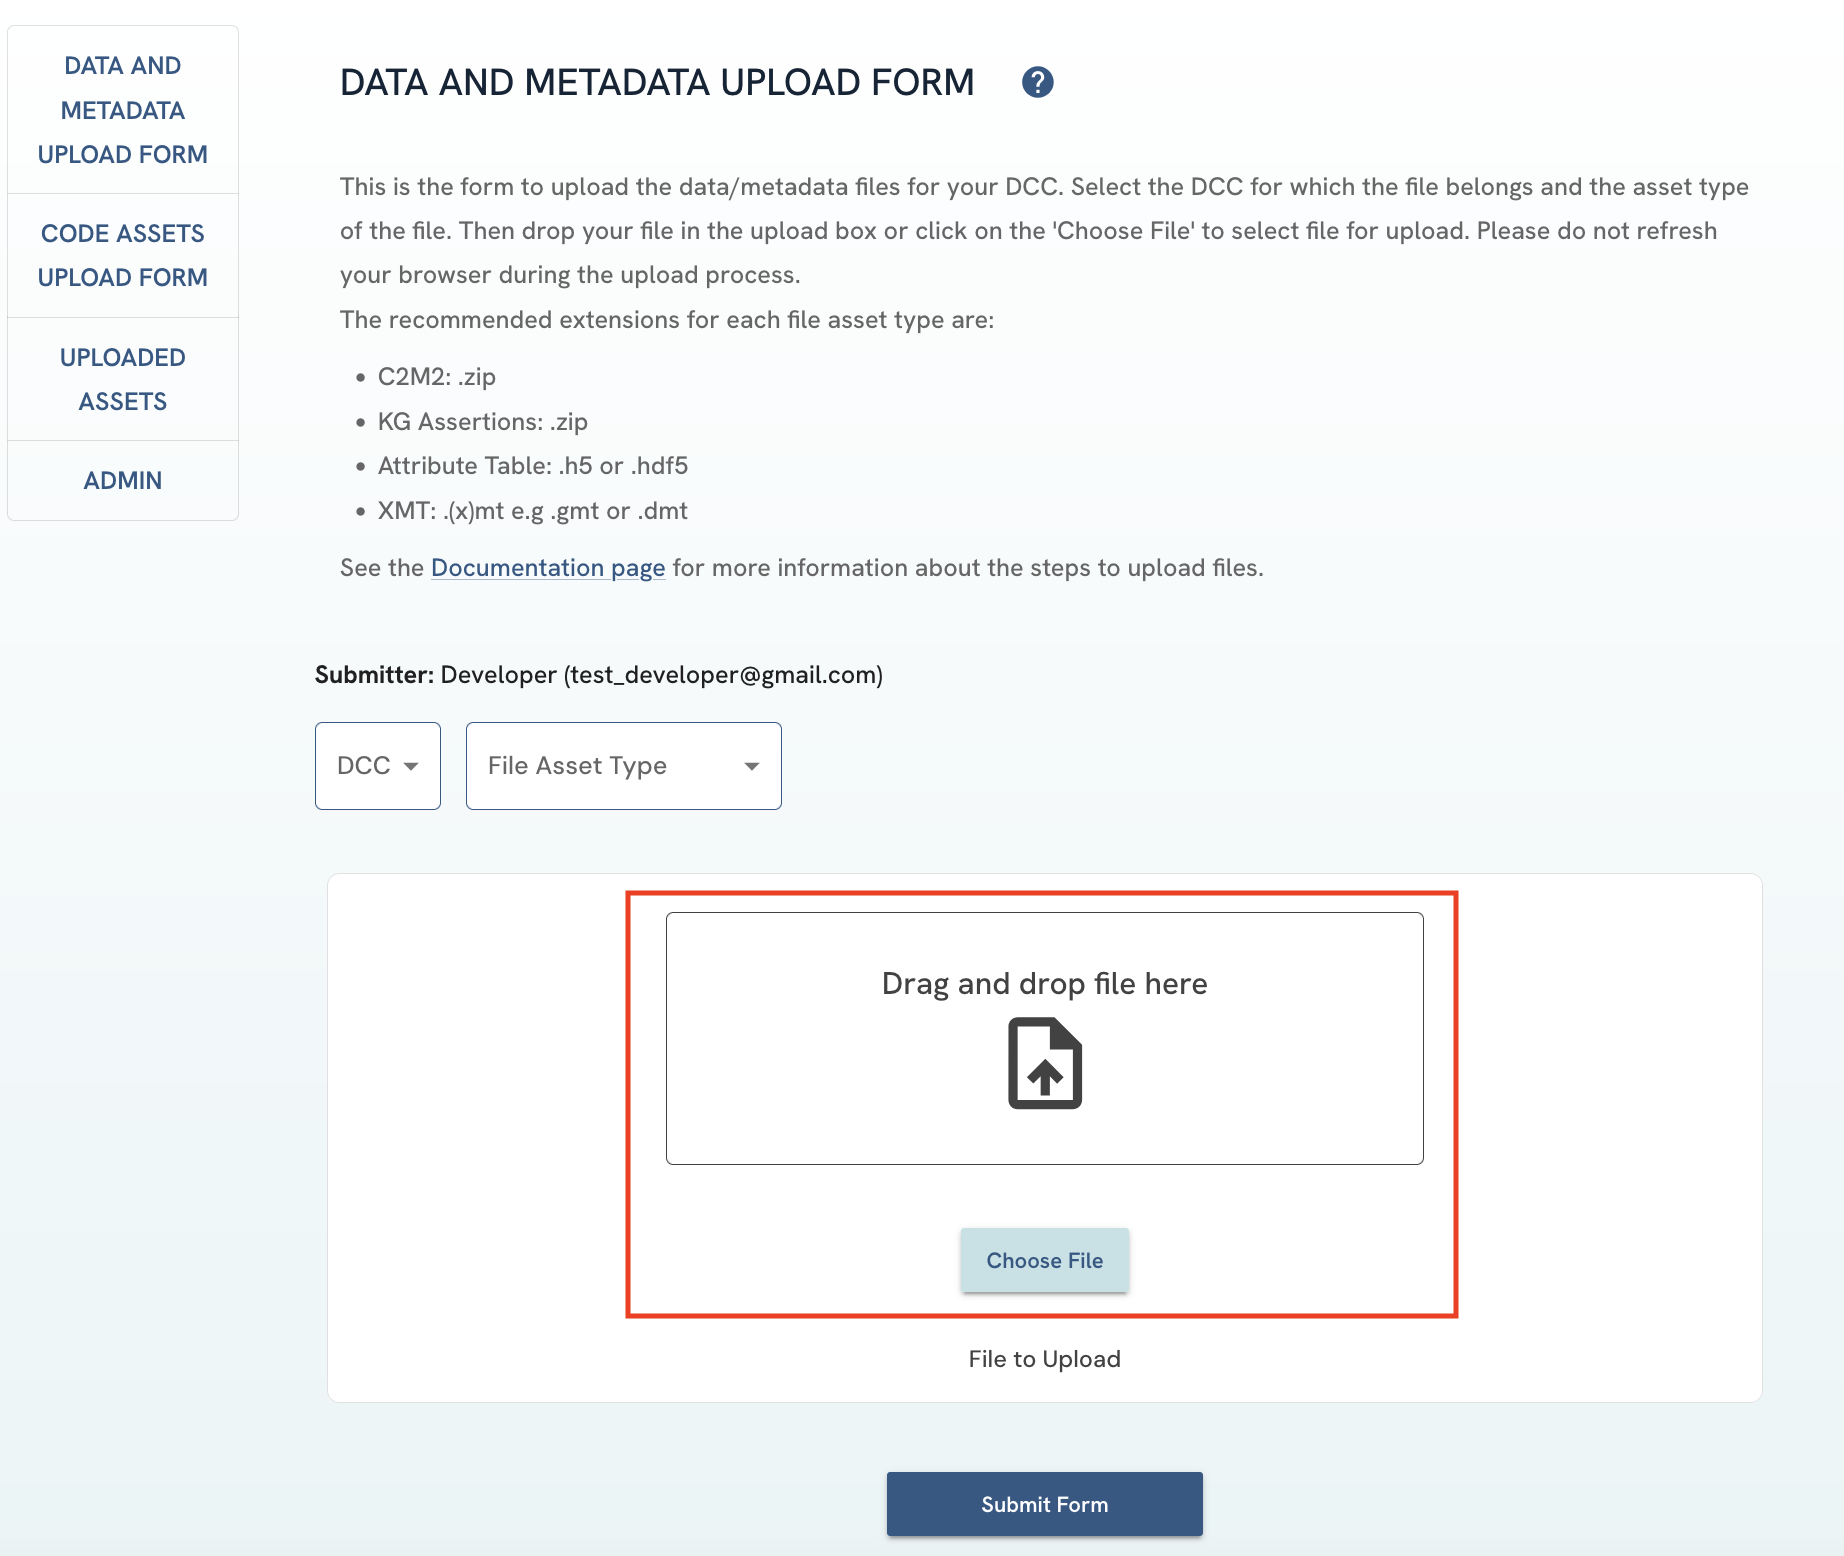 Figure 2: A screenshot of Data and Metadata Upload Form showing file selection.
 -
The file you have selected should appear under “File to Upload”. If you select a wrong file, you can delete it by clicking on the delete icon next to the file name or by re-uploading the correct file.
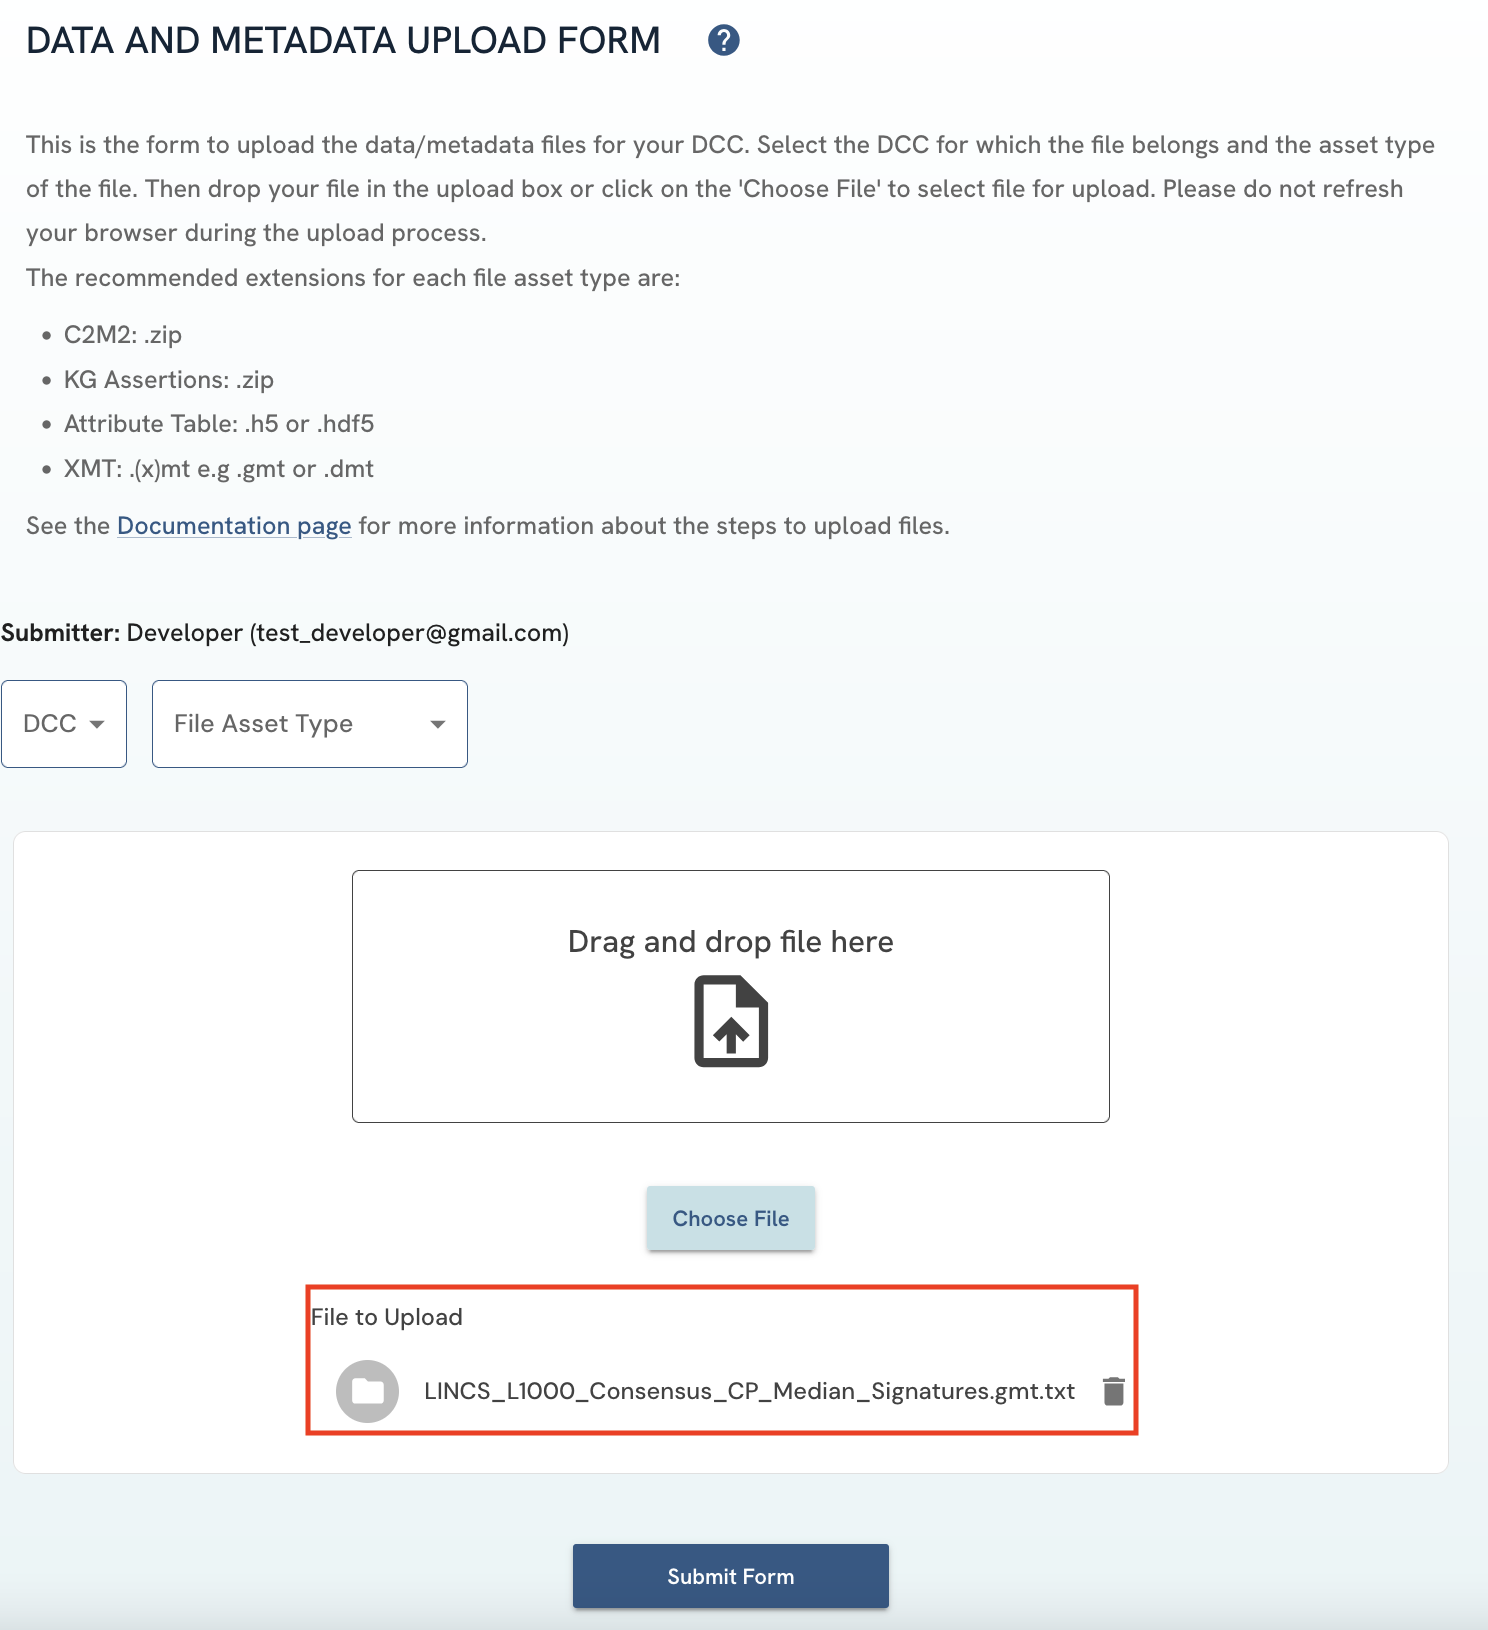 Figure 3: A screenshot of Data and Metadata Upload Form showing selected file.
 -
Select the DCC that the files to upload were generated from. Only DCCs that you are affiliated with will be provided as an option in the dropdown menu. If you are affiliated with a DCC and the option is not provided, please contact the DRC to update this information.
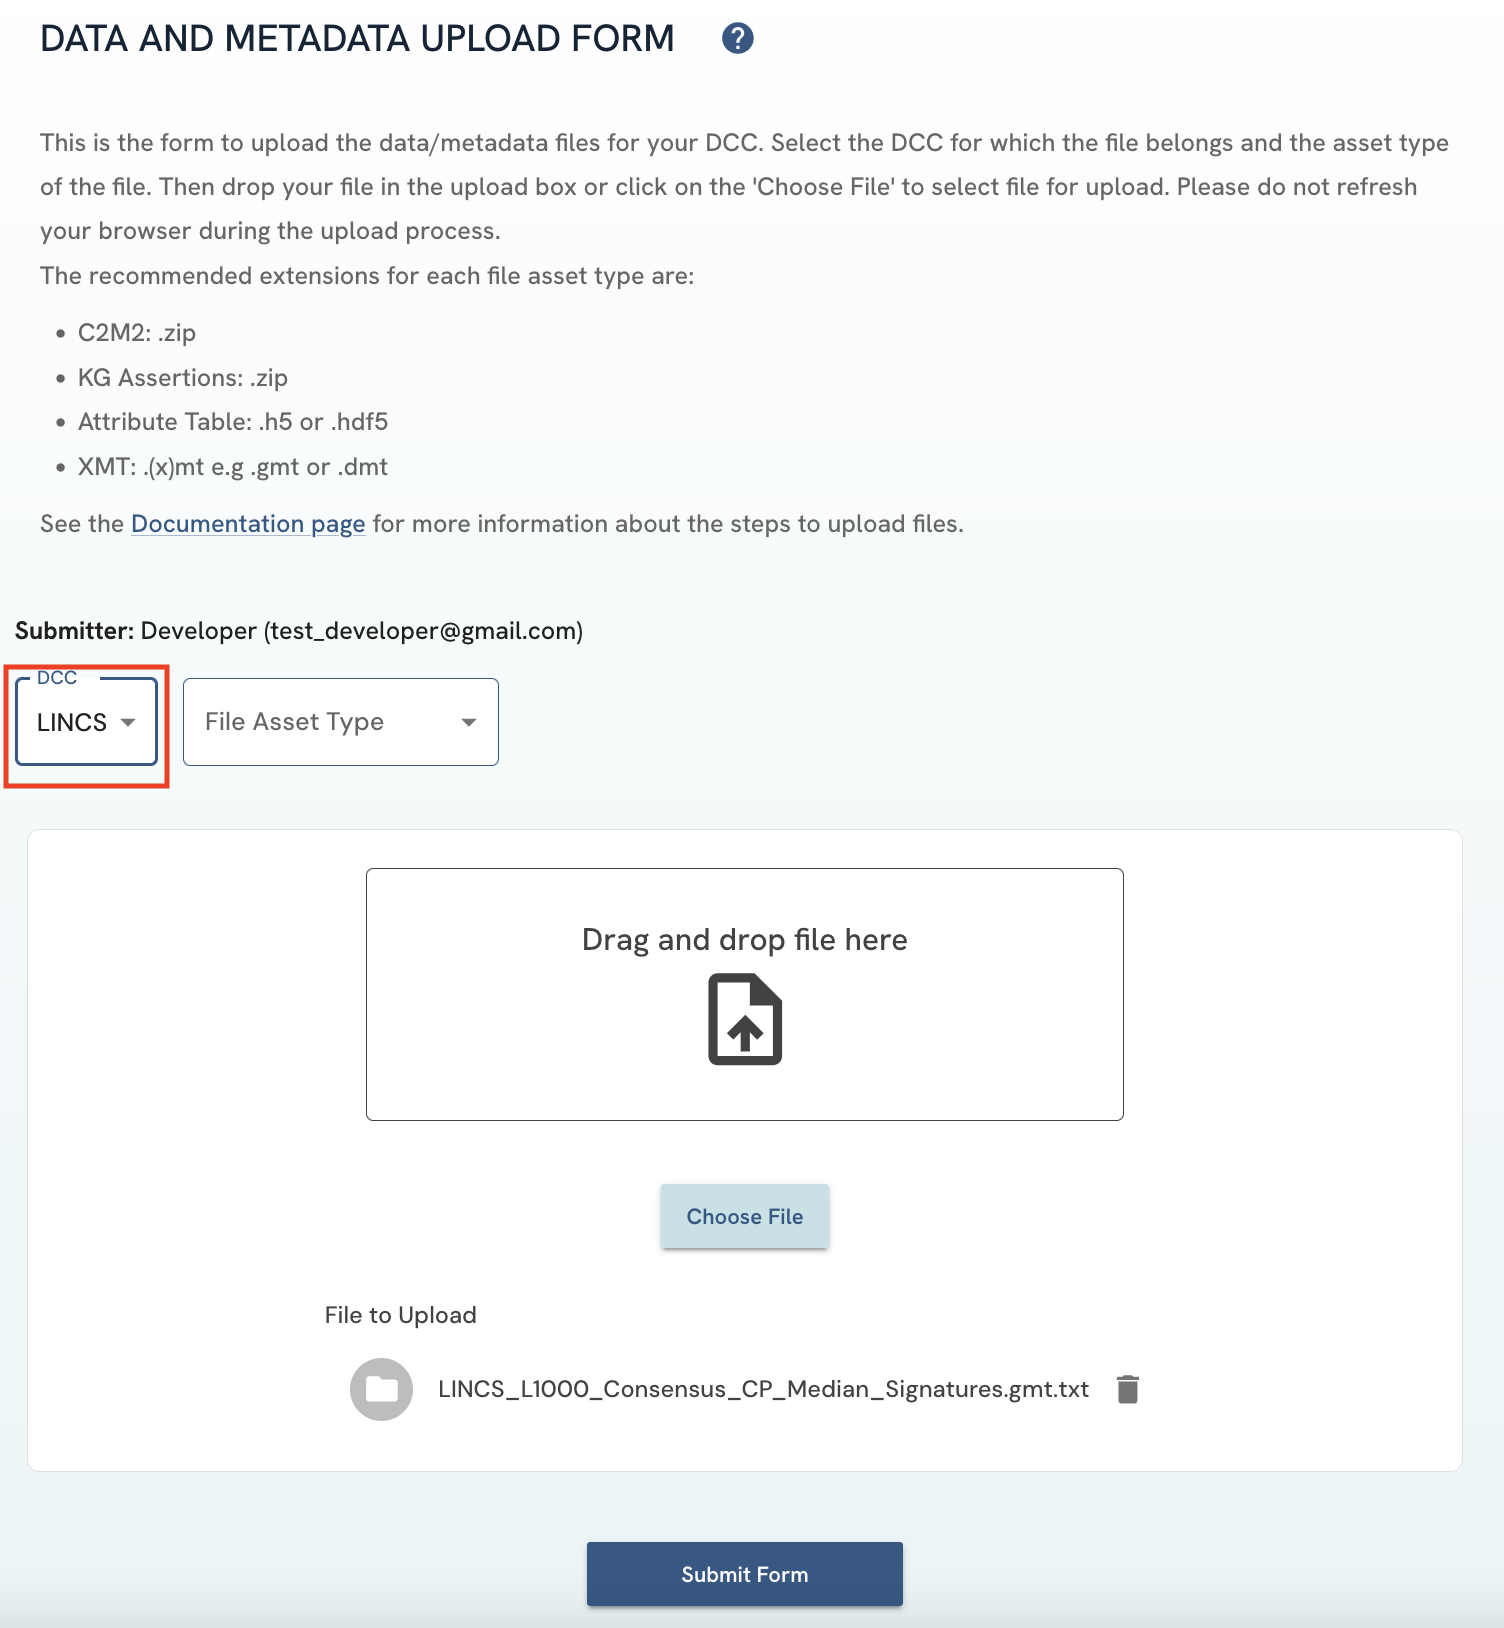 Figure 4: A screenshot of Data and Metadata Upload Form showing DCC selection.
 -
Select the file asset type of your submission. A list of previous submissions that are marked as current will then be displayed. If the submission you are doing is an update of an older one, click on the older file to archive it automatically (see previous section regarding current and archived status). Click on the "Submit Form" button to upload the file.
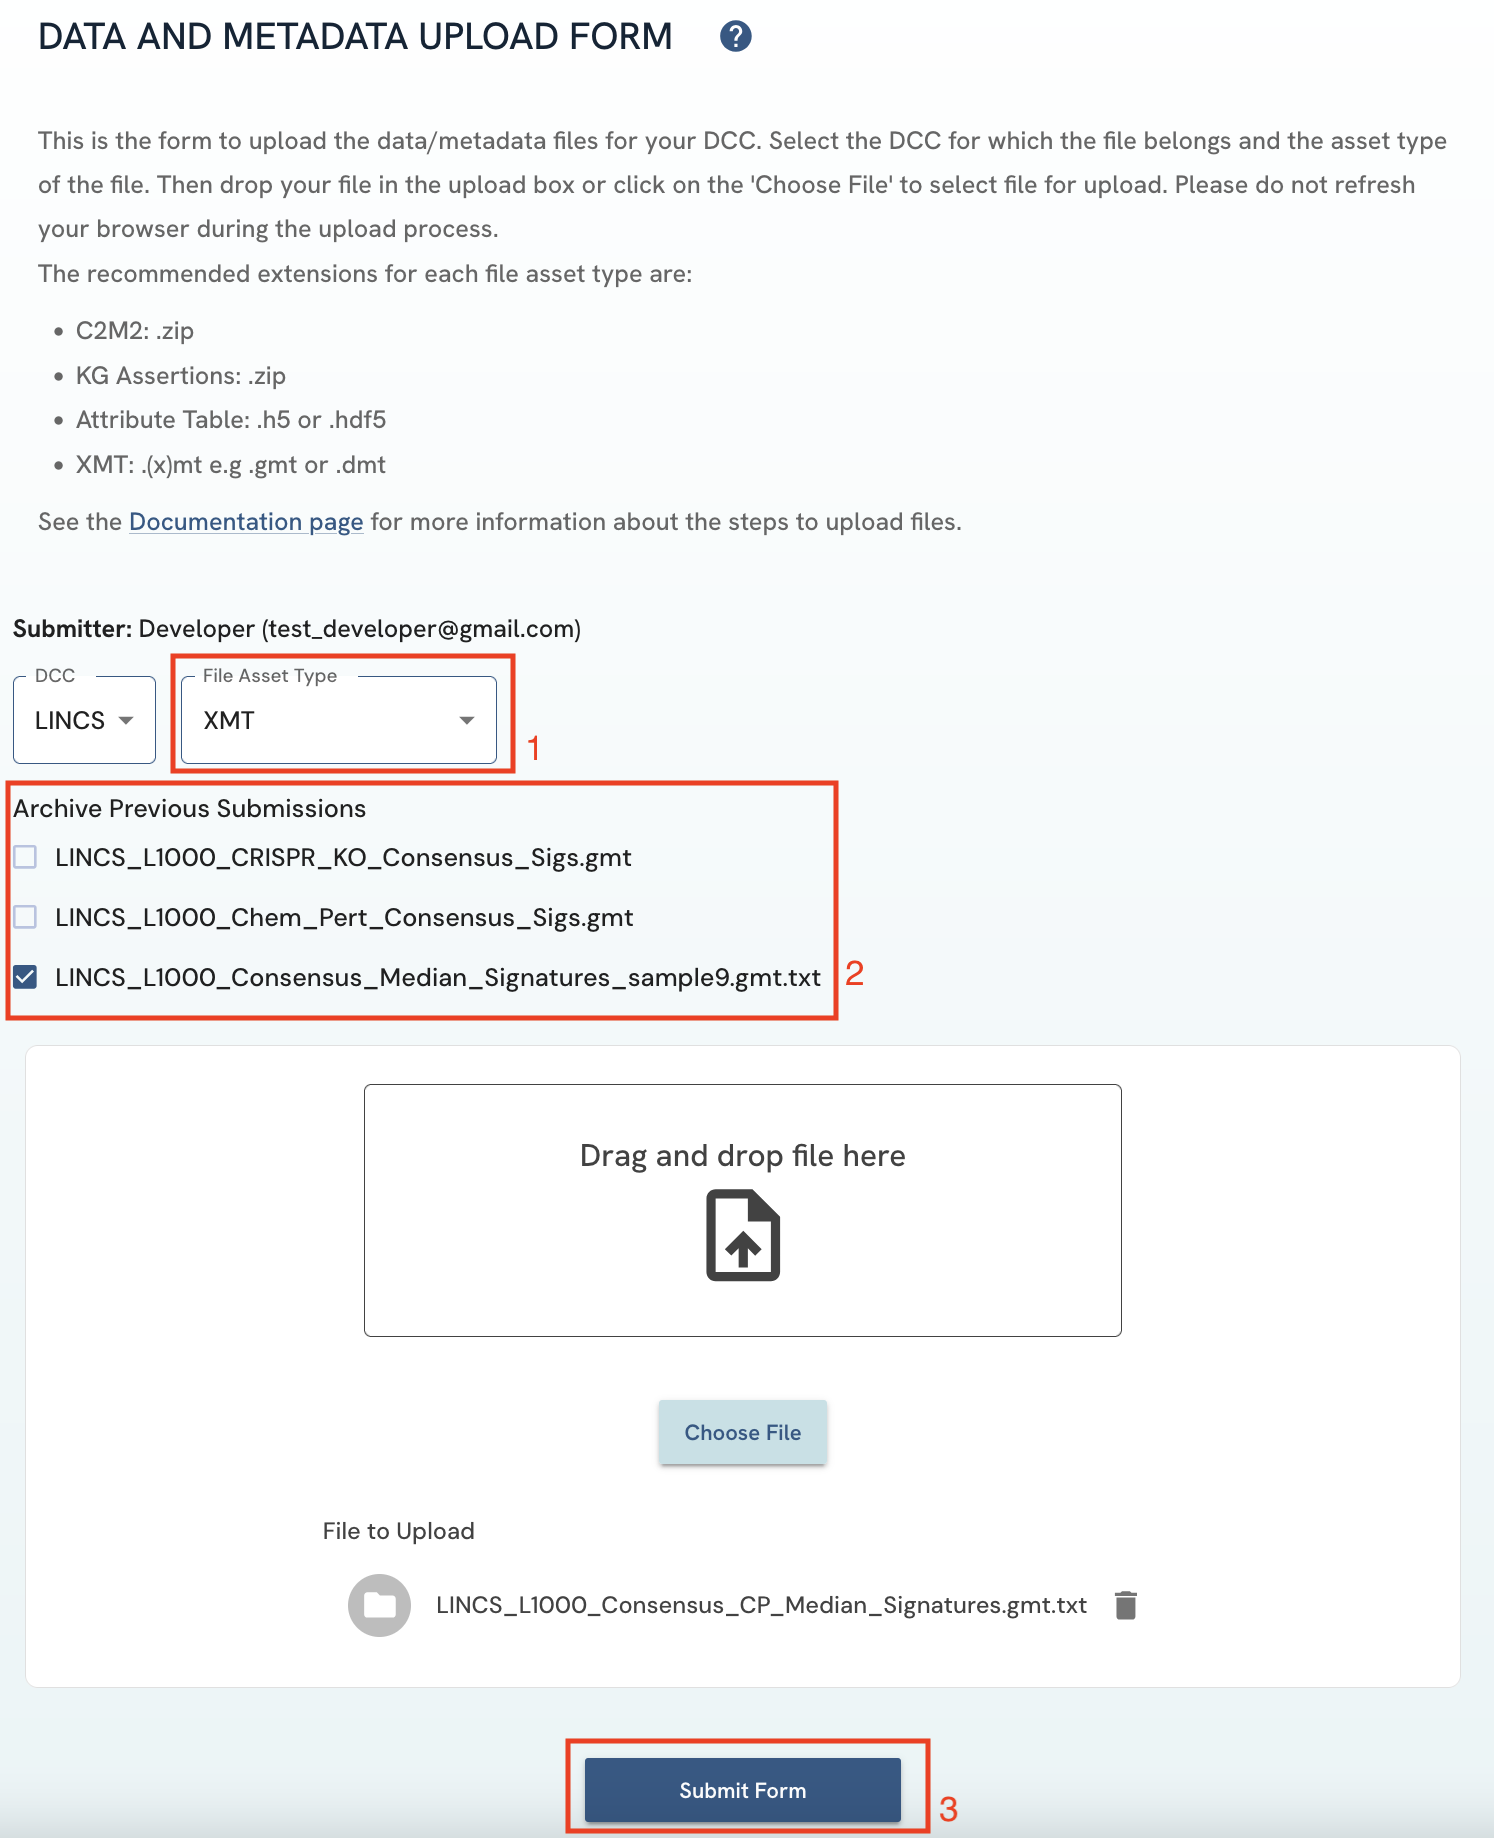 Figure 5: A screenshot of Data and Metadata Upload Form showing file asset type selection and the archive feature.
 -
Unexpected File type: There are file extensions that are expected for each file asset type. If the extension of the selected file does not match one of the expected extensions based on the entered File Asset Type, a dialog box will appear requesting you to confirm your upload of this unexpected file type. If the unexpected file type is intentional, click on the 'Yes Continue' button to proceed with the upload, otherwise click 'No' to cancel the upload. The recommended extensions for each file asset type are:
- C2M2: .zip
- KG Assertions: .zip
- Attribute Table: .h5 or .hdf5
- XMT: .(x)mt e.g .gmt or .dmt
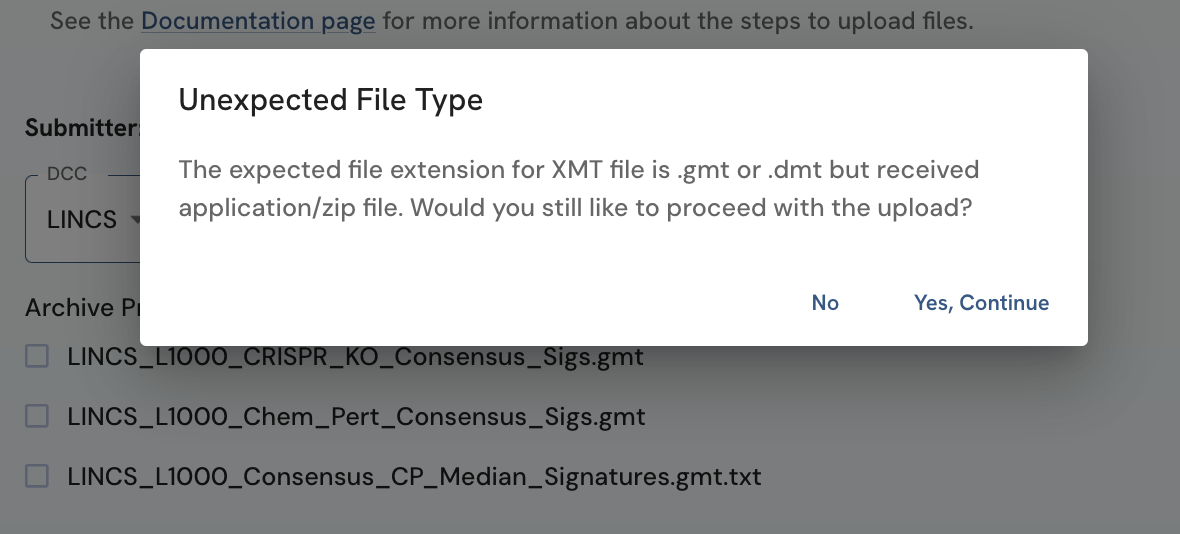 Figure 6: A screenshot of Data and Metadata Upload Form showing pop up that appears with unexpected file type selection.
-
If an upload is successful, a green banner with “Success! File Uploaded” should appear. If an upload is unsuccessful, a red banner with an error message will appear with the reason for the upload error. Please ensure that the file you have selected for upload is not larger than 5GB.
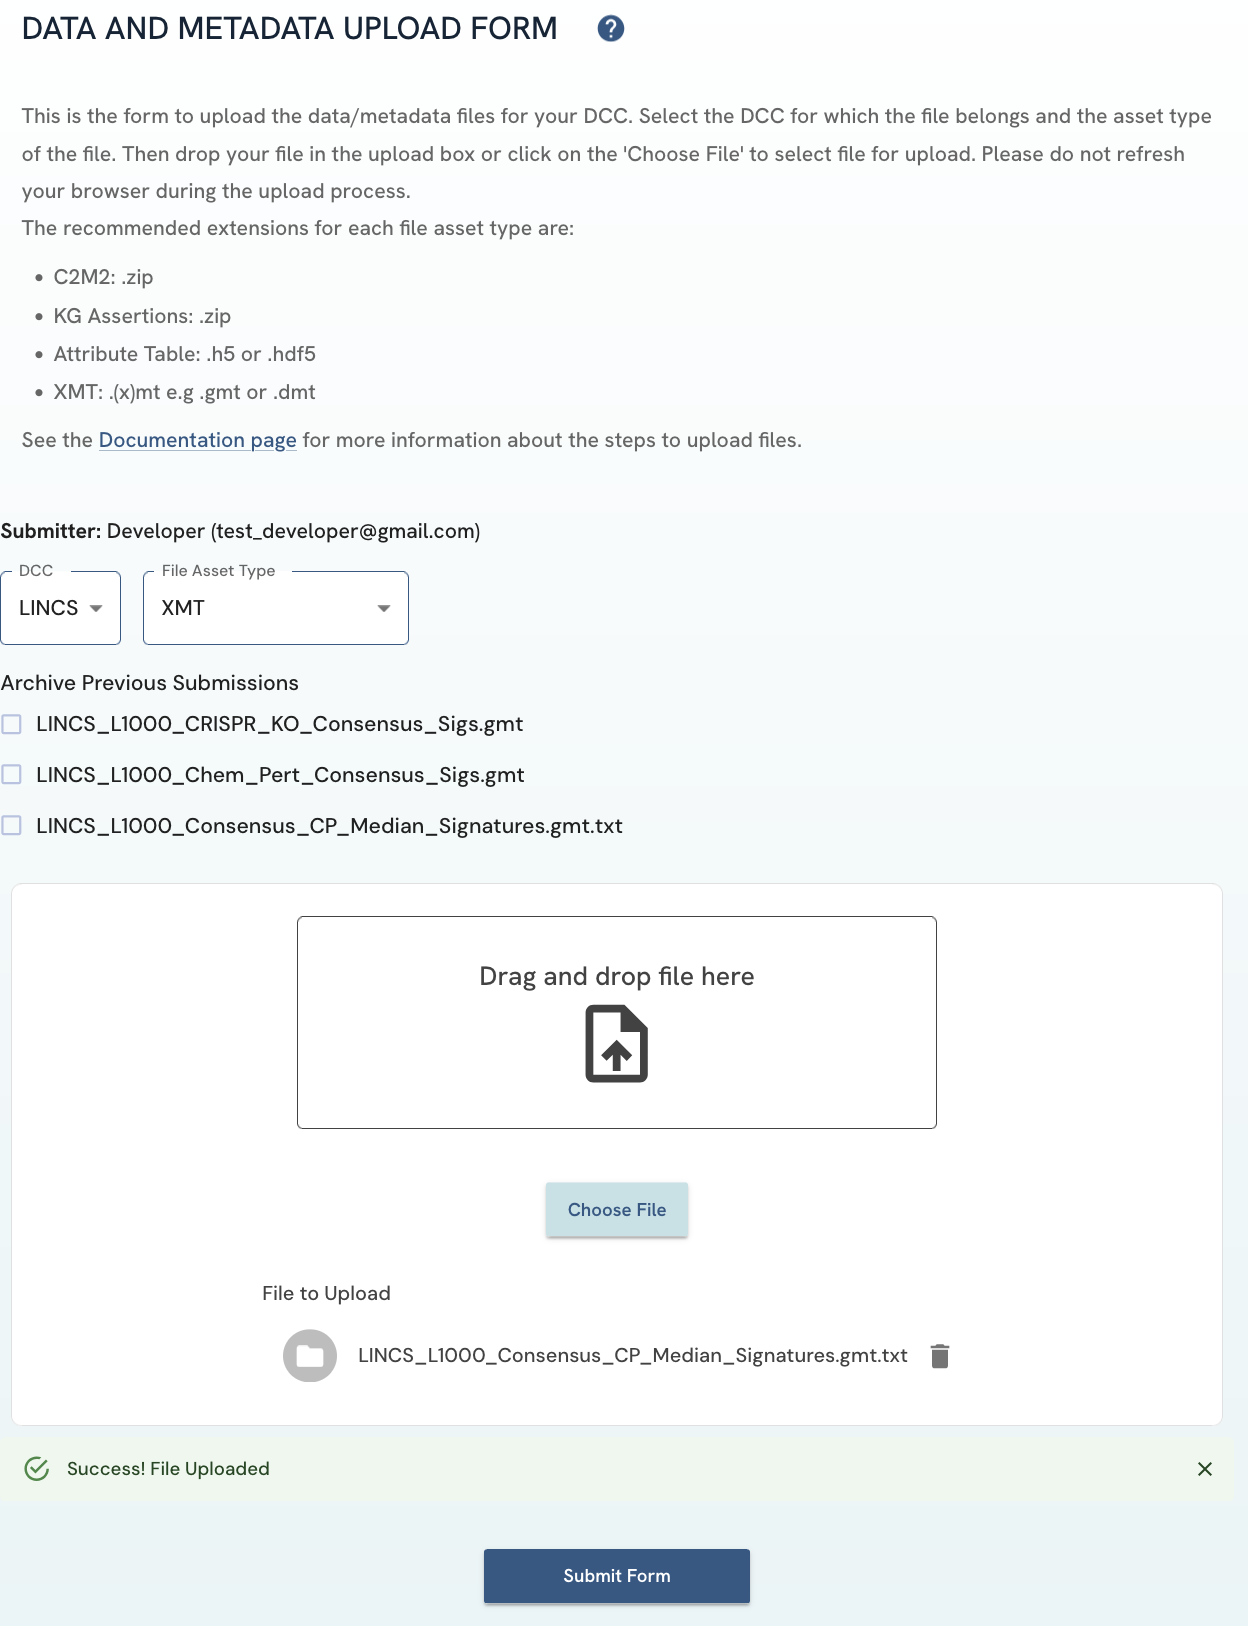 Figure 7: A screenshot of Data and Metadata Upload Form showing successful file upload banner.
 -
Details of your uploaded file should appear on the Uploaded Assets page.
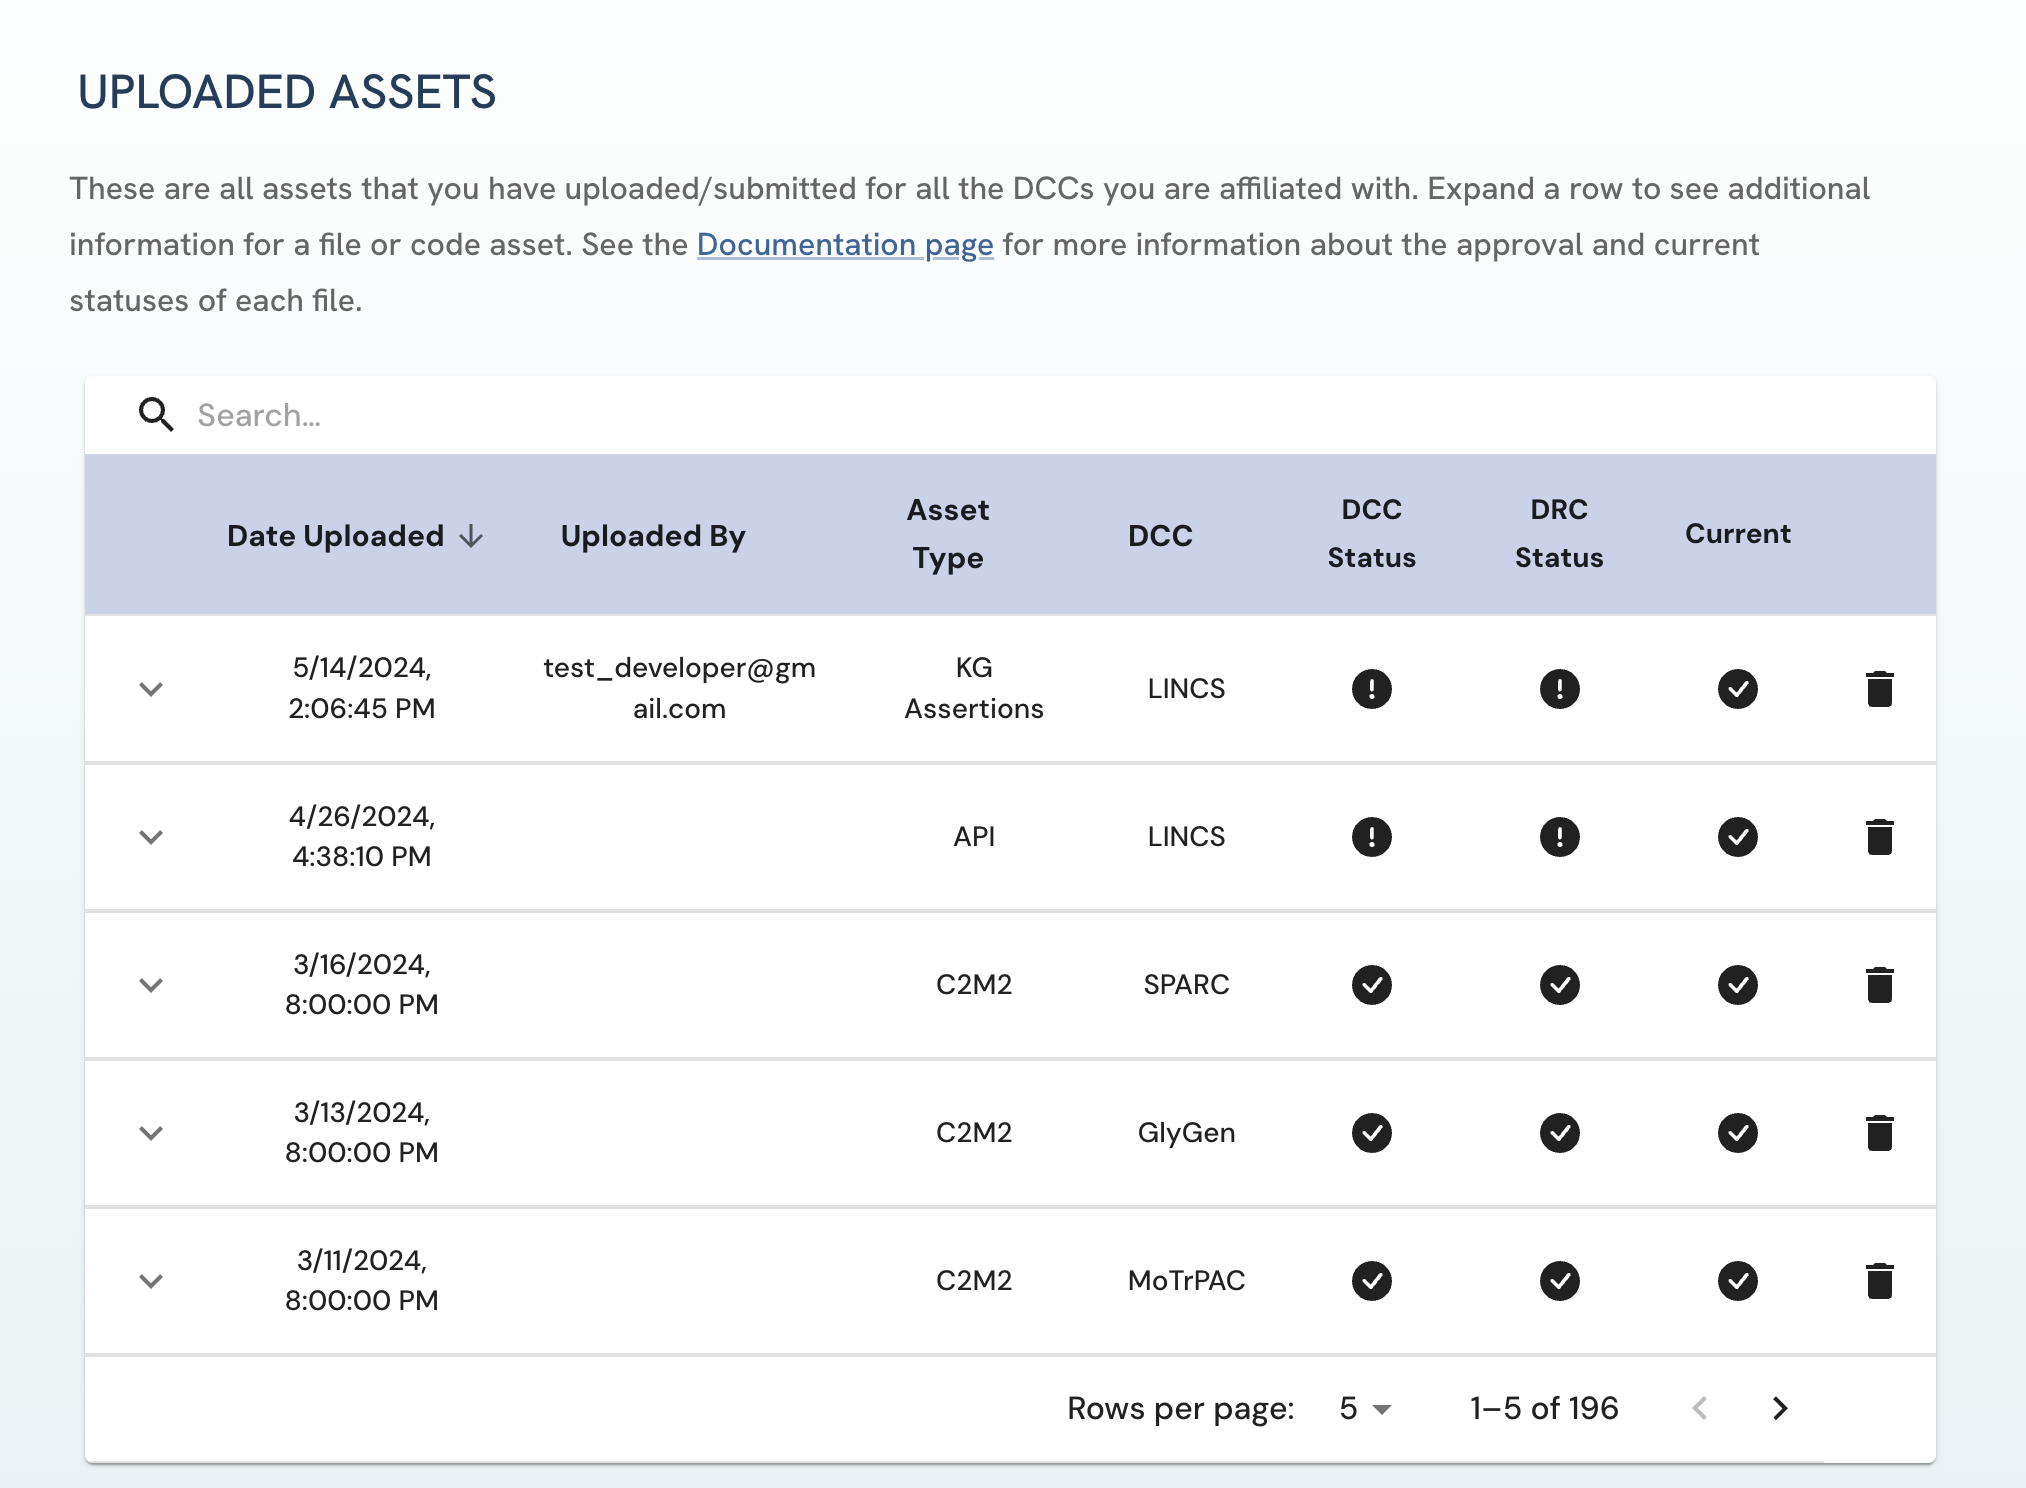 Figure 8: A screenshot of Uploaded Assets page showing uploaded file asset.
File Integrity Validation
A checksum is a digital fingerprint that can be made from a sequence of bytes, otherwise known as a bitstream e.g. the contents of a file. Just like a fingerprint, a checksum is unique to the bitstream. Any change to the bitstream, however big or small, will cause the value of its checksum to change completely. Checksums can be used to detect changes in the contents of a file which occur during file upload and download. During file submission on the site, file integrity is verified using the SHA256 checksum algorithm. A checksum is calculated from the file a user upload browser-side and compared to the checksum calculated from the file received by the AWS S3 bucket. If these checksum values are the same, which shows that the file was unchanged/uncorrupted during upload, the file upload is successful. Otherwise, if the values are different, the system will throw an error.
-
The checksum of a successfully uploaded file is displayed on the Uploaded Assets page under the File Info dropdown of each file.
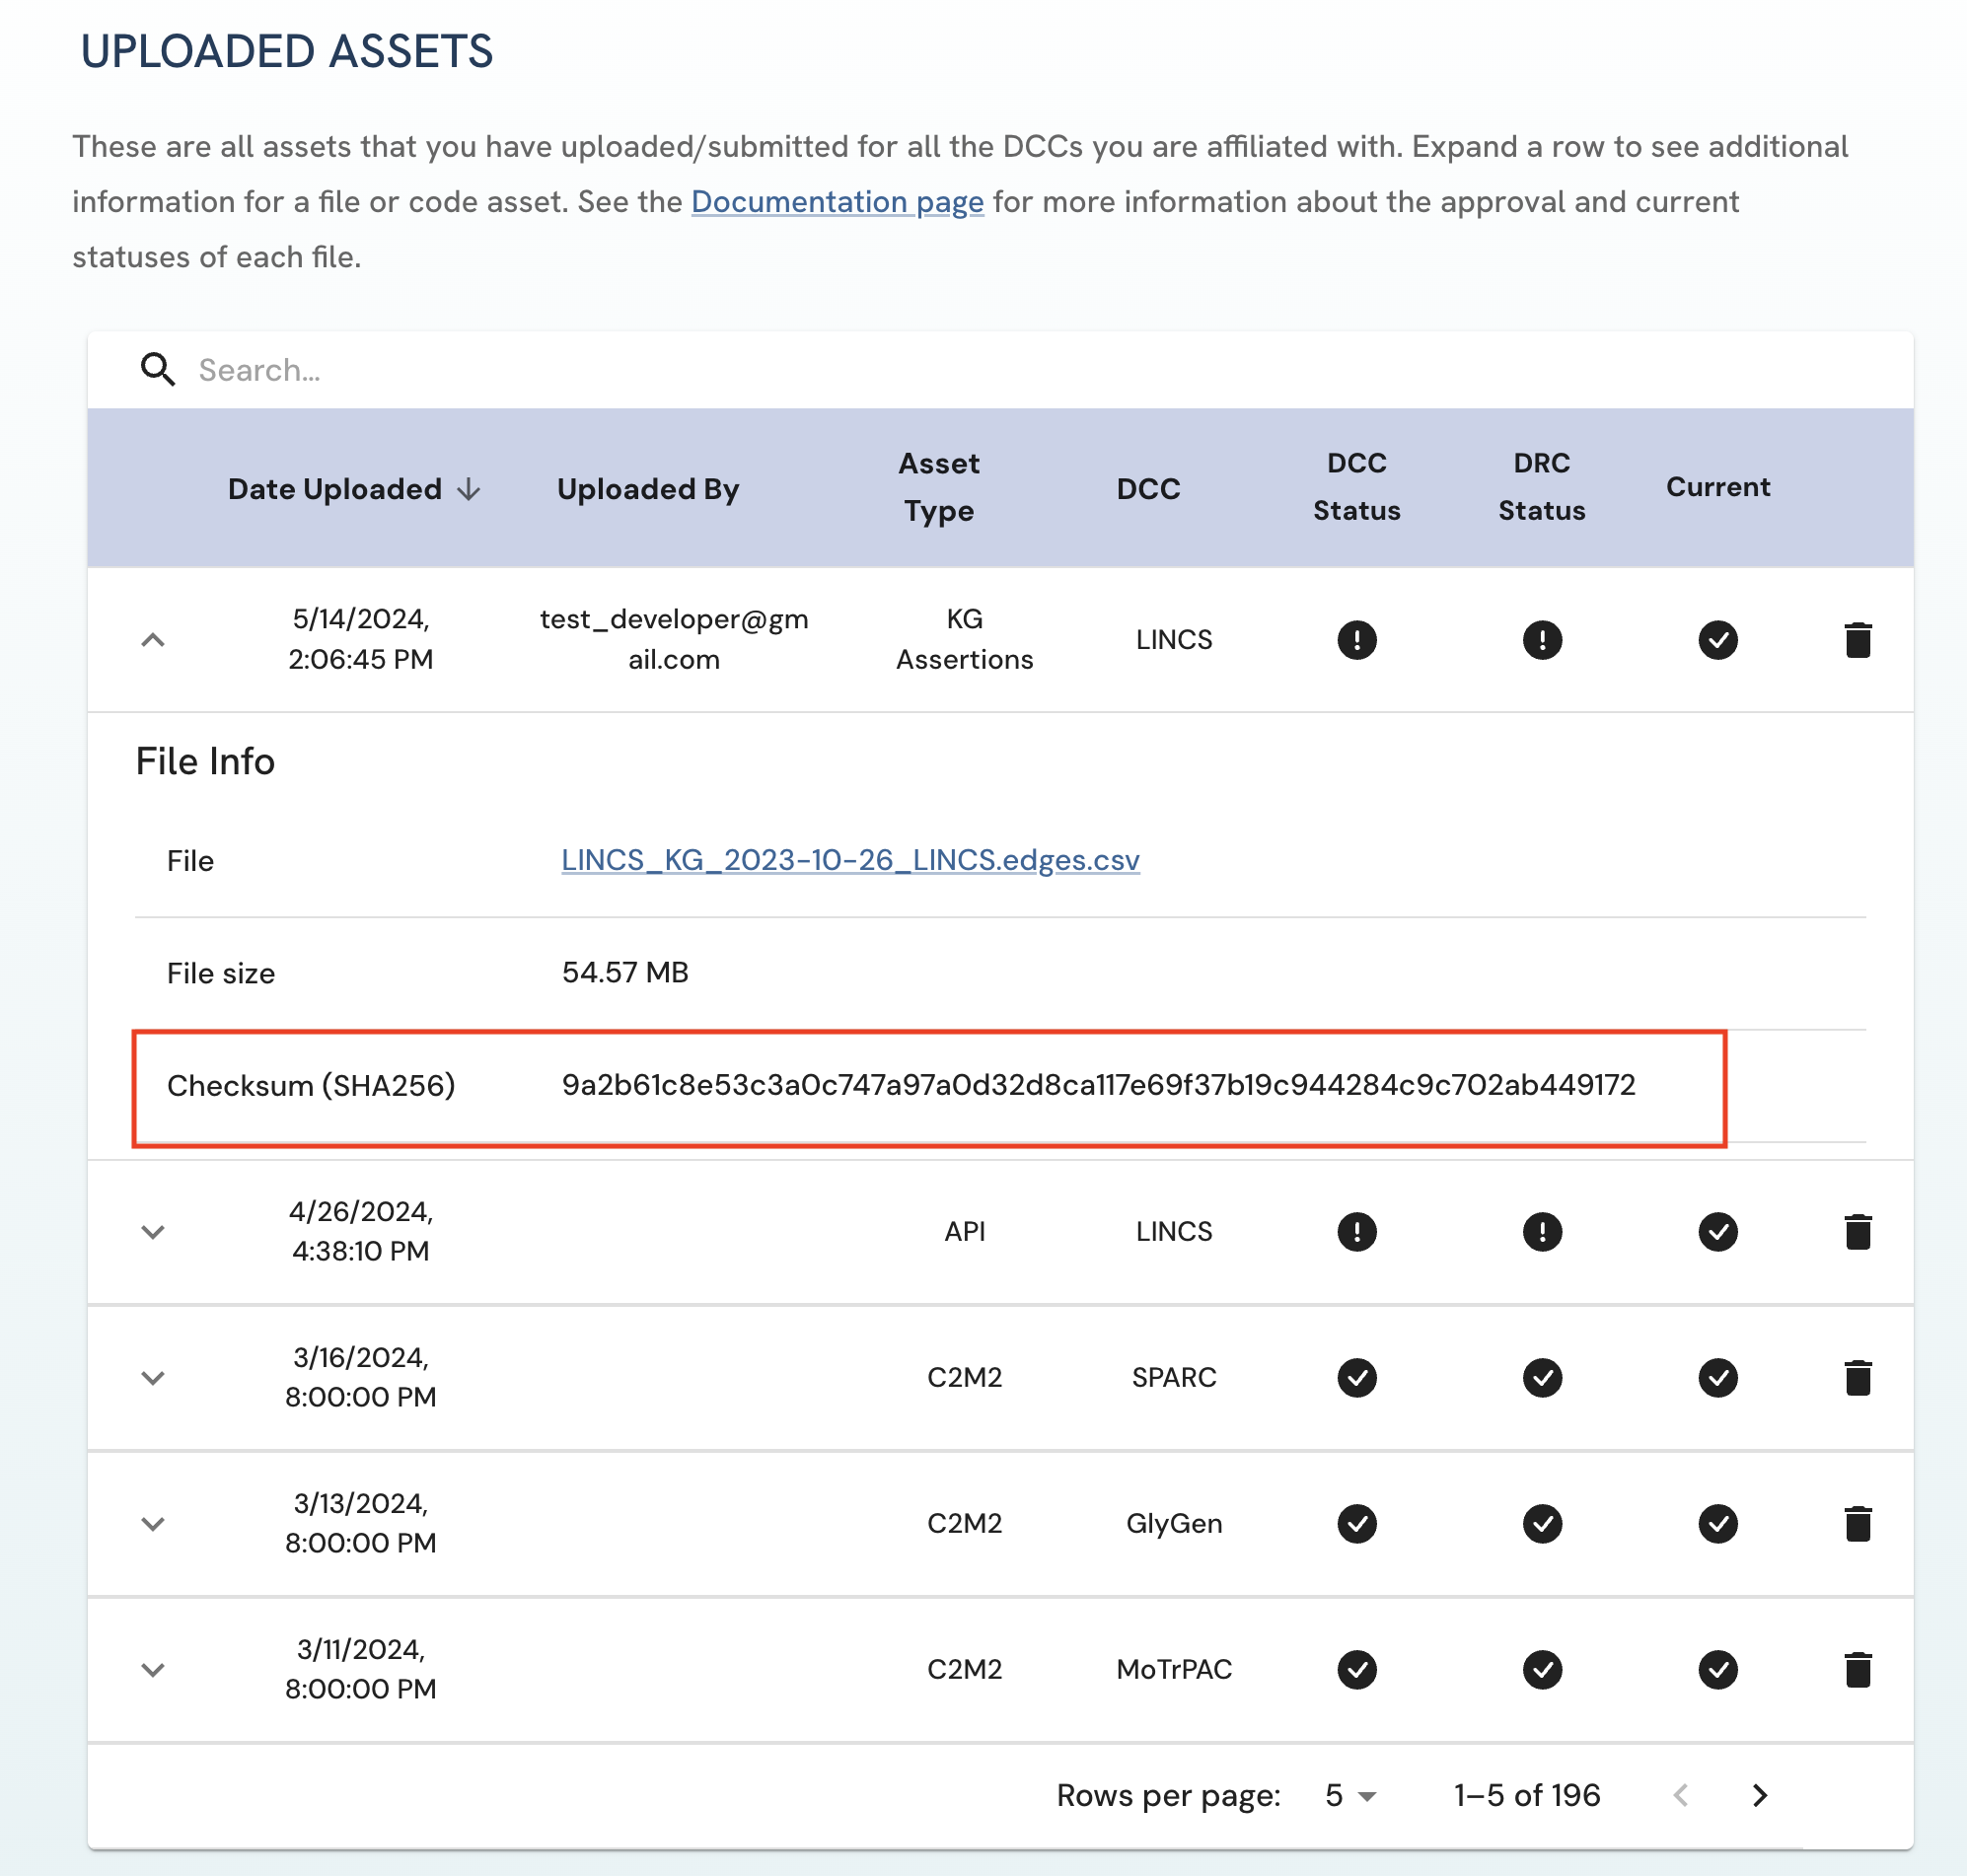 Figure 9: A screenshot of Uploaded Assets page showing the SHA-256 checksum of uploaded file asset.
 -
To verify file integrity after downloading a file from the portal:
-
Download the intended file
-
Calculate the checksum in your terminal:
-
For Windows:
certutil -hashfile [file location] SHA256 -
For Linux:
sha256sum [file location] -
For MacOS:
shasum -a 256 [file location]
-
-
If the string that is returned is the same as that displayed for the file on the portal, then the file contents have not been changed during download.
Code Assets Upload Form
General Code Asset Submission Steps
-
Go to the Code Assets Upload Form page. This page can found by clicking on the "Submit" tab in the navigation bar or in the footer and on the "Submit and Manage File/Code Assets" button on the Submit page:
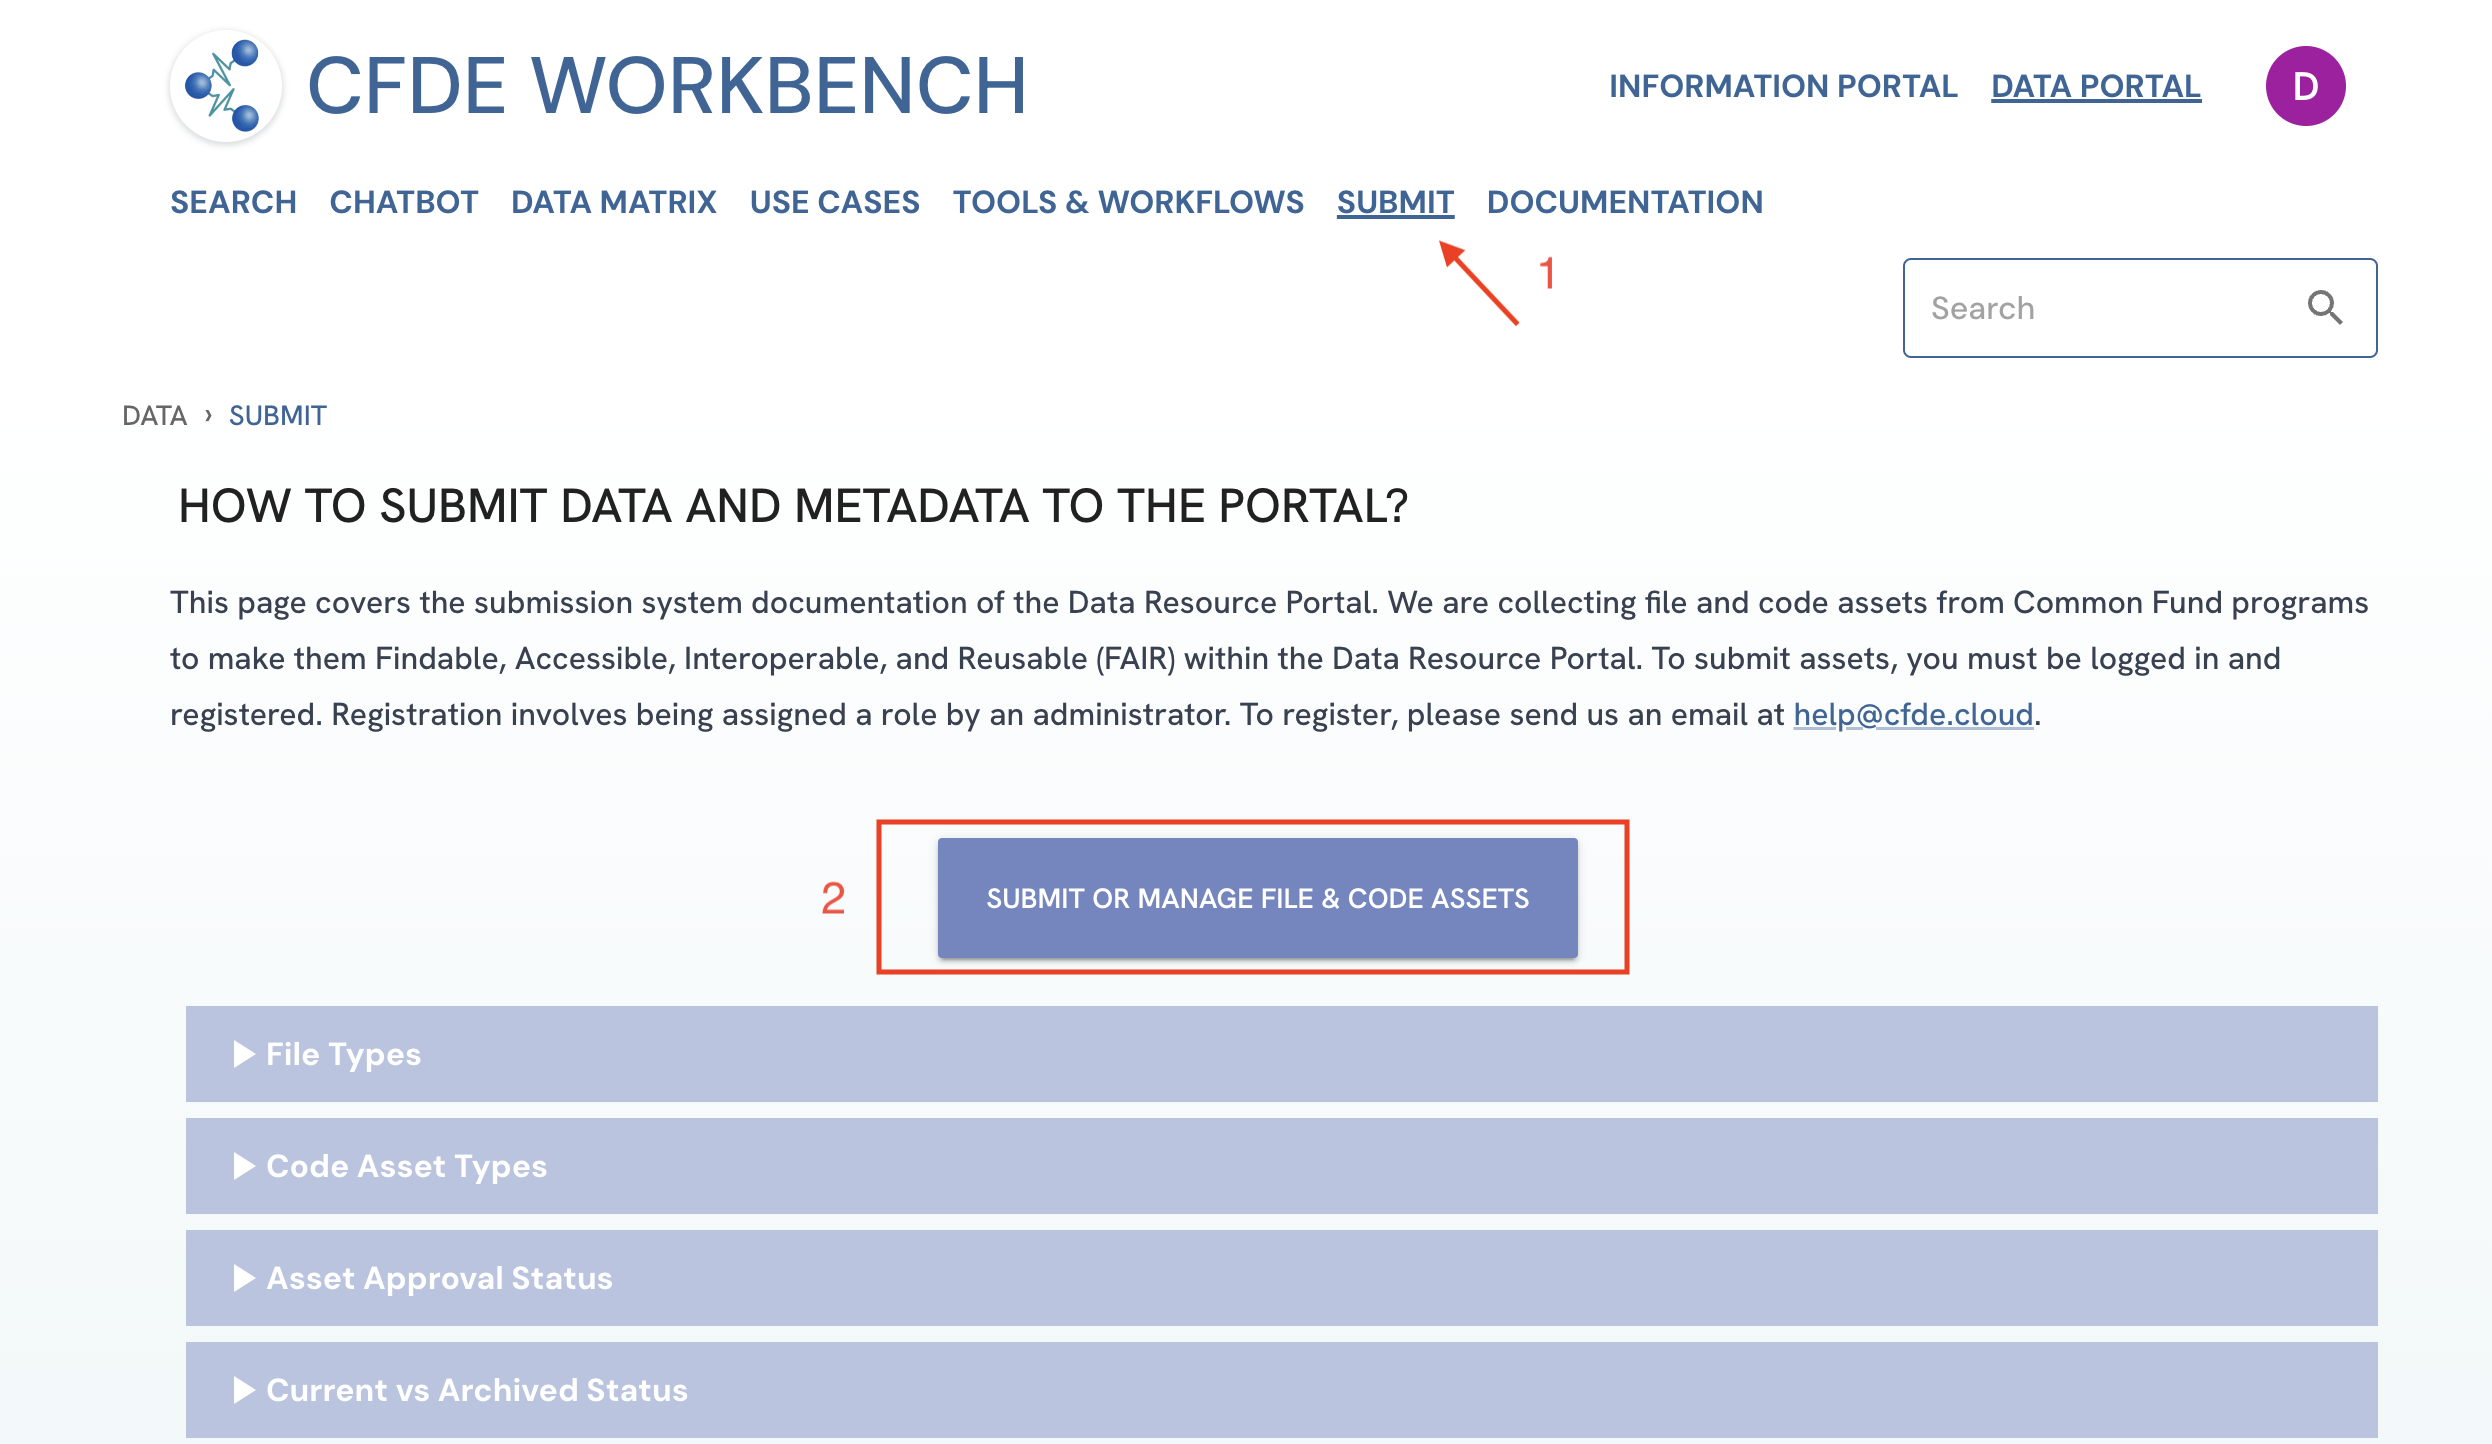 Figure 1: A screenshot of Submission System showing navigation to Code Assets Upload Form.
 -
On the Code Assets Upload Form, fill out all the fields:
- Select the DCC for which the asset is affiliated with
- Select the code asset type you wish to submit from the available options ETL, API, PWB Metanode, Entity Page Template, Models and Apps URL. If submitting an API asset. Please see the API Code Asset Submission Steps section
- Enter the URL for the code asset in the URL field. Only valid HTTPS URLs are accepted.
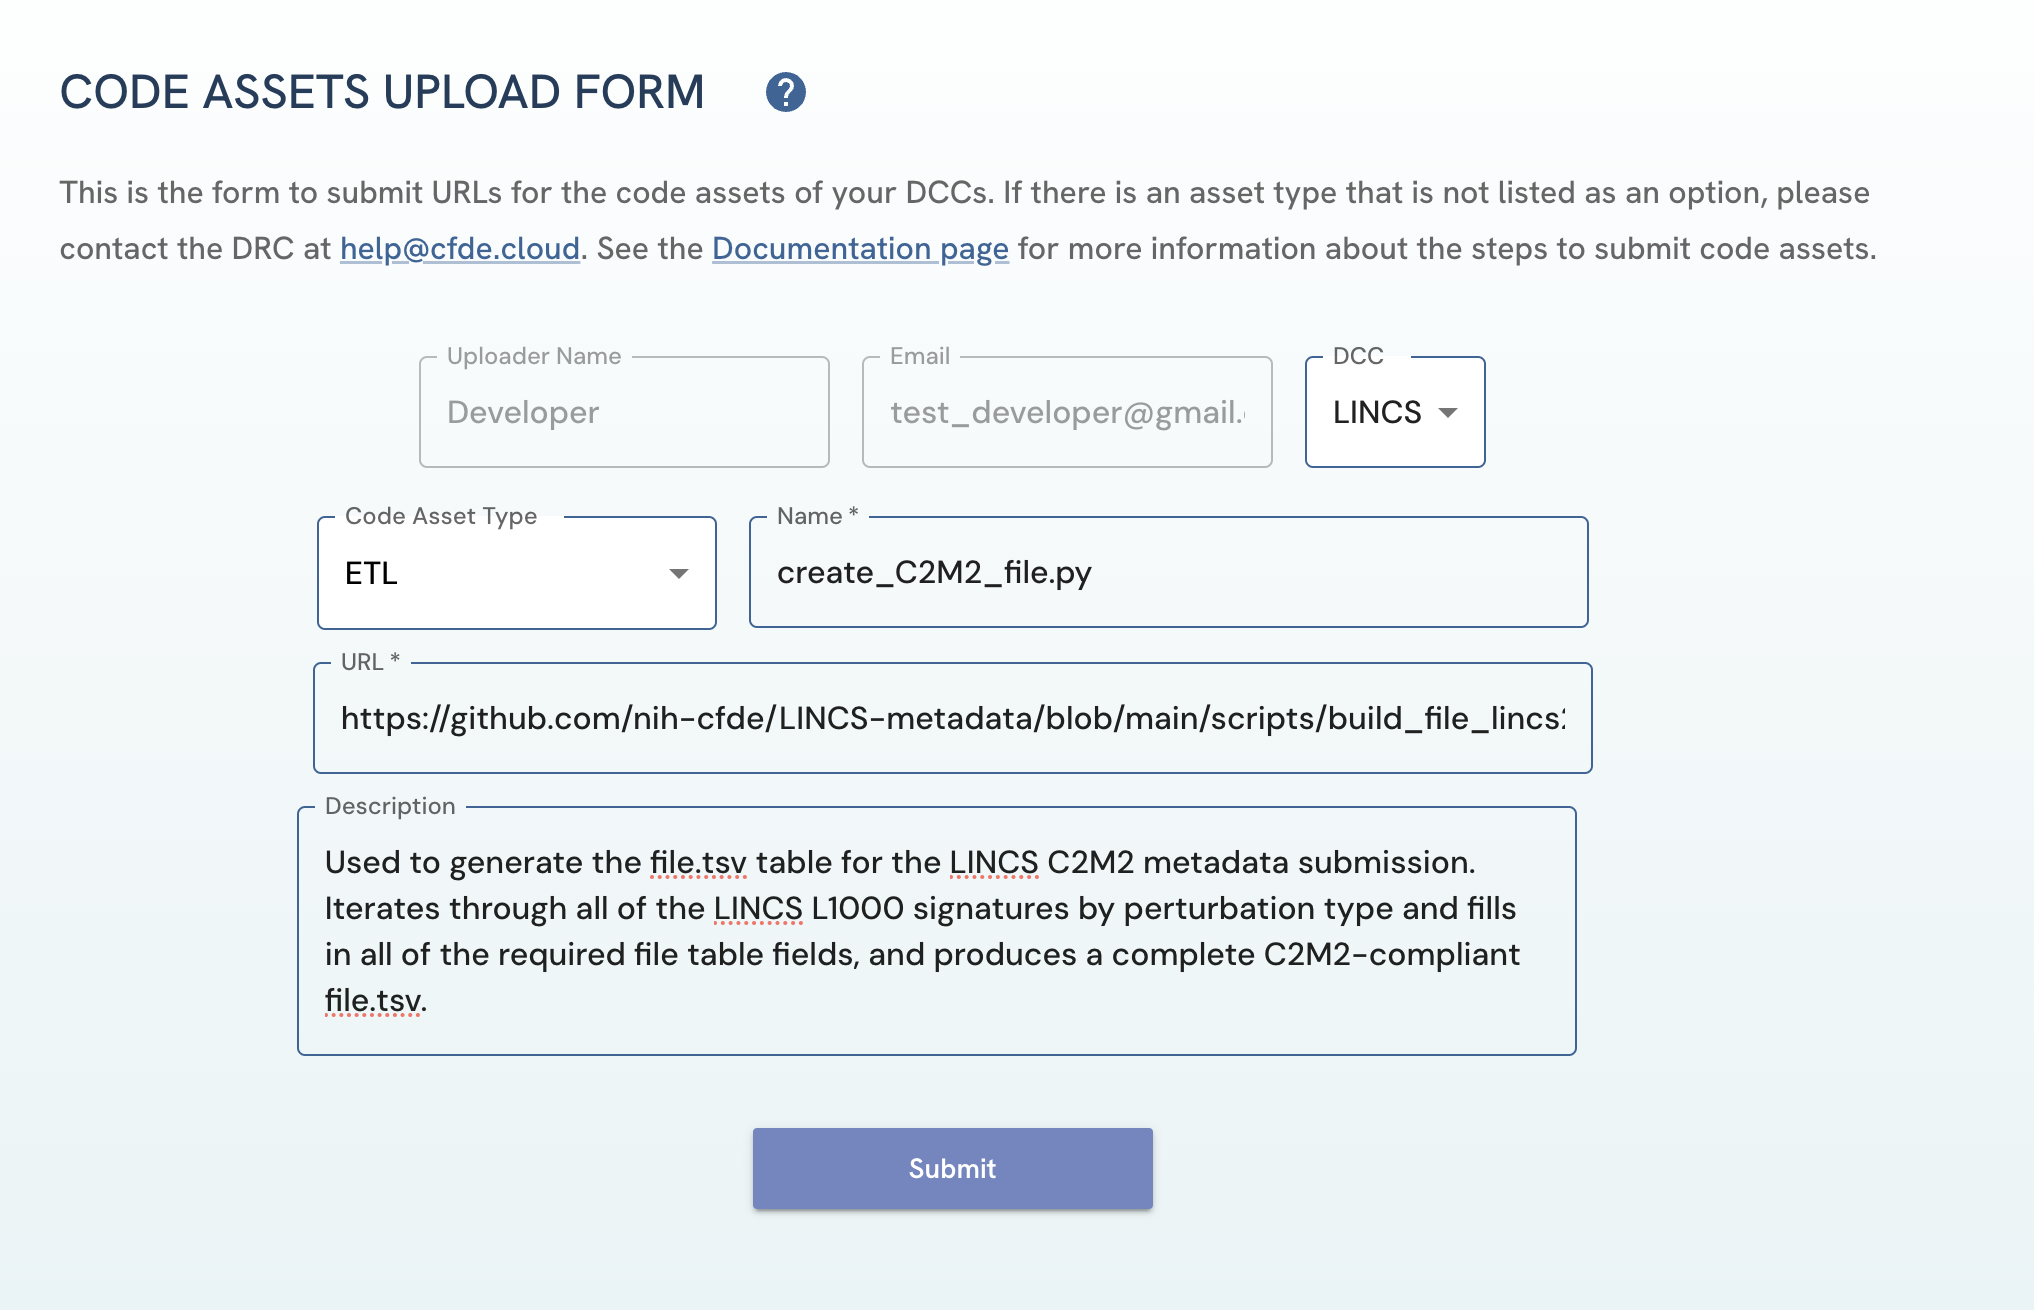 Figure 2: A screenshot of Code Assets Upload Form showing submission of code asset.
-
After clicking on the “Submit Form” button:
- If an upload is successful, a green banner with “Success! Code Asset Uploaded” should appear.
- If an upload is unsuccessful, a red banner with an error message will appear.
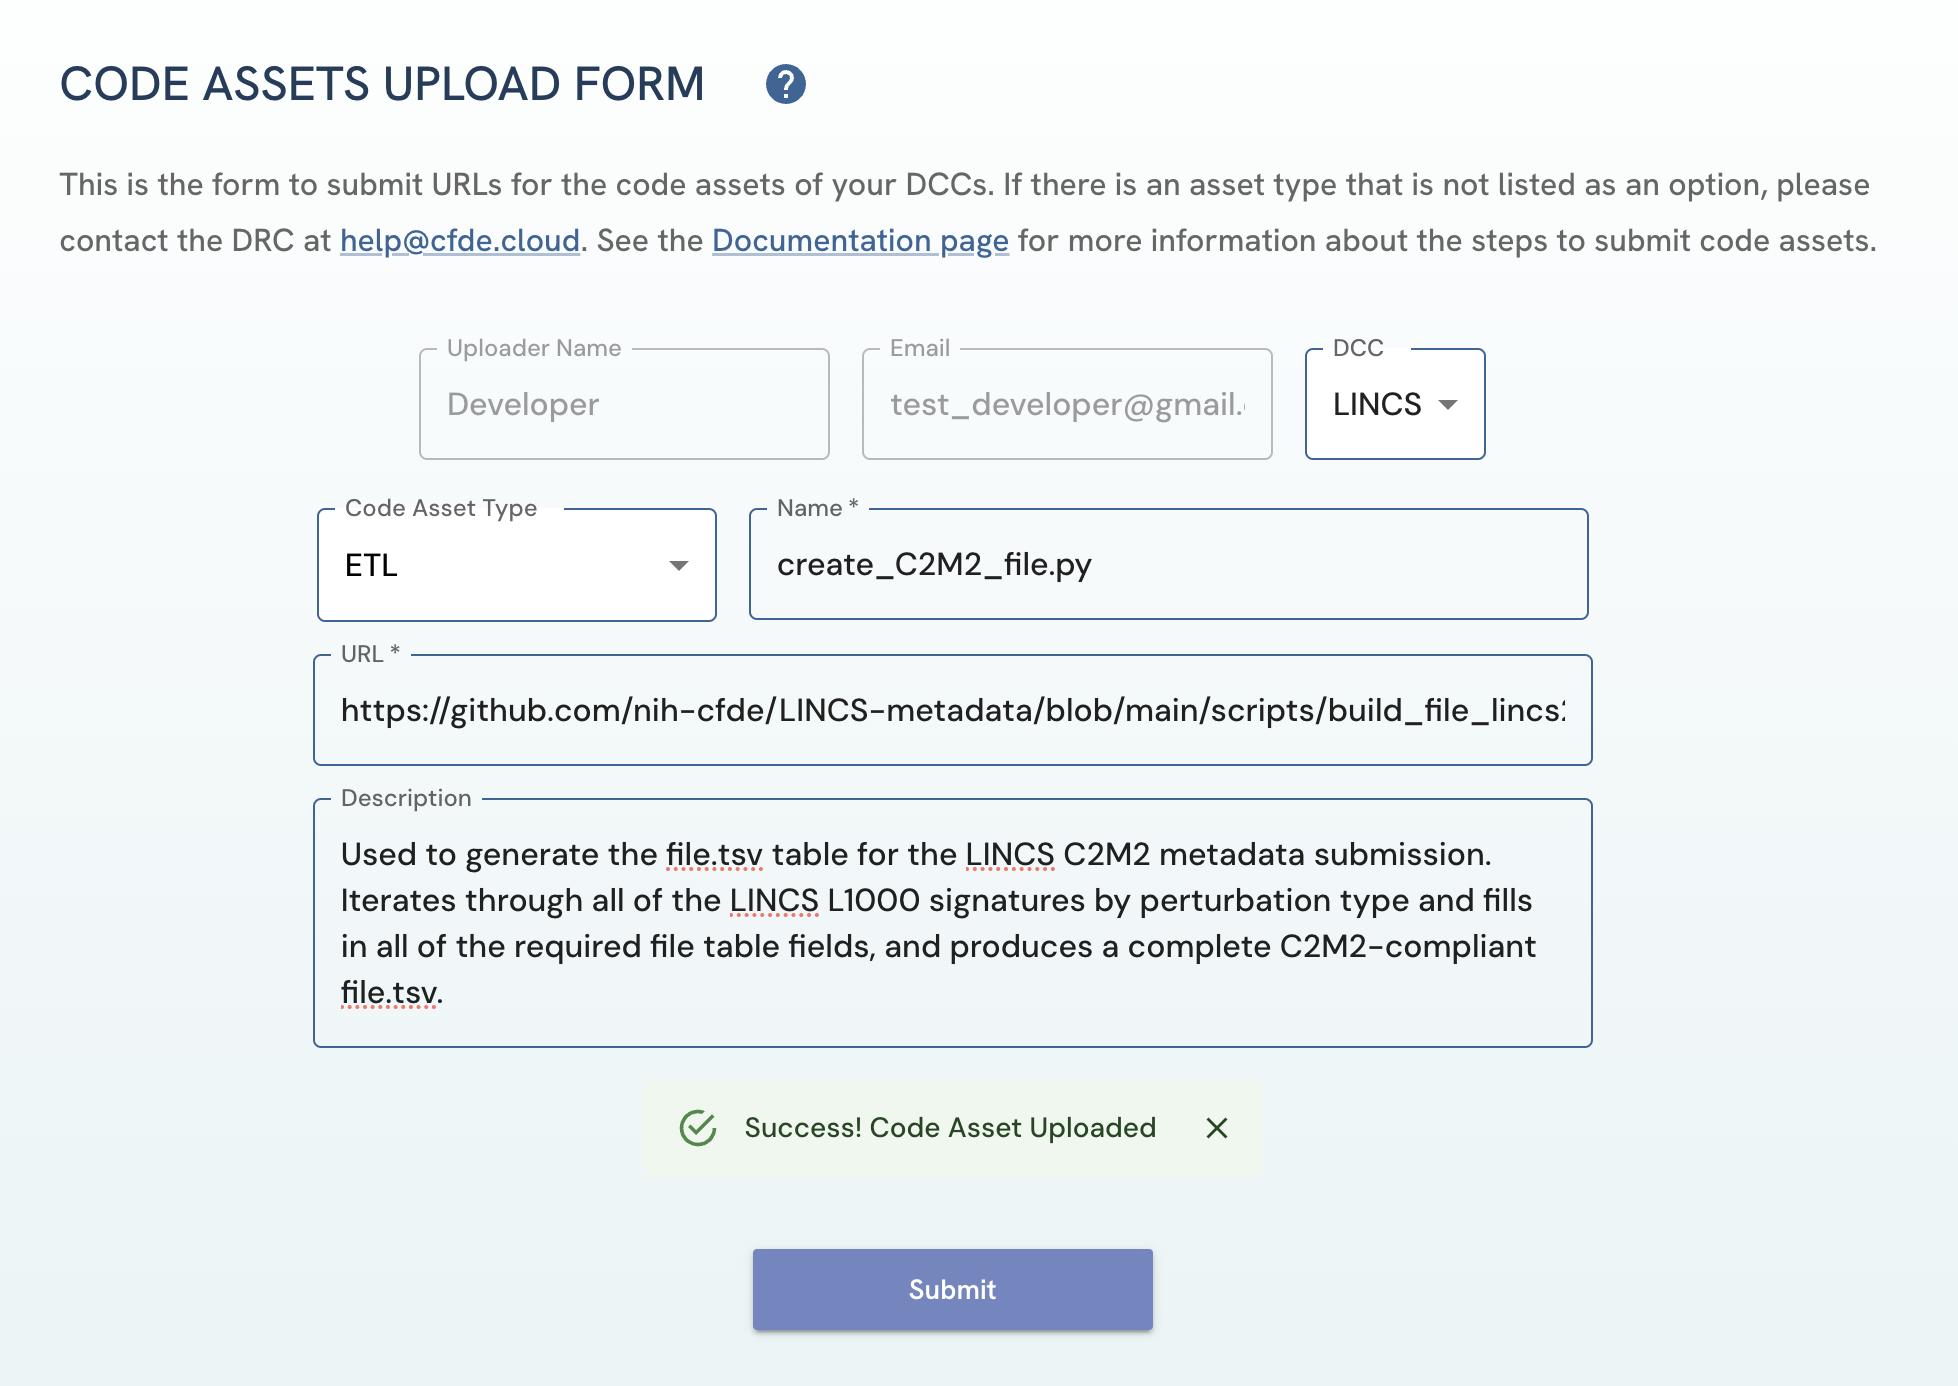 Figure 3: A screenshot of Code Assets Upload Form showing success banner with successful submission of code asset.
-
Details of your uploaded code asset should appear on the Uploaded Assets page.
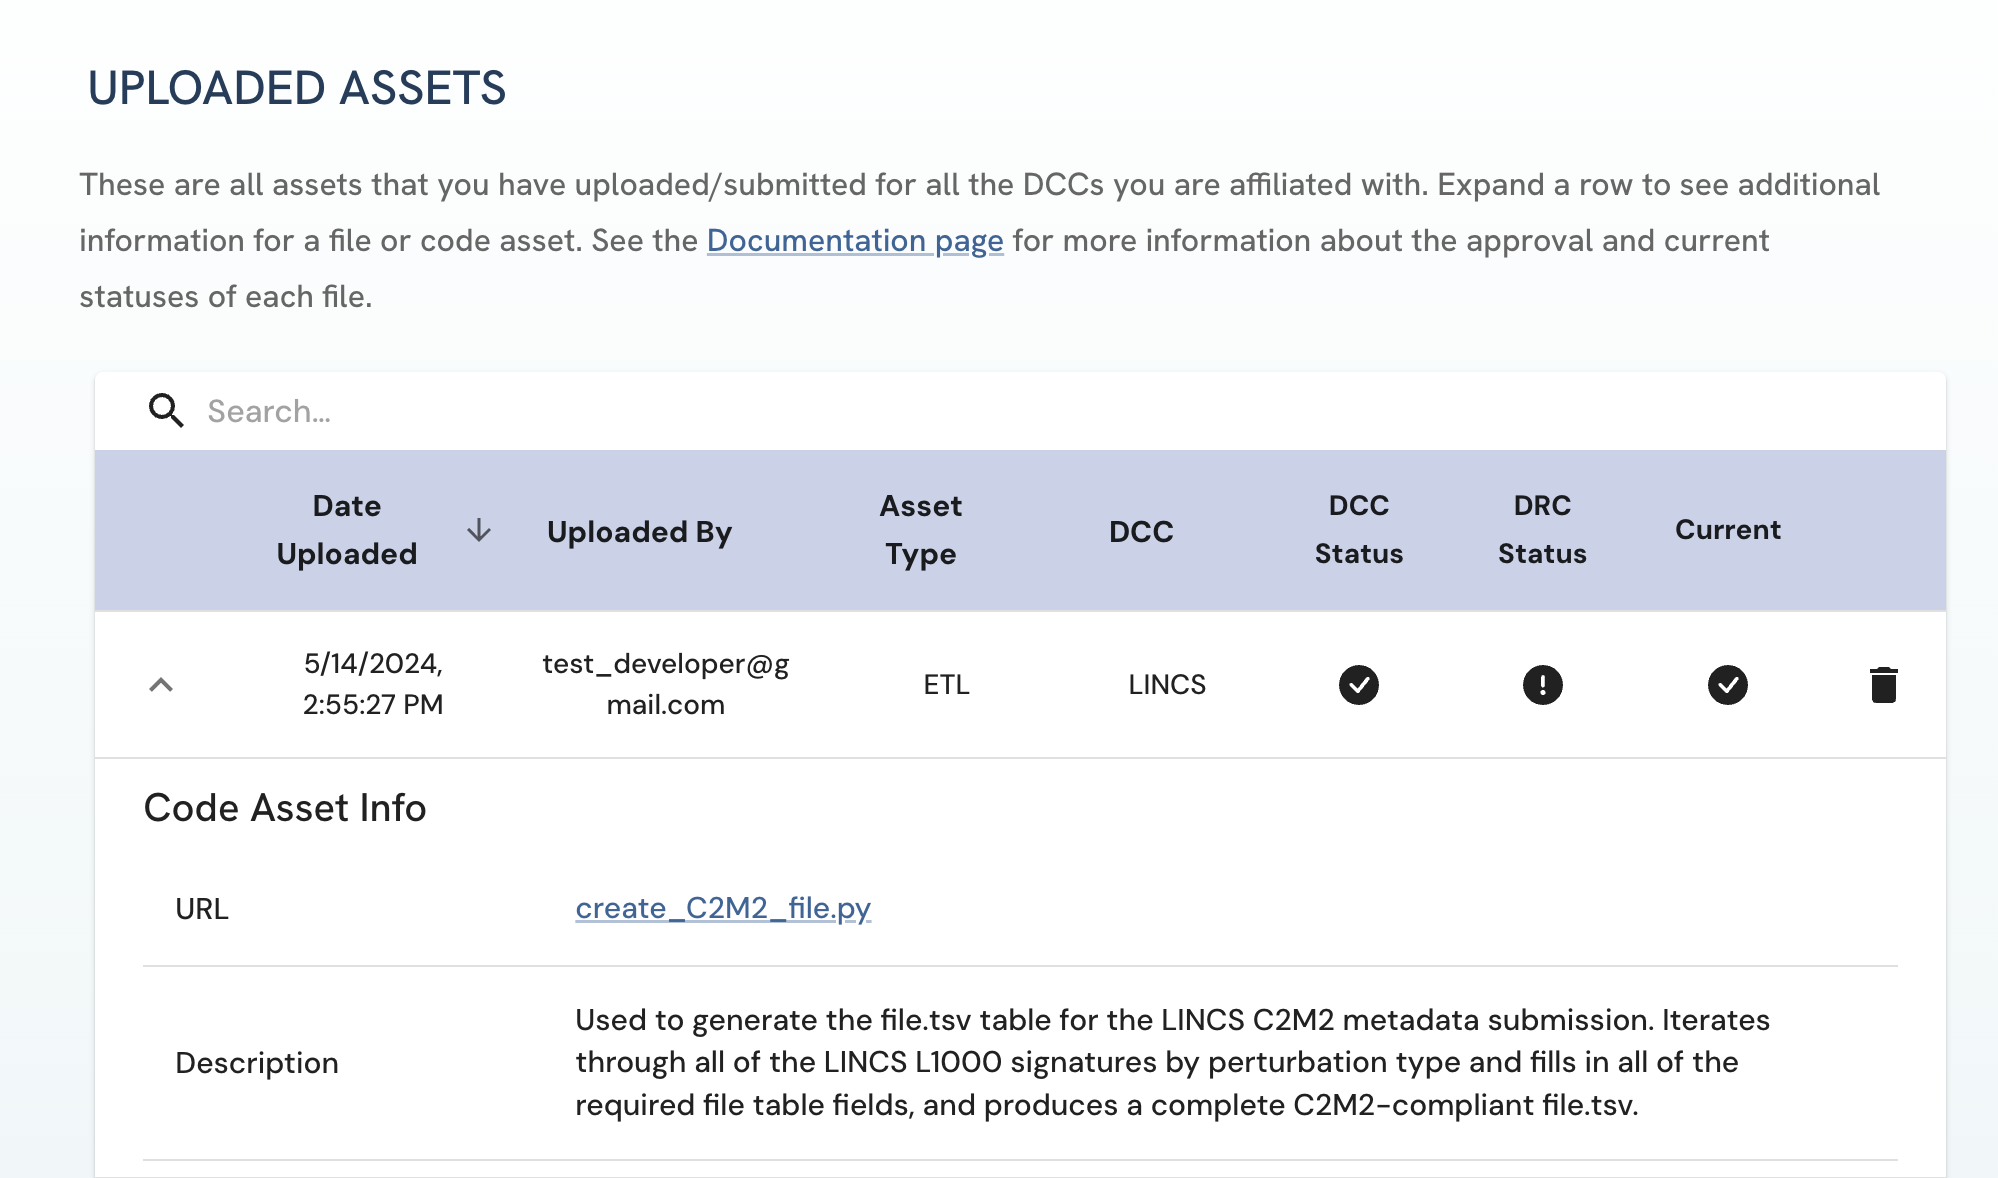 Figure 4: A screenshot of Uploaded Assets page showing submitted code asset information.
API Code Asset Submission Steps
- Follow Steps 1-3 of the Code Asset Submission Steps section.
- Enter the URL of the page that documents the DCC APIs.
- If the API documentation meets OpenAPI specifications, check the OpenAPI Specifications box.
- If the API documentation is deposited in the SmartAPI registry, check the Deposited in SmartAPI box and insert the SmartAPI URL (the link to the page that displays the page of the API on the SmartAPI website) in the provided textbox.
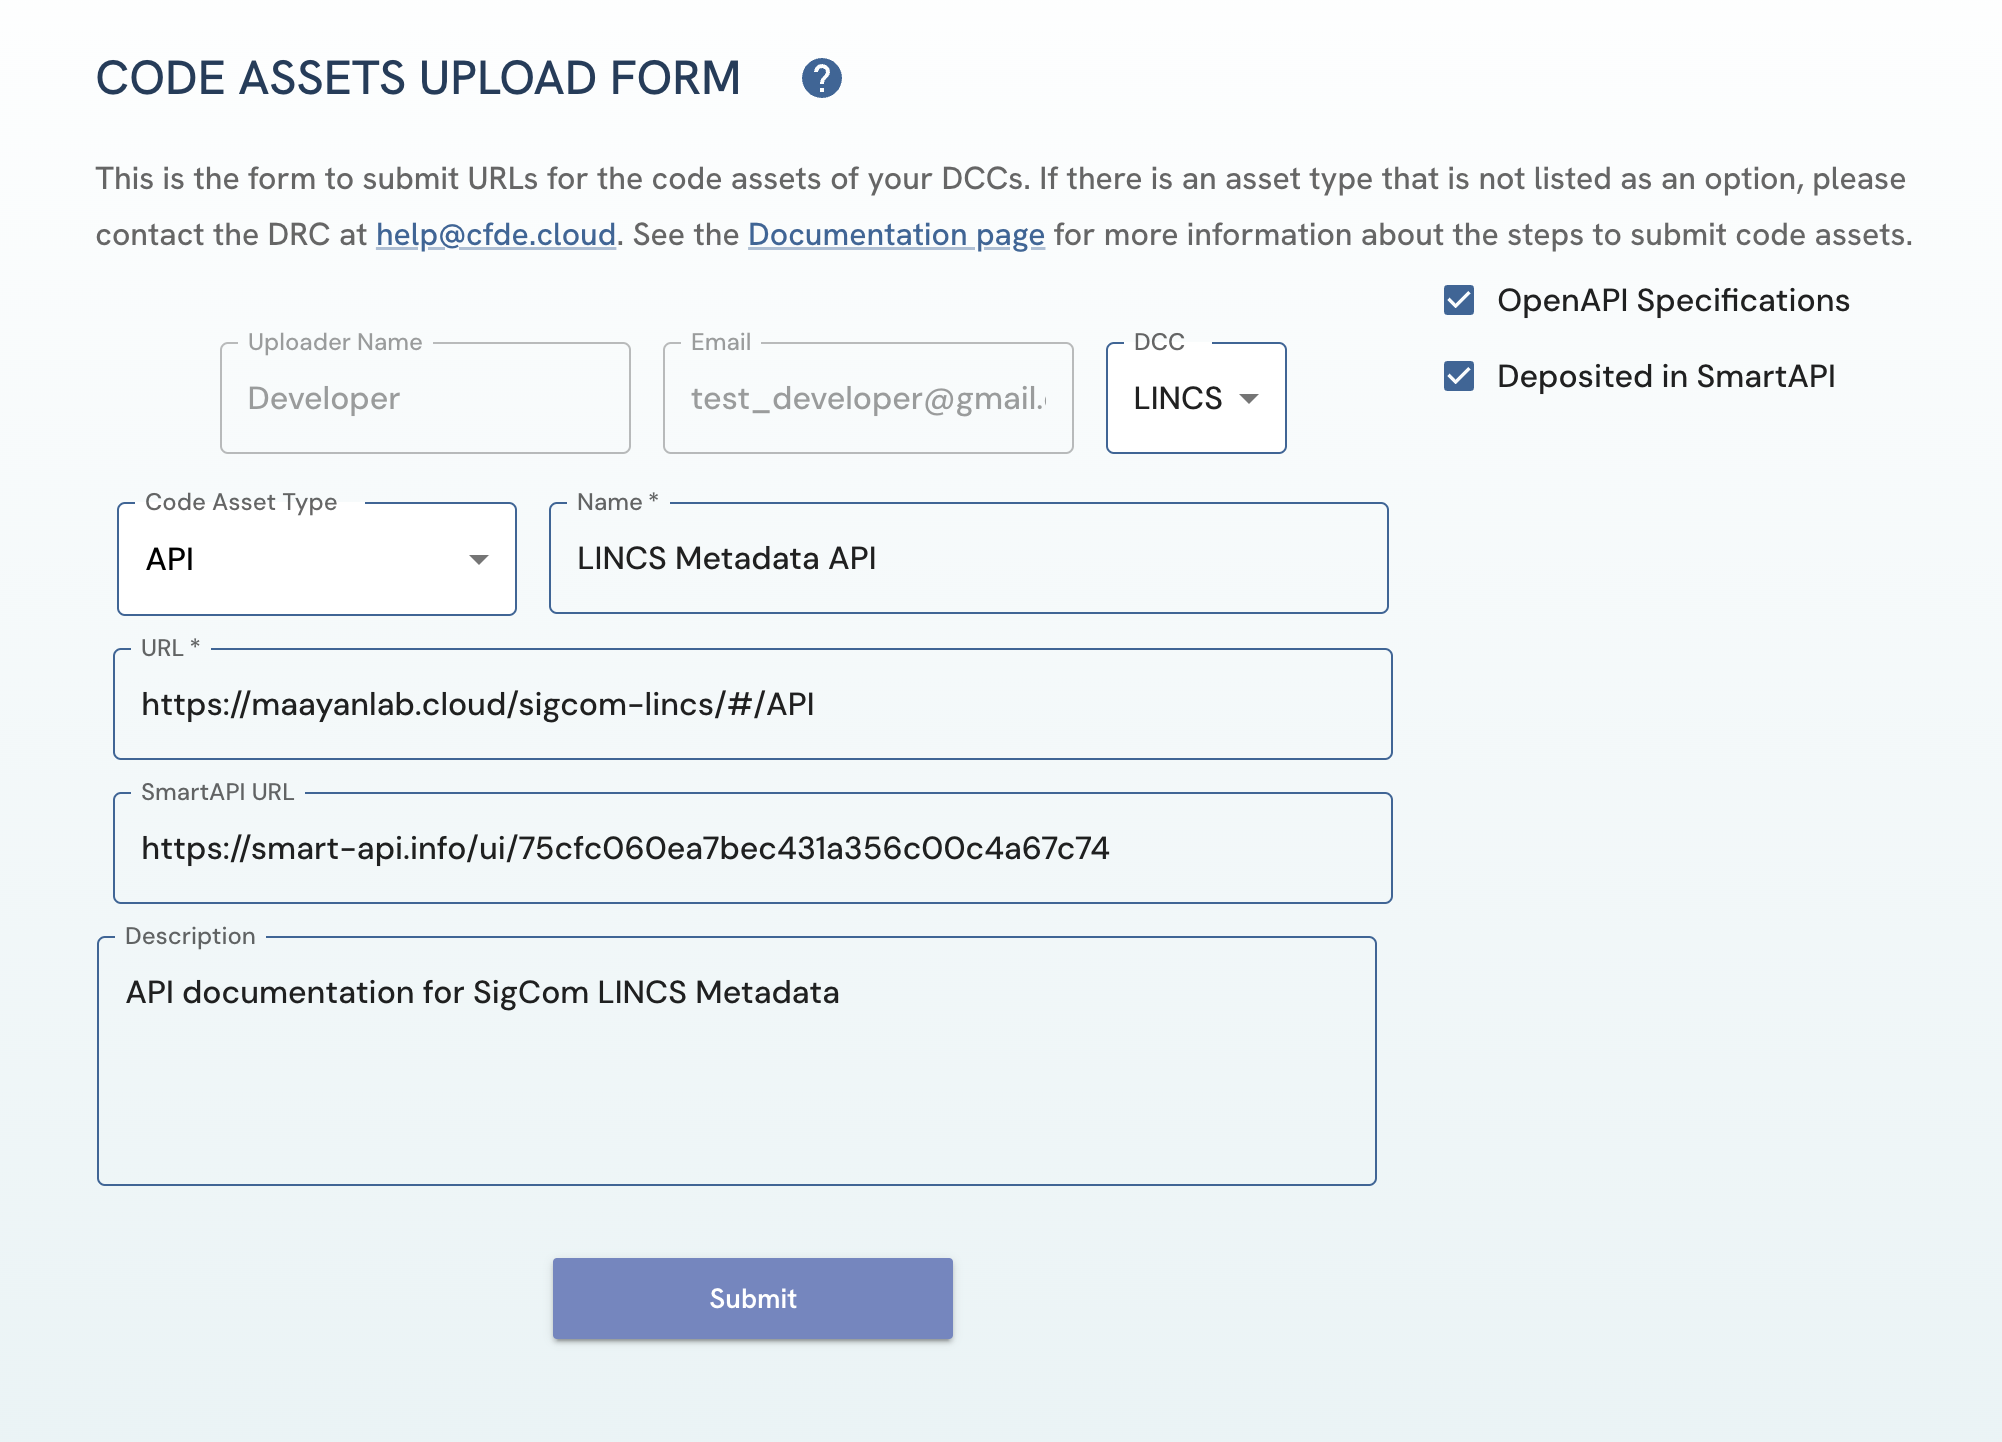 Figure 5: A screenshot of Code Assets Upload Form page showing submission of API code asset.
Asset Upload Submission Troubleshooting/FAQ:
-
Before uploading, ensure that all your account information has been entered/is accurate on the My Account page
- If your email is missing, please fill it out and click 'Save Changes' or press the enter key
- If you do not have any DCCs associated with your account, please contact the DRC to update your information.
- If a DCC that you are affiliated with (and you are an uploader for) is not listed as one of your DCC options, please contact the DRC through email to update your information.
- If Role is inaccurate, please contact the DRC to update your information.
Figure 6: A screenshot of Data Portal showing navigation to My Account page that displays user account information. -
If you are to be an Uploader or Approver for your DCC and have “Access Denied” on the Code Assets Upload Form and Uploaded Assets pages, please contact the DRC through email to grant you access.
-
If a mistake has been made in a submission, go to the Uploaded Assets page, delete the incorrectly submitted asset by clicking on the delete icon on the row of the given file and reupload the corrected file.
Asset Approval Steps
Approving Submitted Assets
-
Go to the Uploaded Assets page. This page can be found by clicking on the “Submit” tab in the navigation bar or in the footer, clicking on the "Submit and Manage File/Code Assets" button on the Submit page and on the Uploaded Assets tab
Figure 1: A screenshot of Data Portal showing navigation to Code Assets Upload Form.
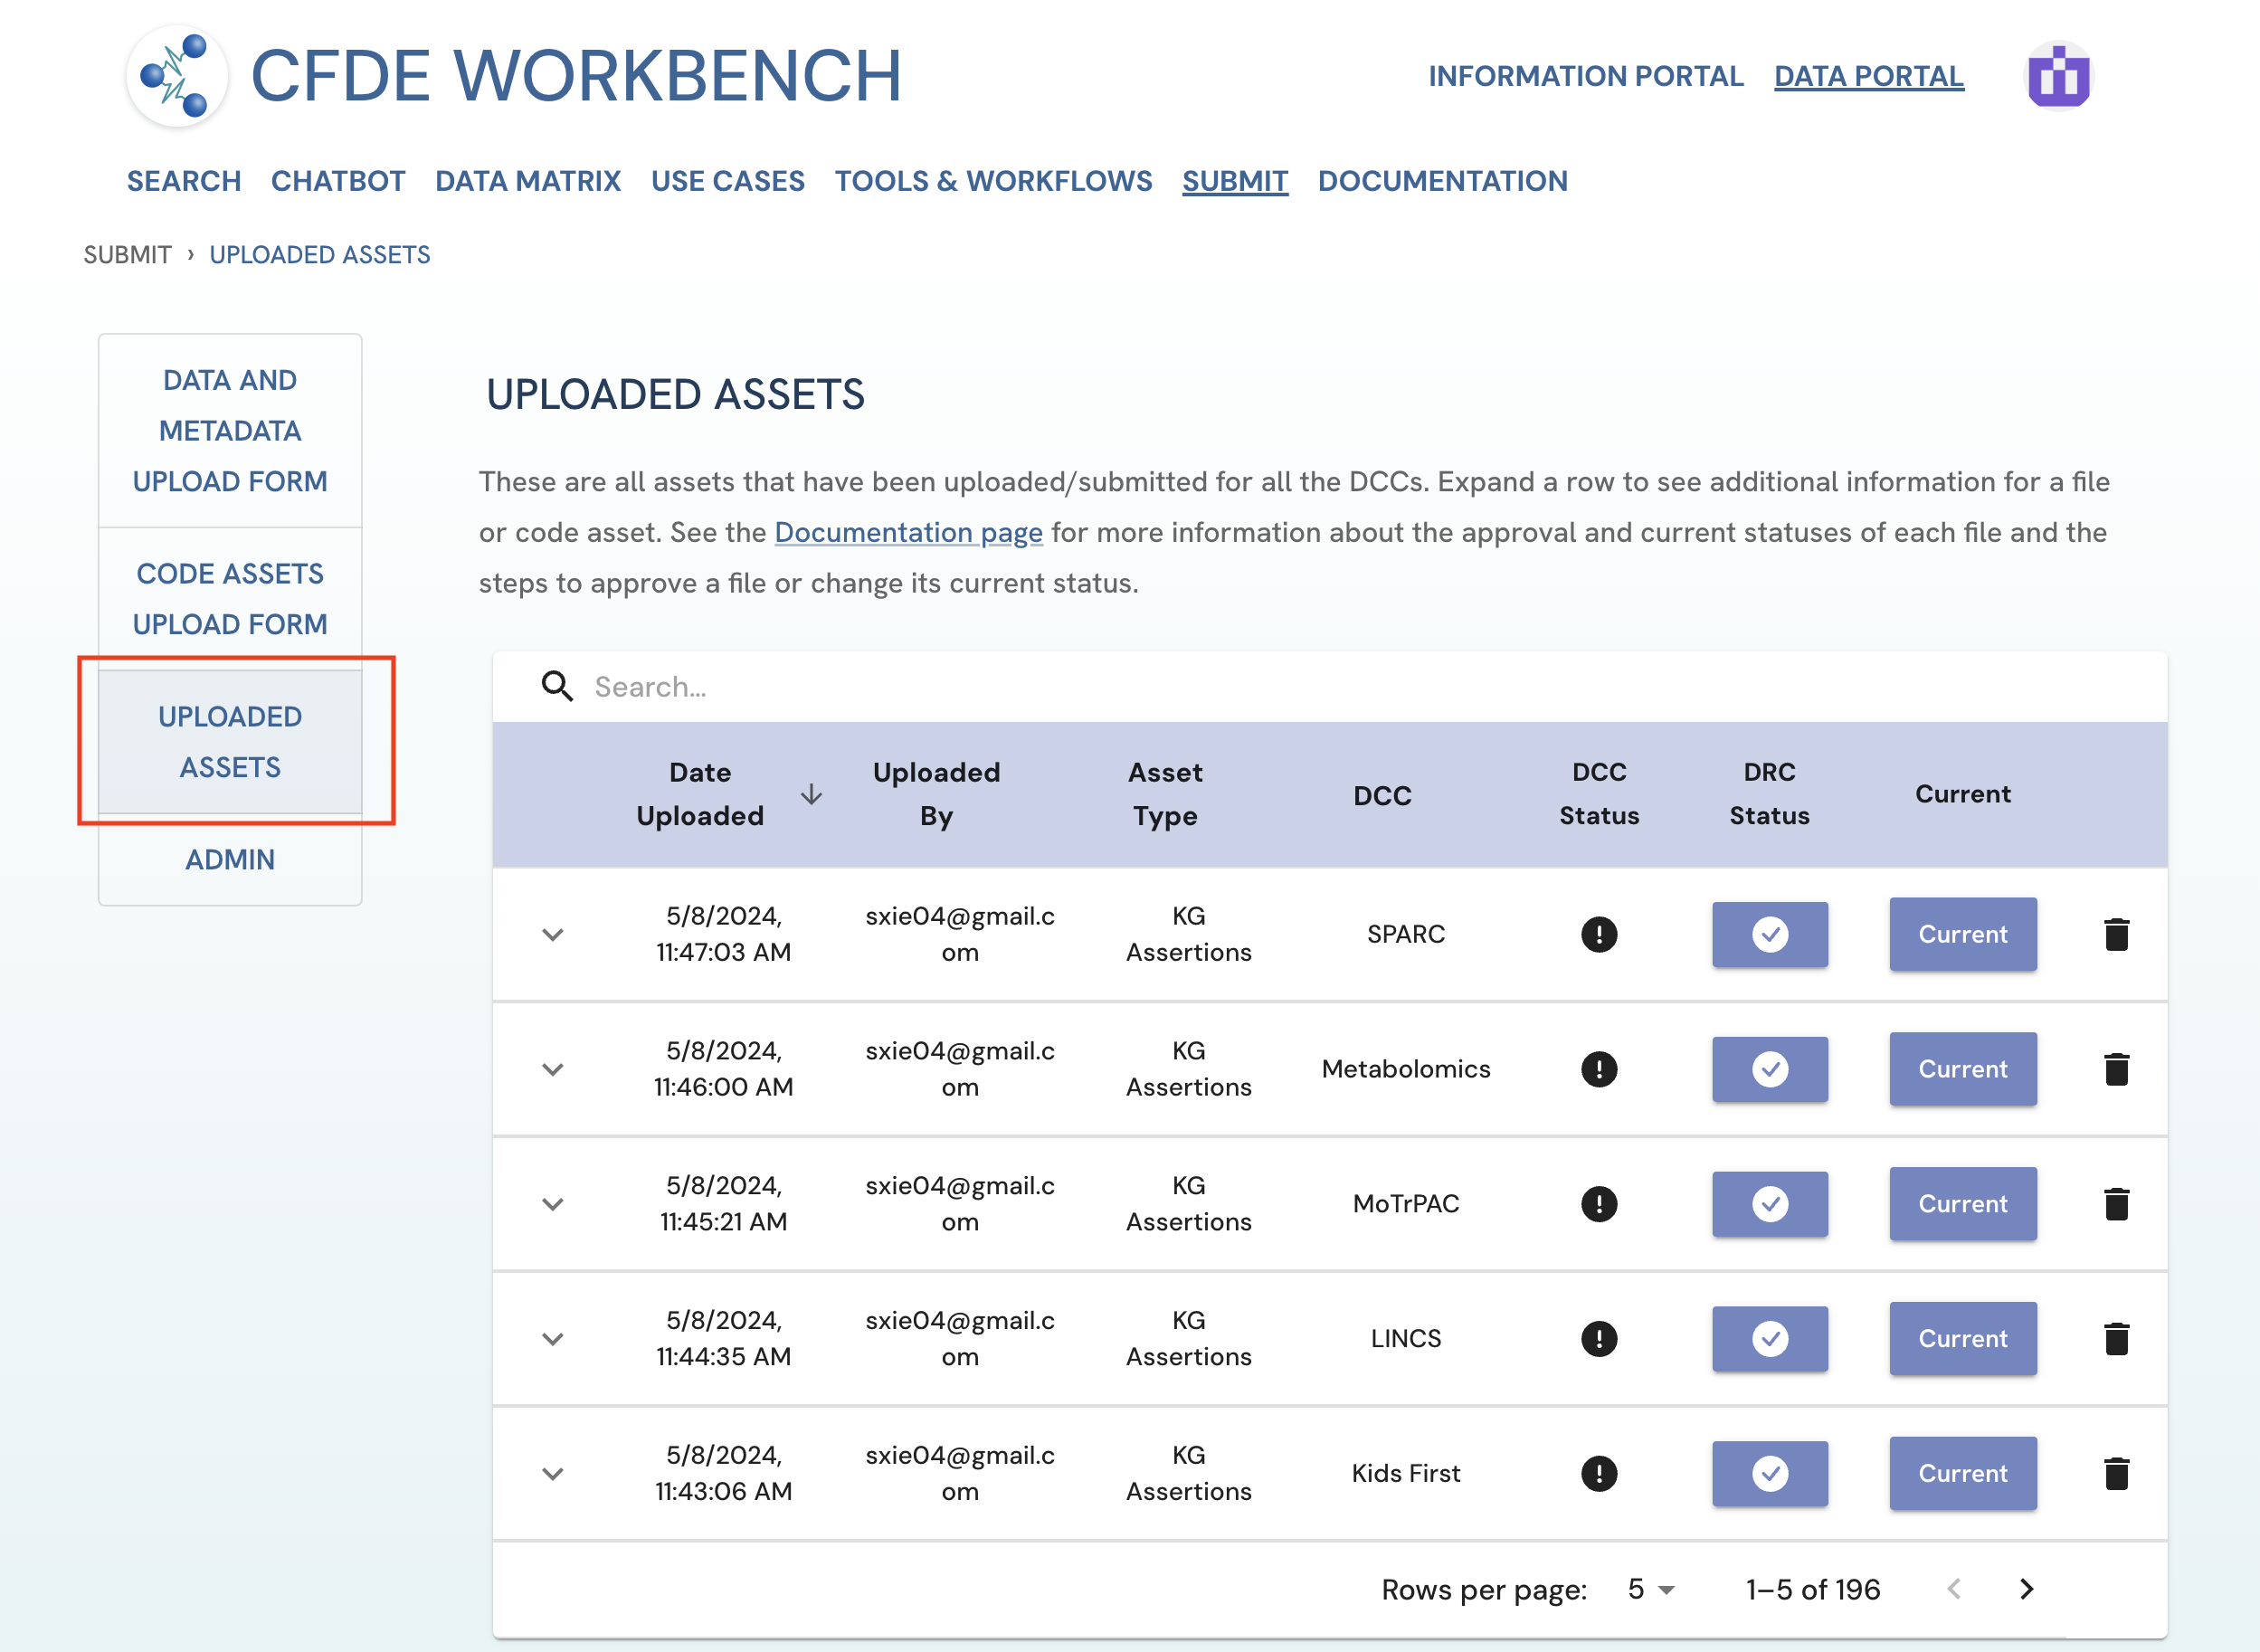 Figure 2: A screenshot of Submission System showing navigation to Code Assets Upload Form.
 -
Here you will find all uploaded assets that fall under your jurisdiction.
-
All unapproved assets that you are authorized to approve will be marked by the “Approve Upload” button under the DCC status or DRC status columns for DCC and DRC Approvers respectively.
-
For DCC Approvers, these are all assets that have been uploaded or submitted for your DCC.
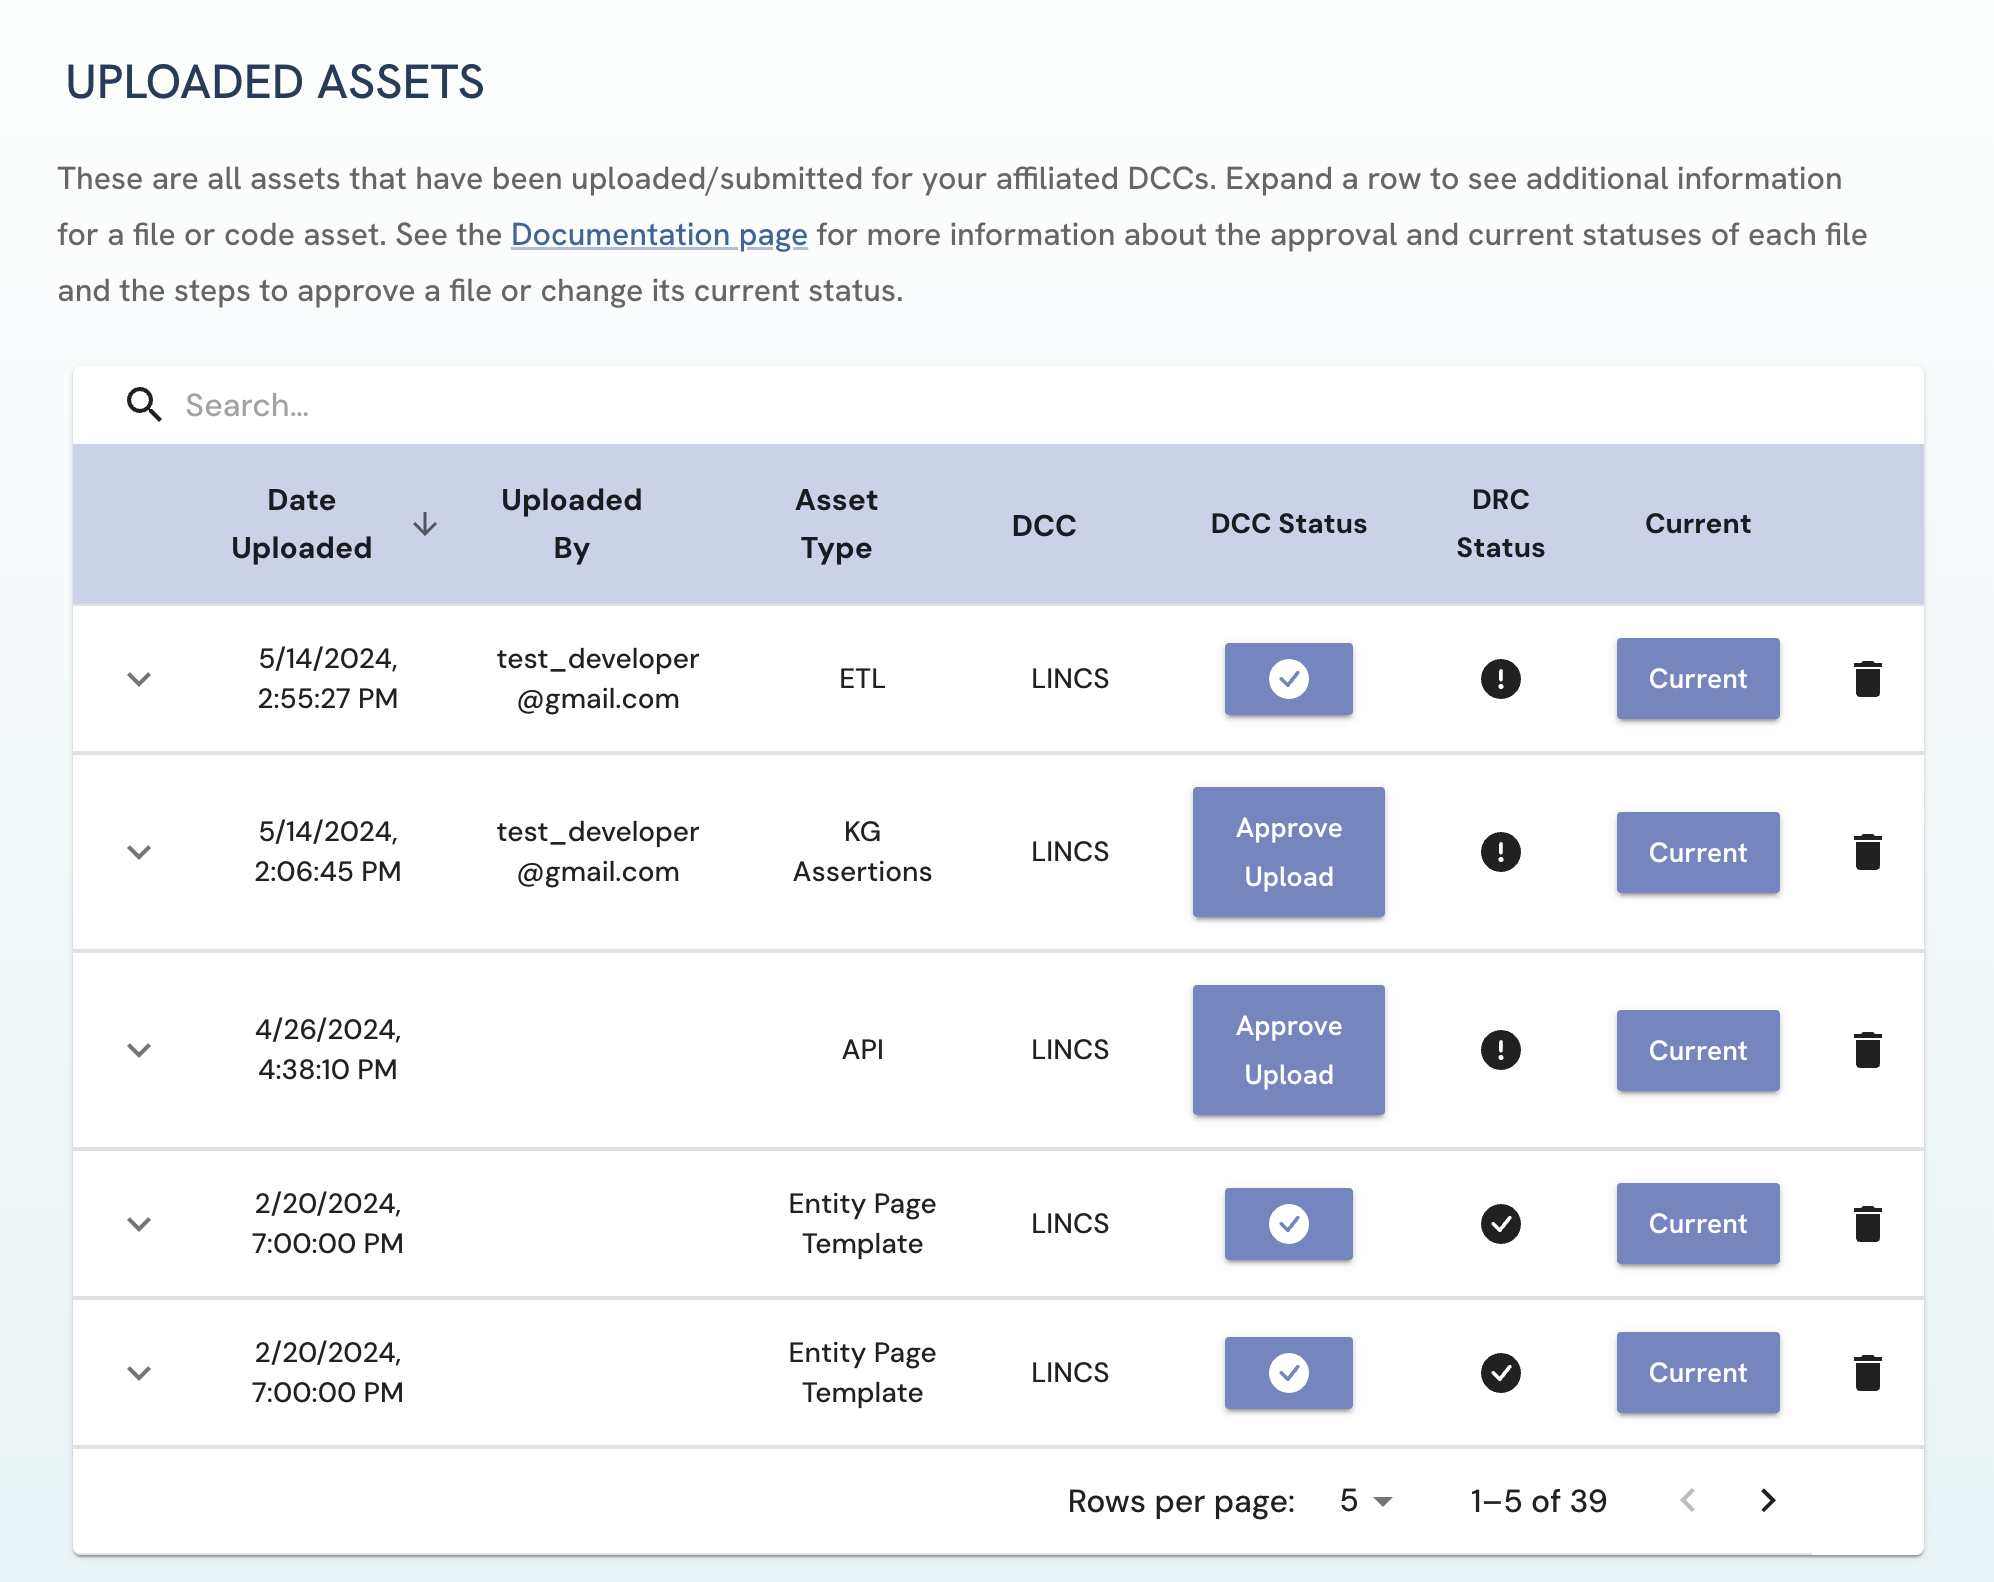 Figure 3: A screenshot of Uploaded Assets page in the view of a LINCS DCC Approver.
 -
For DRC Approvers, these are all assets that have been uploaded/submitted by uploaders across all DCCs.
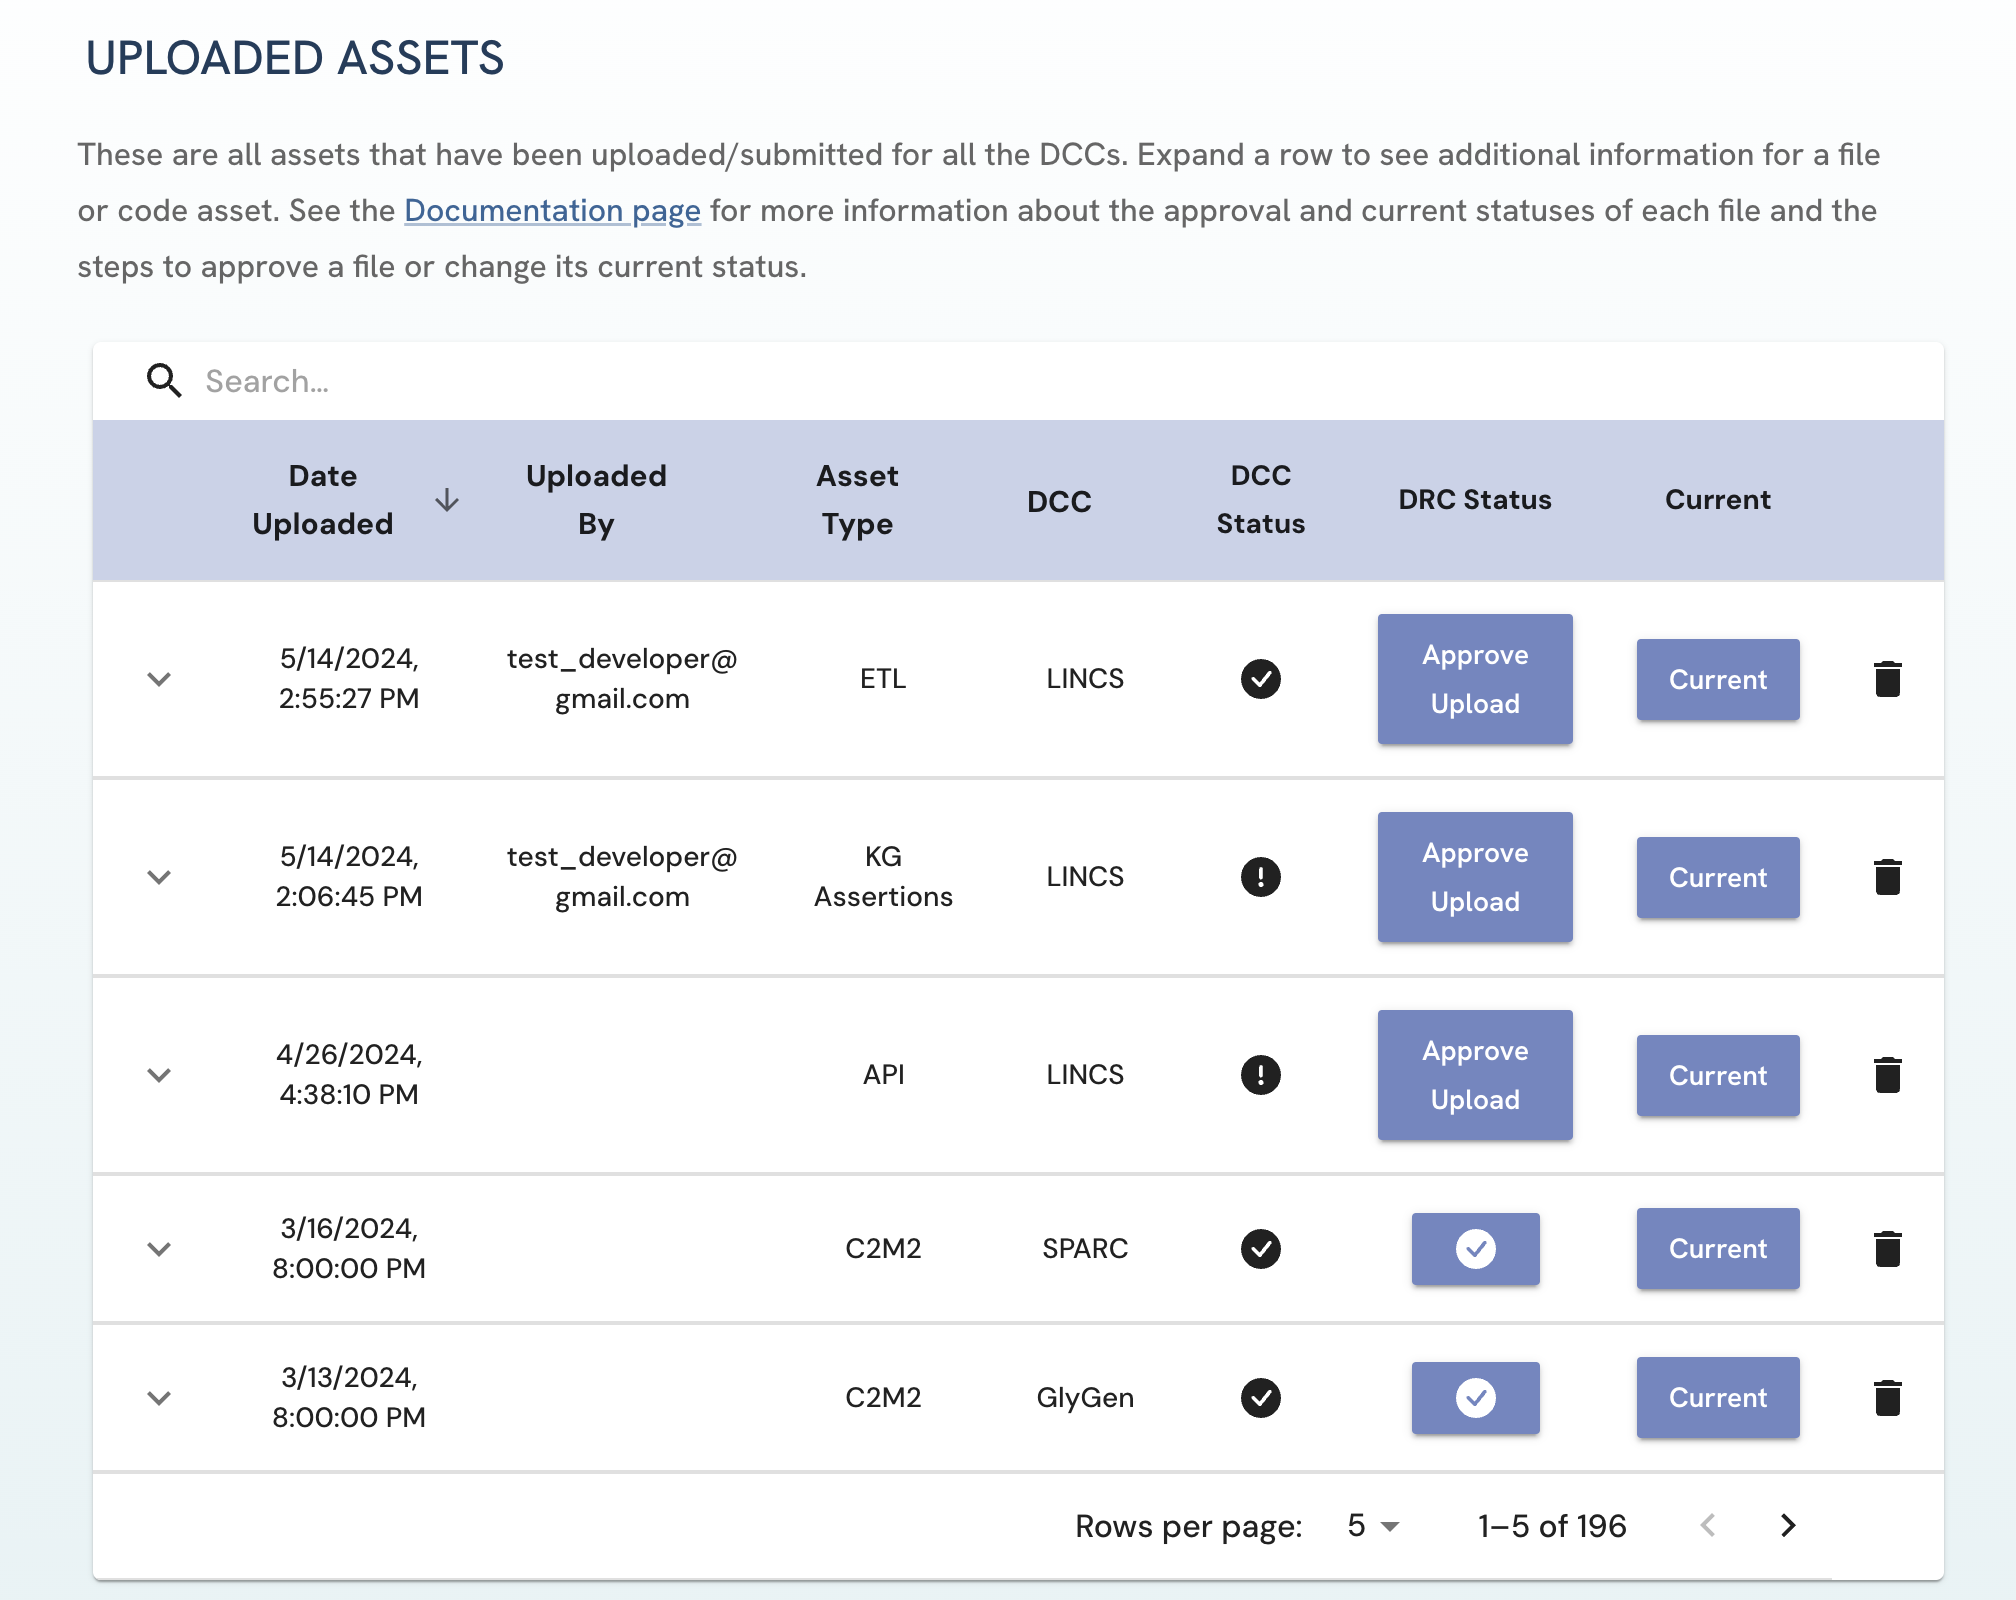 Figure 4: A screenshot of Uploaded Assets page in the view of a DRC Approver.
-
-
To approve an asset, click on the “Approve Upload” button to approve the file.
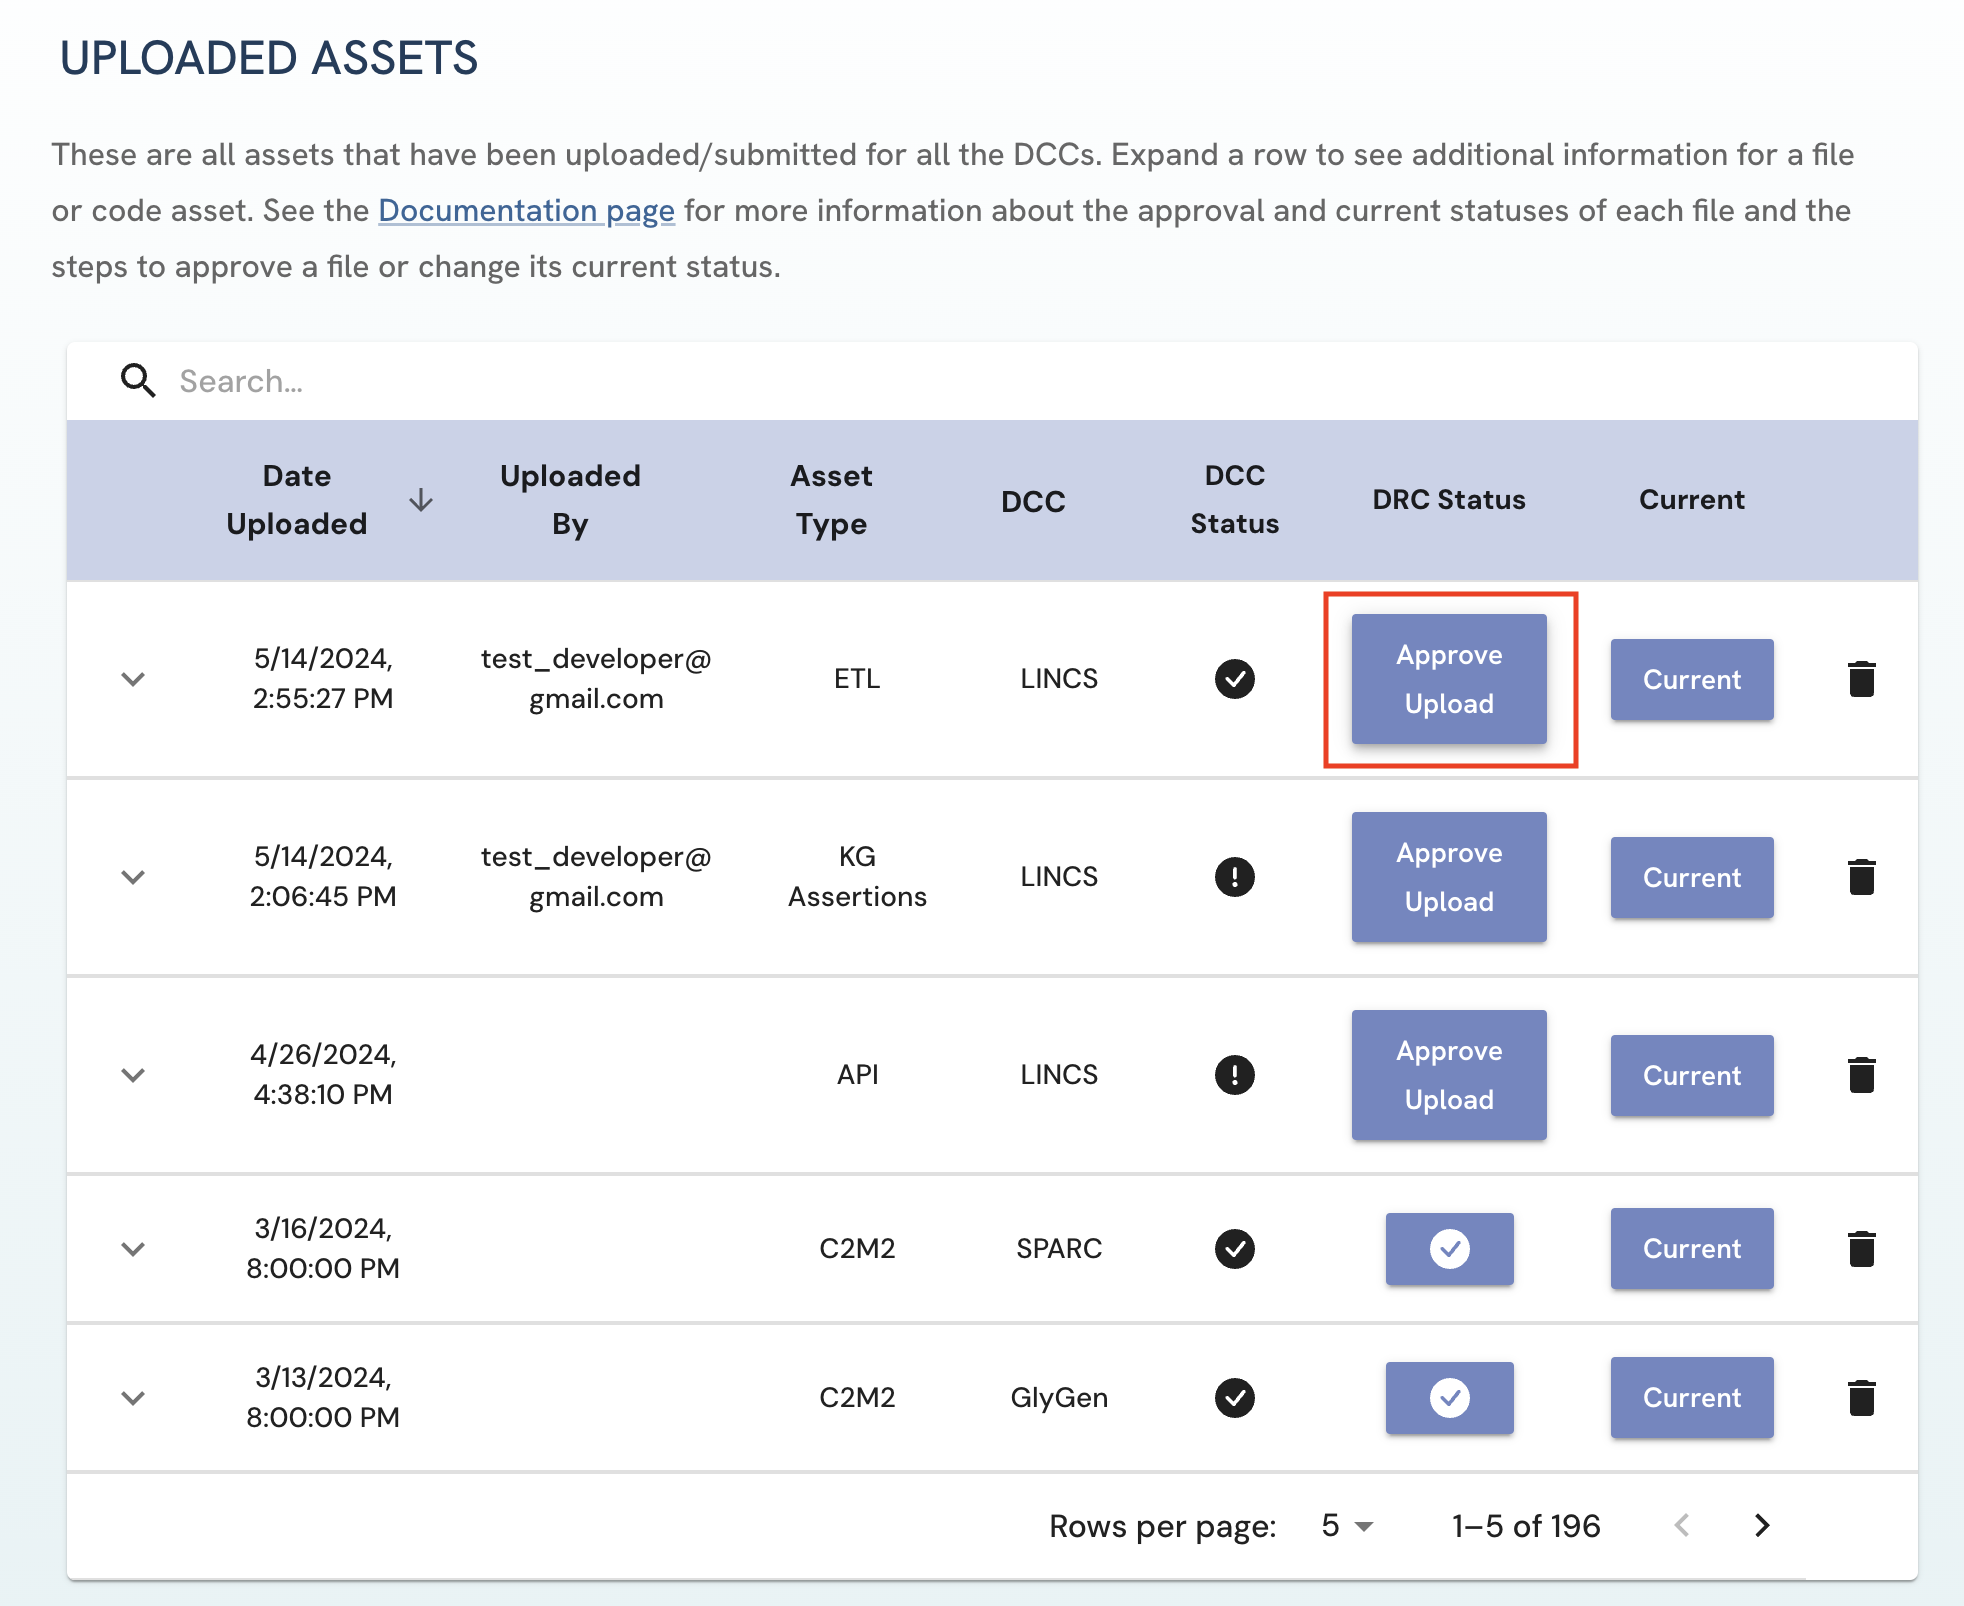 Figure 5: A screenshot of Uploaded Assets page showing approval of a submitted asset.
 -
To remove the approved status of a asset, click on the button under the DCC/DRC status column. This reverses the Approval action.
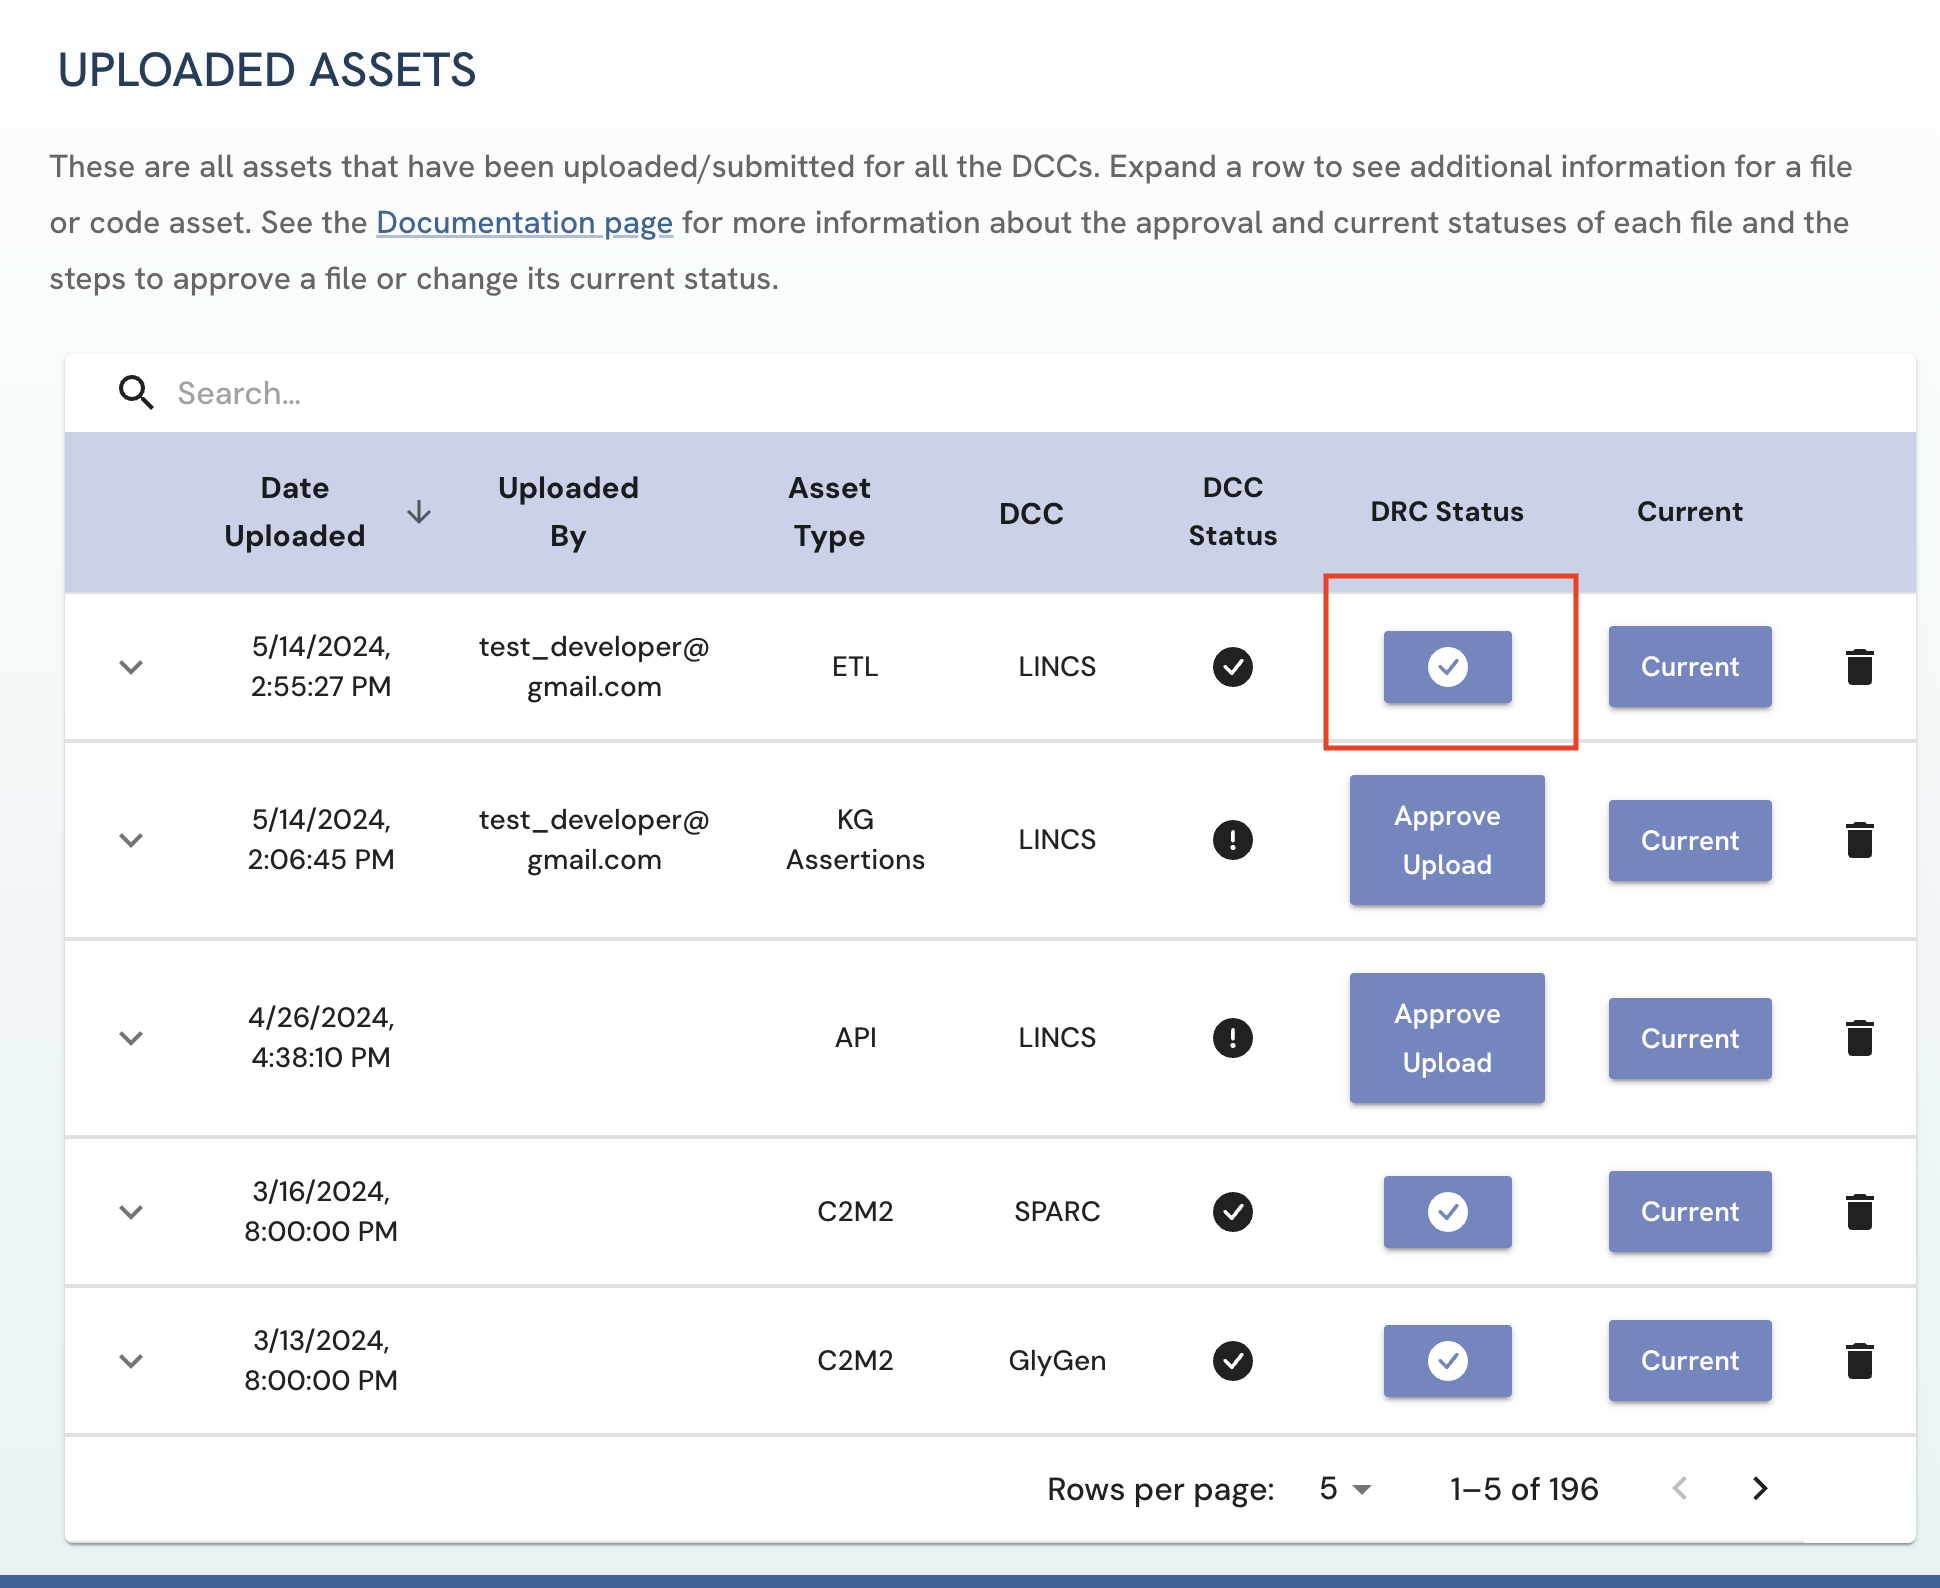 Figure 6: A screenshot of Uploaded Assets page showing approval removal of a submitted asset.
Archiving Submitted Assets
Similar steps are done to set an asset as the most current version.
- To toggle between setting an asset as Current and Archived, click on the button under Current column. Please note that:
- Multiple assets of the same asset type can be set as current for a DCC.
- DCC and DRC approvers are authorized to change the current status of assets for affiliated DCCs/all DCCs respectively.
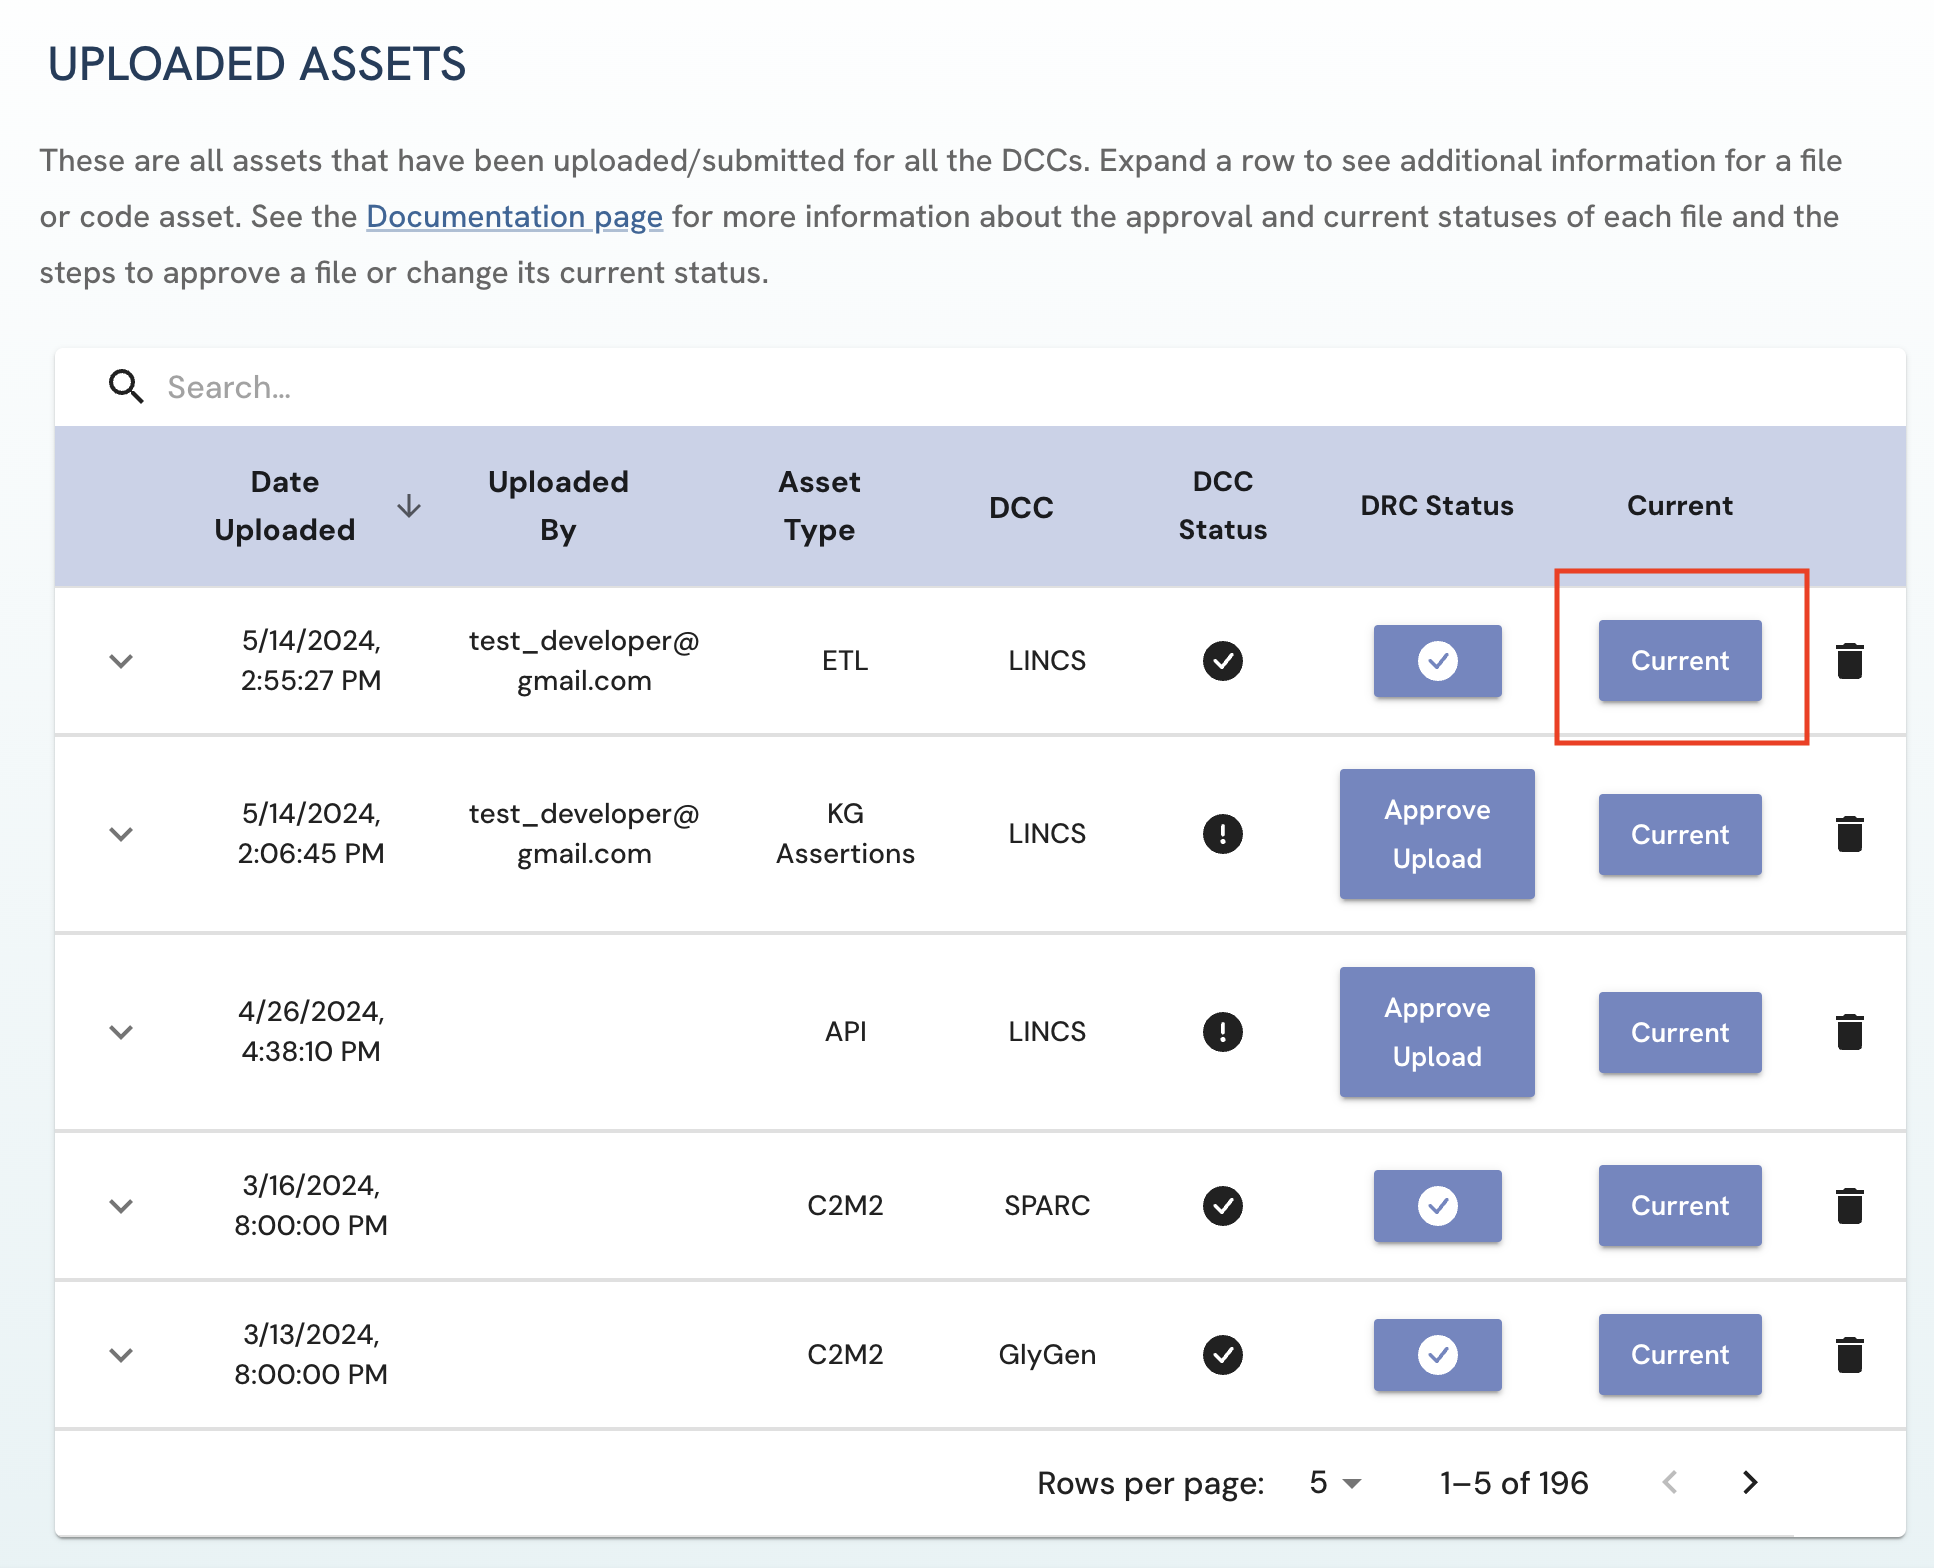 Figure 7: A screenshot of Uploaded Assets page showing changing archived/current status of a submitted asset.
Deleting Submitted Assets
Both Uploaders and Approvers can delete uploaded assets.
-
On the Uploaded Assets page, click on the delete icon next to the asset you wish to delete.
-
A pop up will appear verifying your decision to delete the given asset.
-
Click on "Yes, Delete" to confirm the deletion of the asset. Please note that the delete operation is permanent.
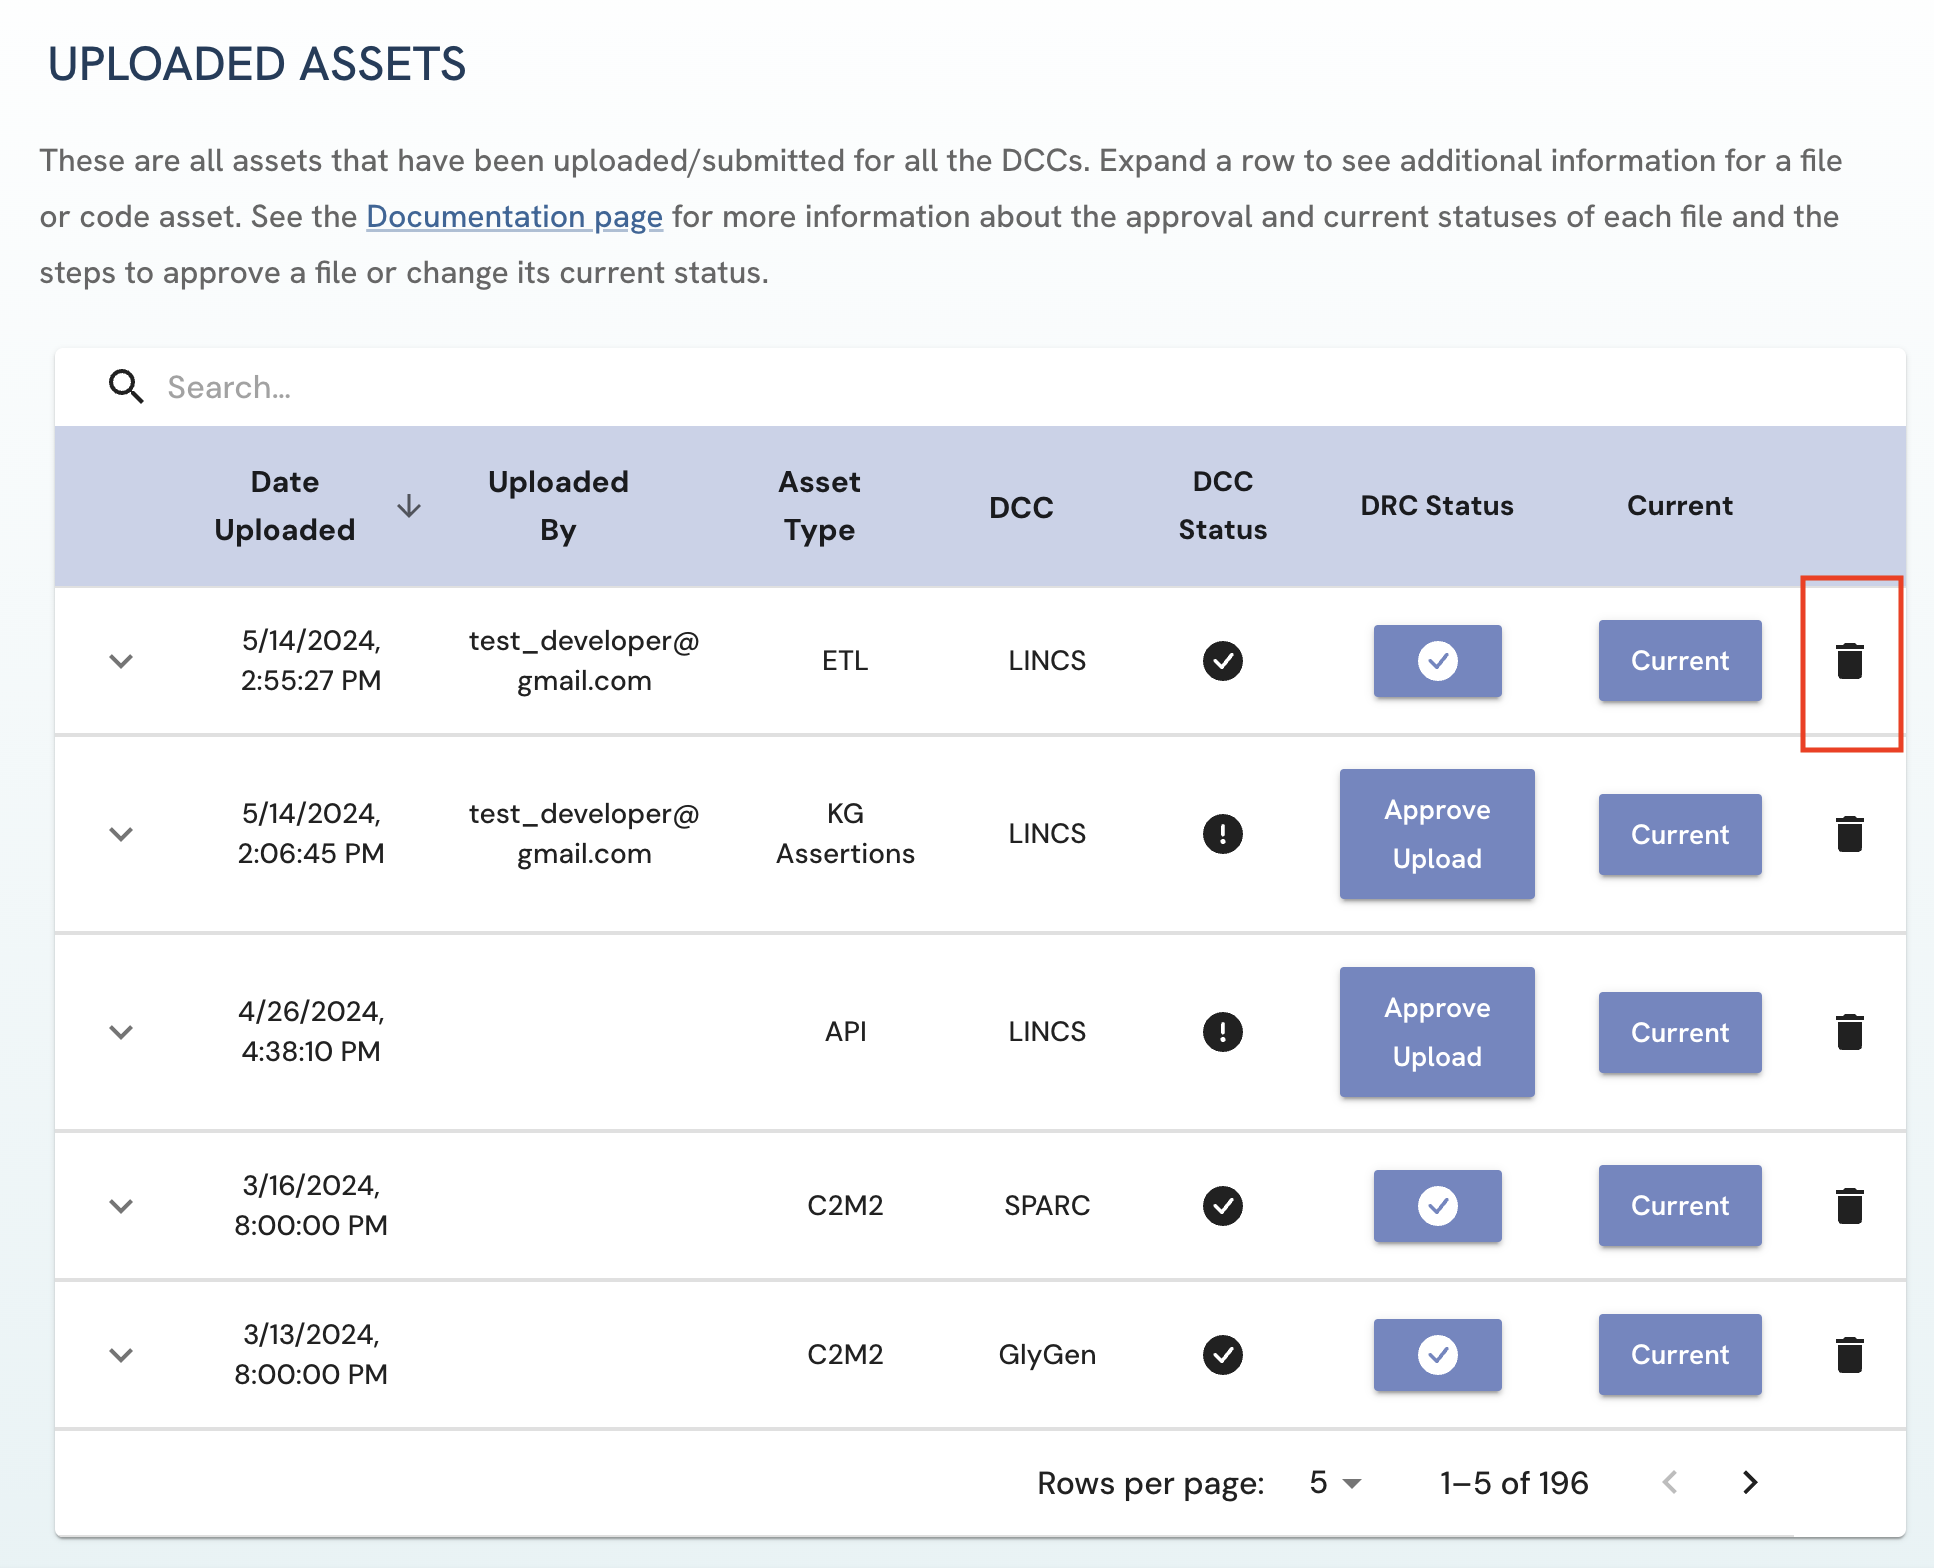 Figure 8: A screenshot of Uploaded Assets page showing deleting submitted asset.
 -
For DCC and DRC approvers: If a current asset is deleted, please update the current status of the otherwise most up-to-date DCC asset of that type.
Troubleshooting/FAQ:
- If you are to be a DCC or DRC Approver and have “Access Denied” on the Uploaded Assets page, please contact the DRC through email to change your role and grant you access.
- If a DCC that you are affiliated with is not listed as one of your DCC options on the My Account page, please contact the DRC through email to update your information. You will not be allowed to approve uploaded files for this DCC otherwise.
Admin User Documentation
Create a User:
-
Go to the Admin page and click on the "Create New User" button,
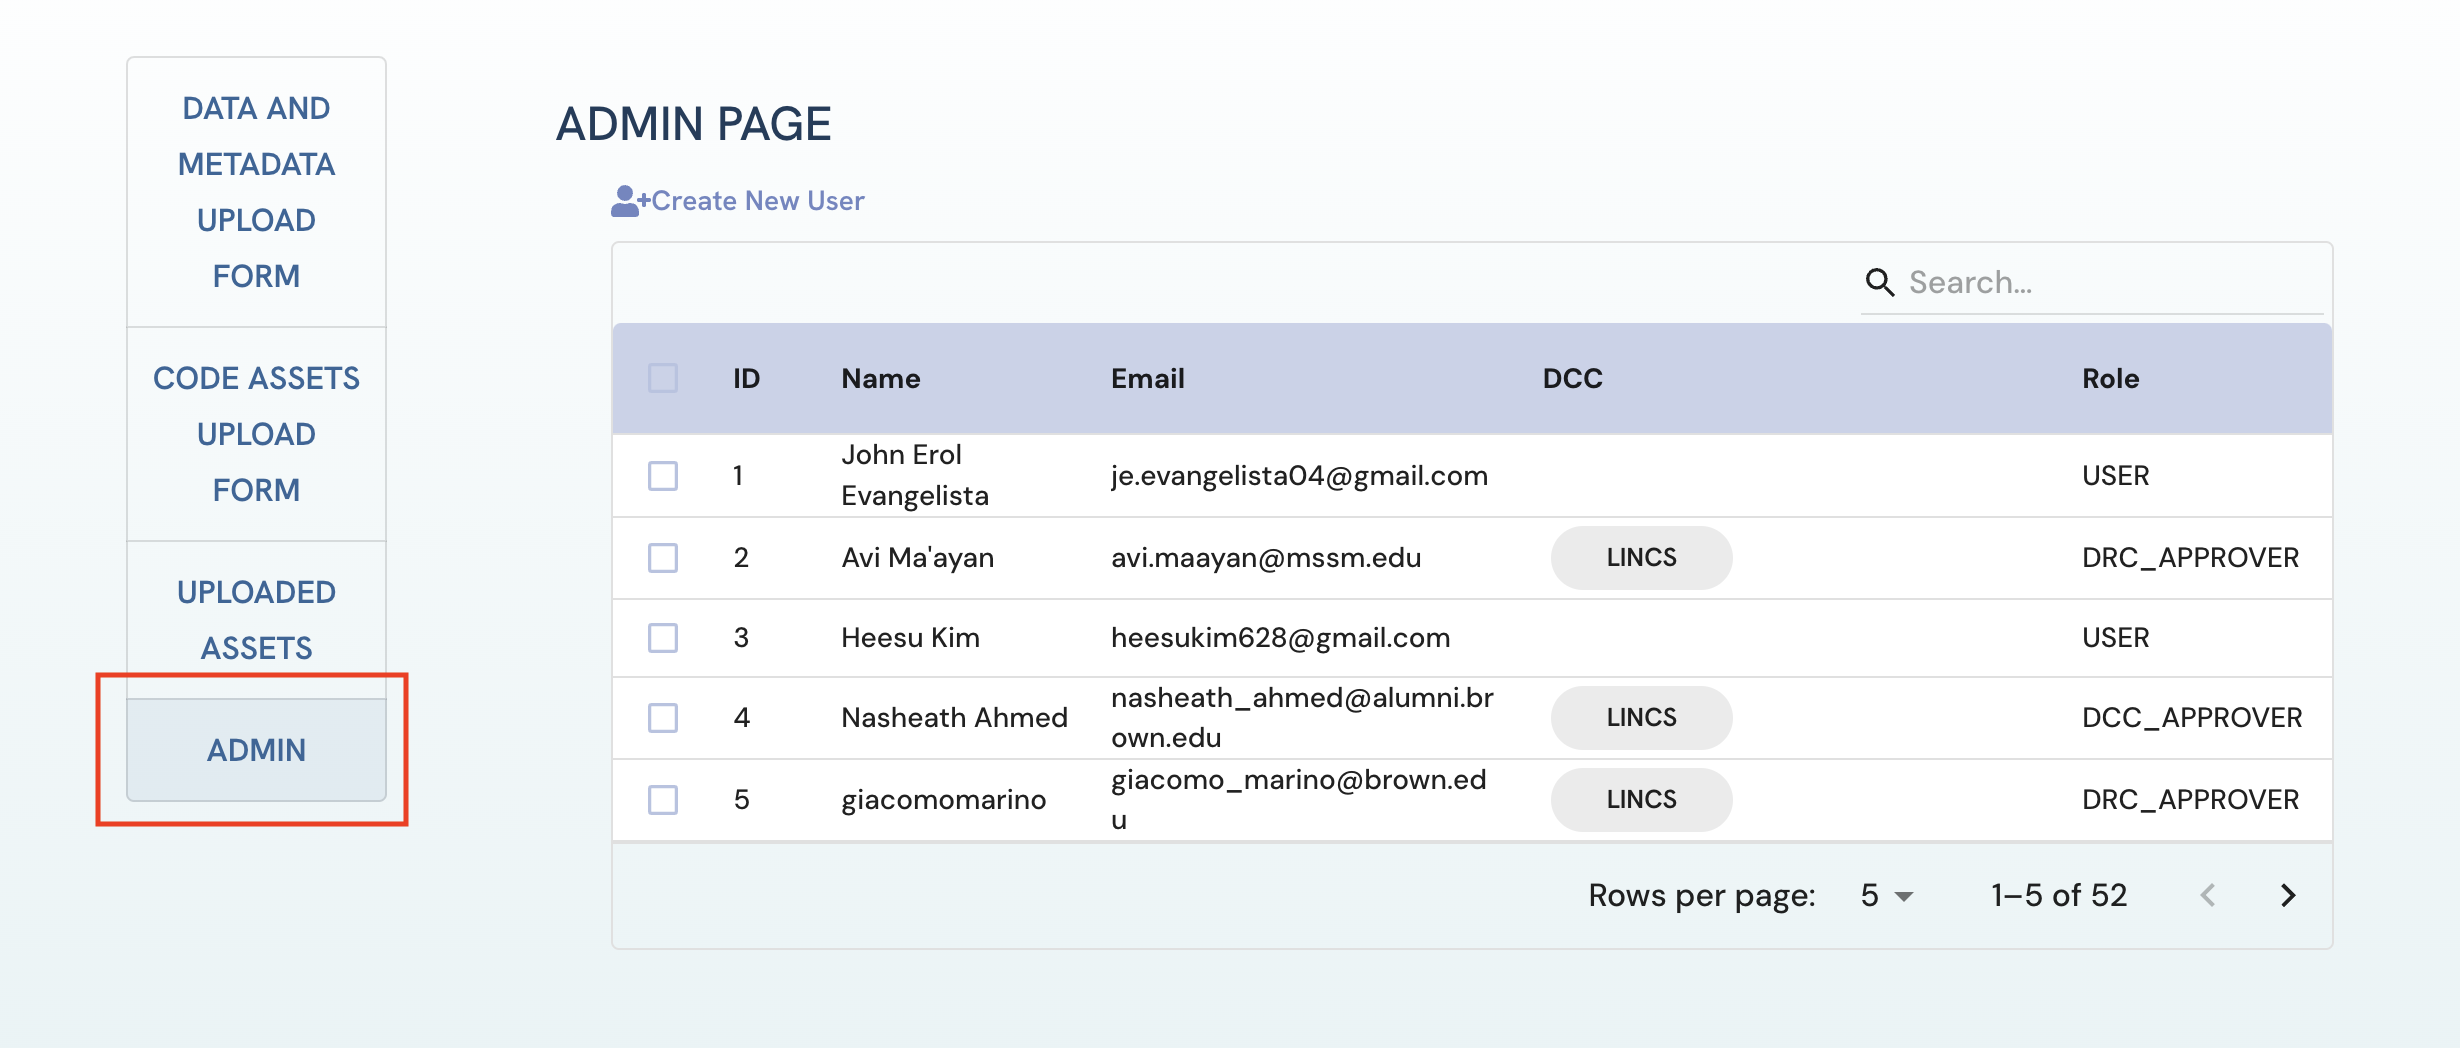 Figure 1: A screenshot of Admin page showing navigation to admin page.
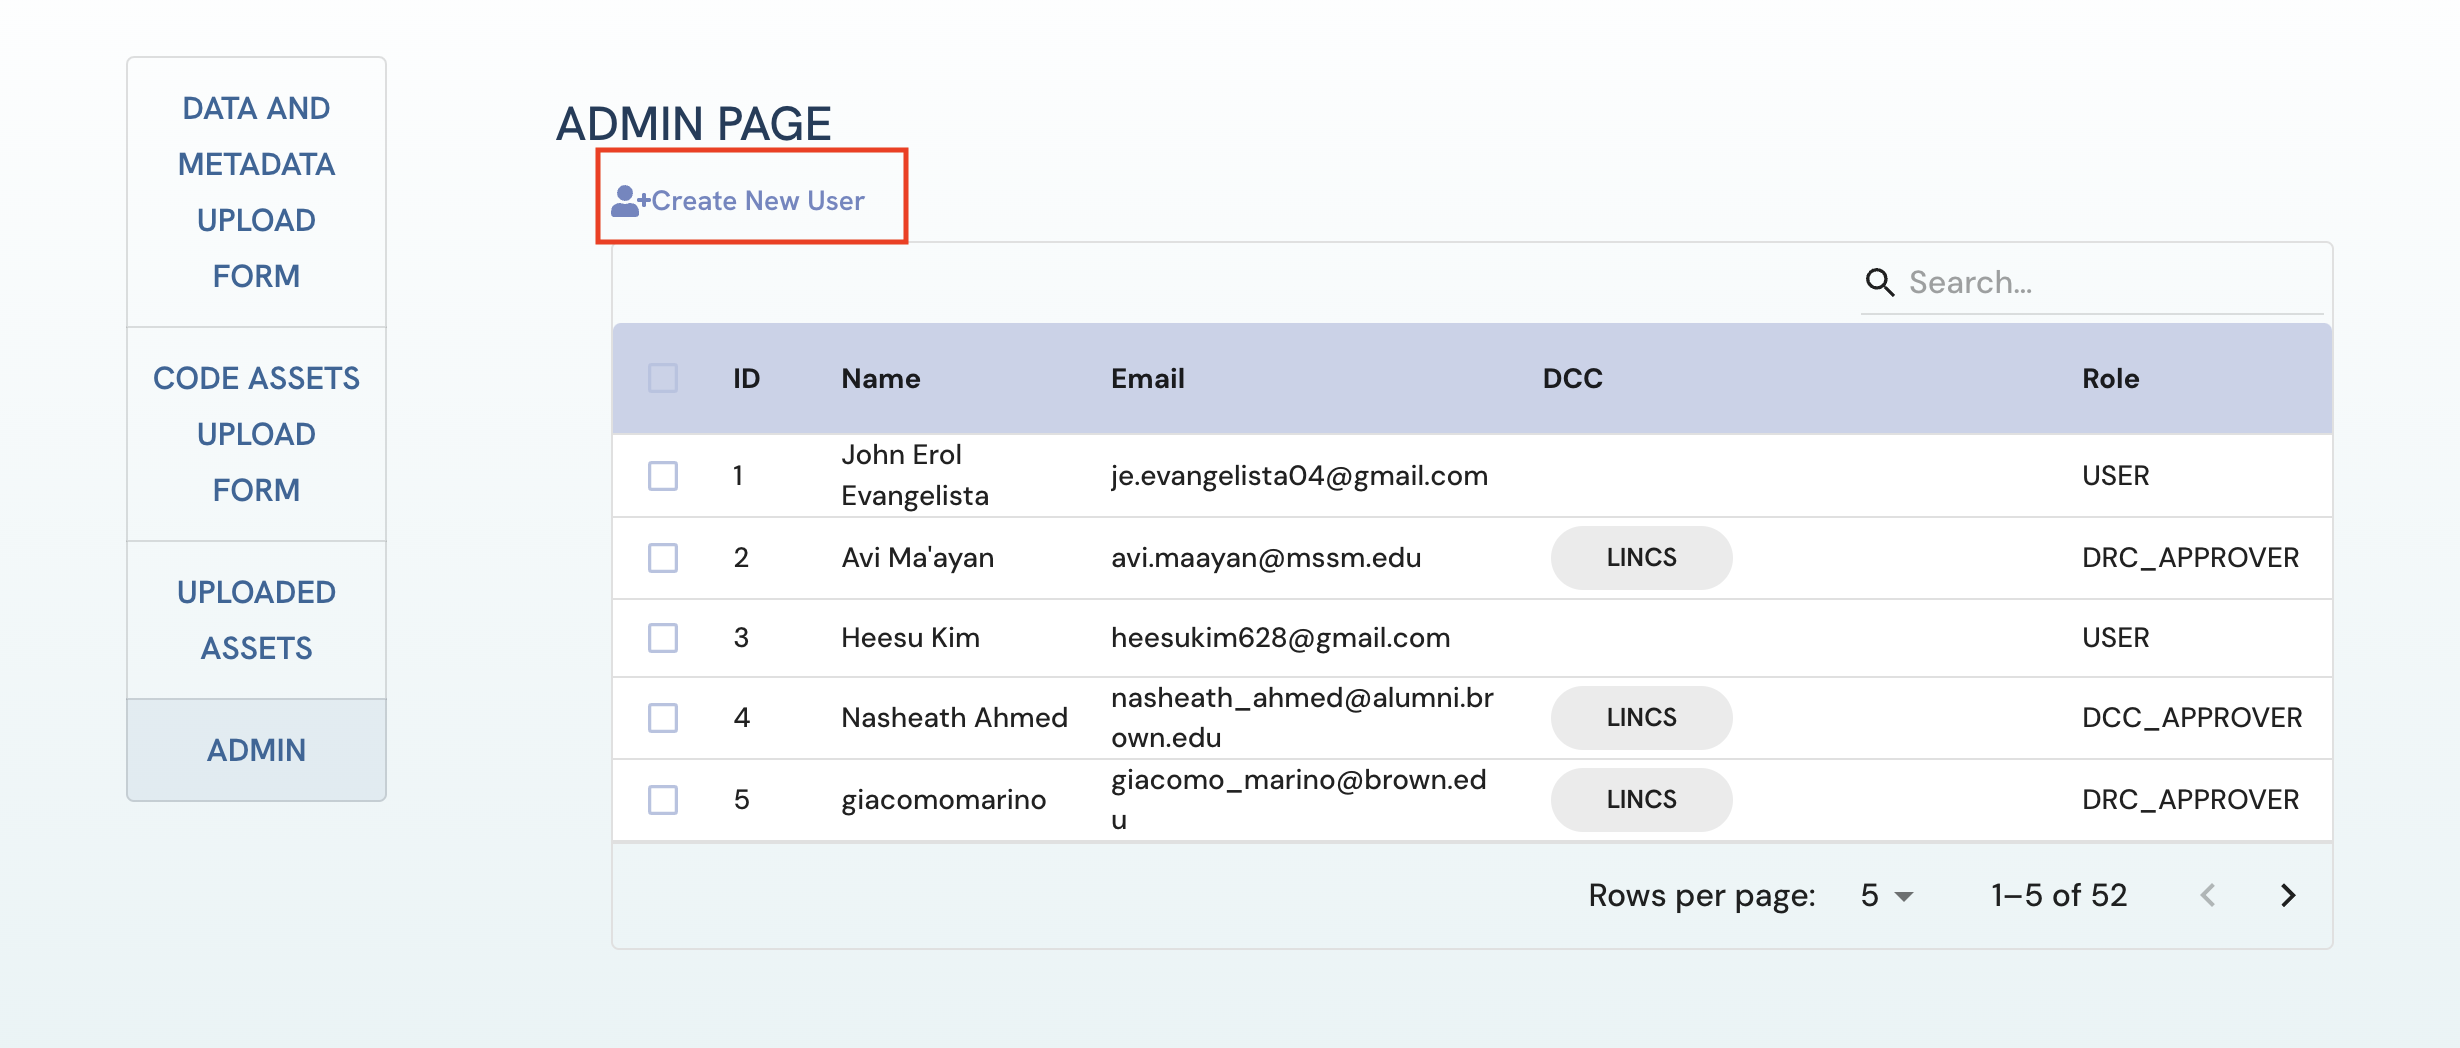 Figure 2: A screenshot of Admin page showing creation of user.
 -
Fill out the new user's information and click the “Create User” button. If successful, a banner with “User Creation Successful” should appear.
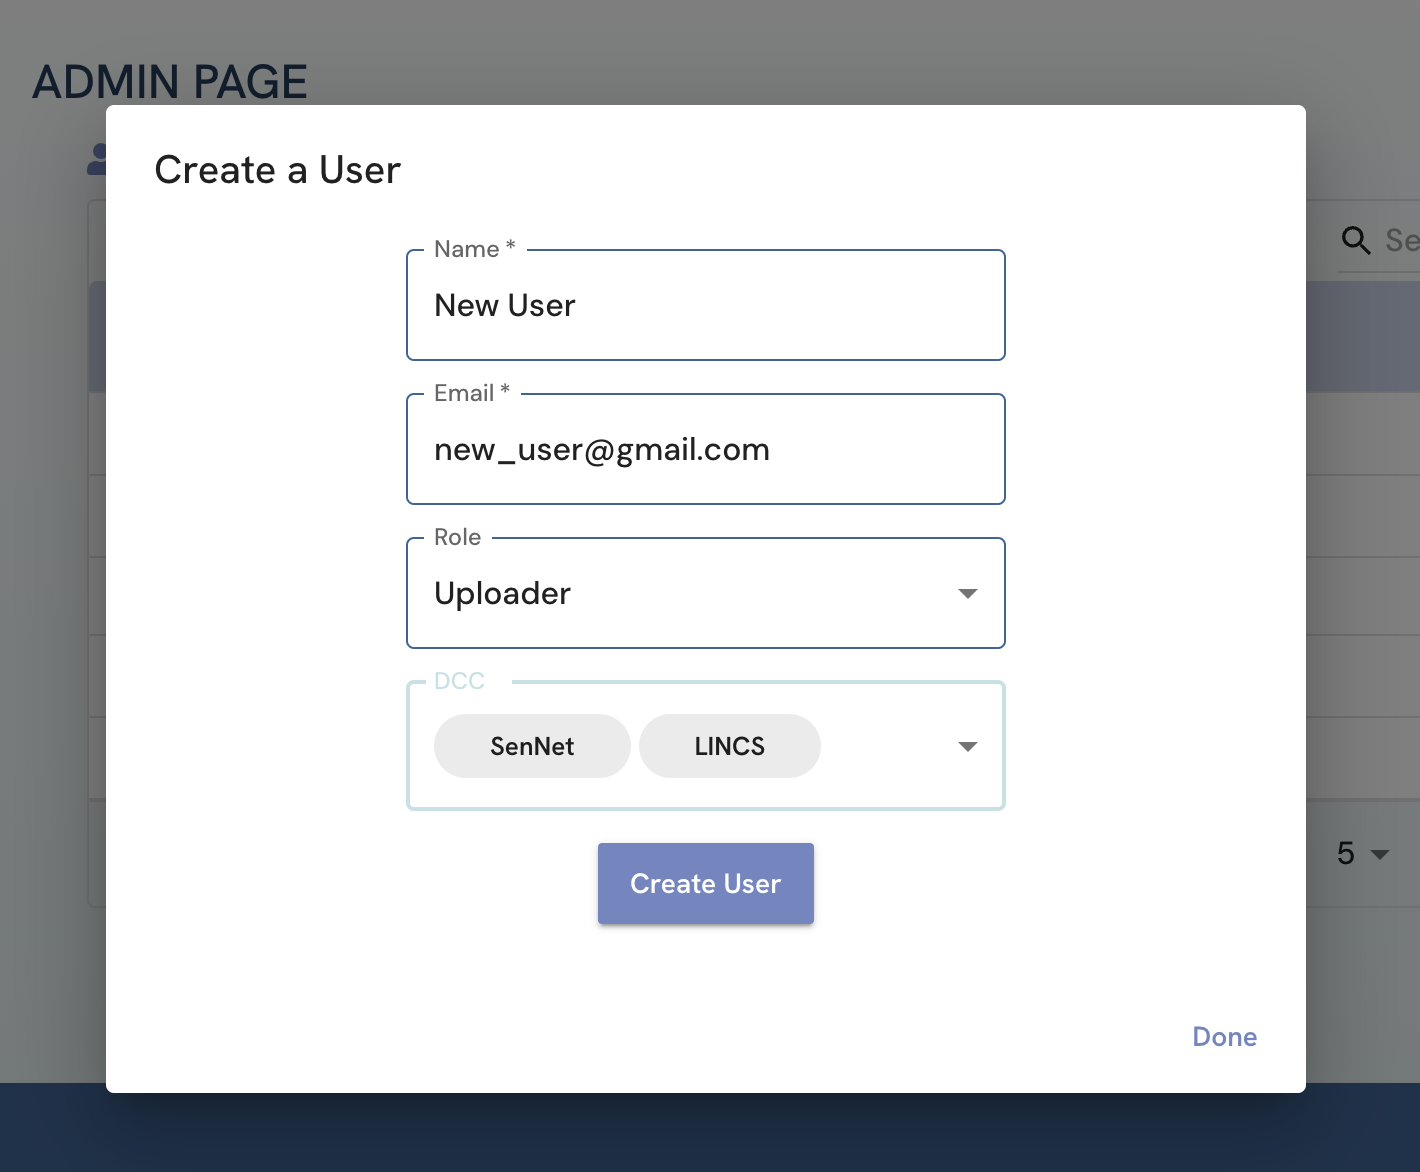 Figure 3: A screenshot of Admin page showing format of filling in new user information.
Update User Information
-
Go to the Admin page and select the users whose information is to be updated and click on the Update User Information button.
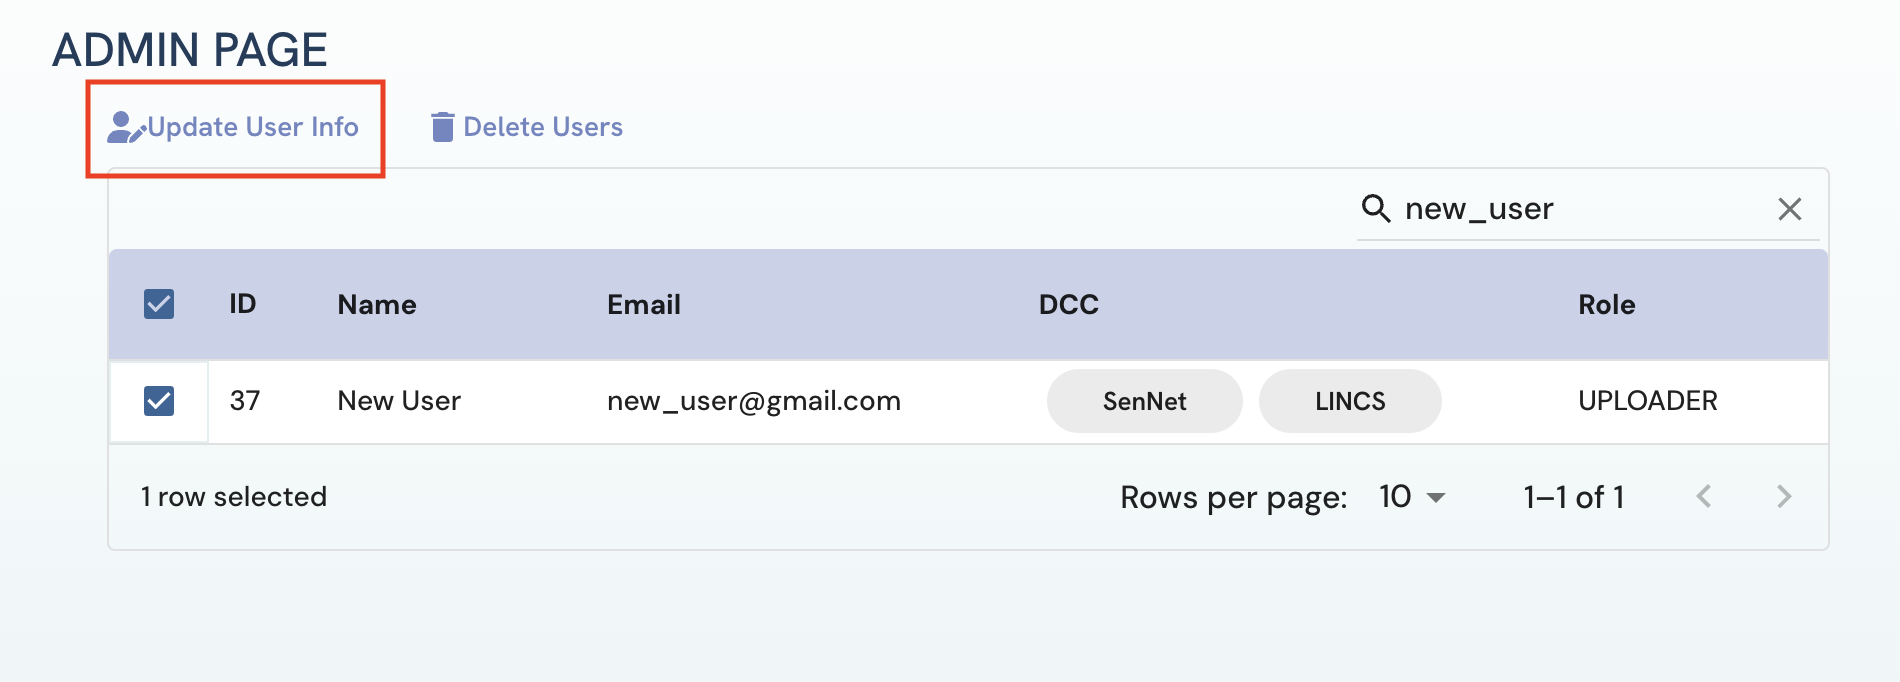 Figure 4: A screenshot of Admin page showing selection of user to update user information.
 -
In the dialog box that appears, for each user, select their new role and DCC information and click “Update”. An alert with “User Information Updated” will appear if the update operation is successful.
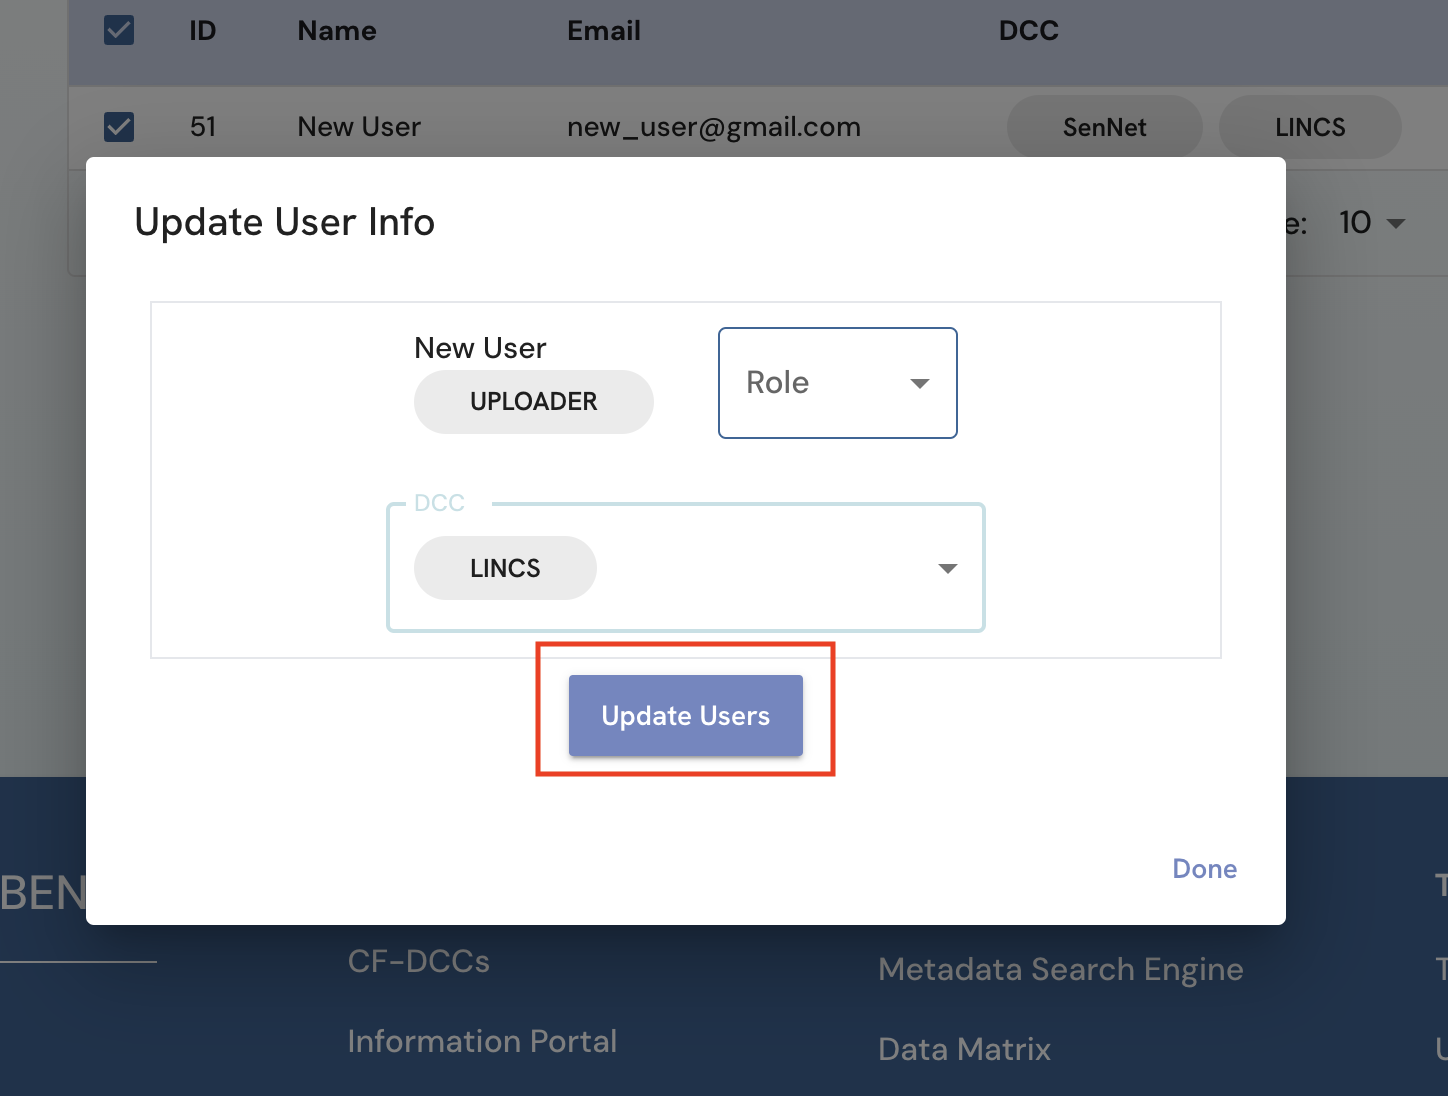 Figure 5: A screenshot of Admin page showing filling in in updated user information.
 -
When all selected users' information have been updated, click on “Done” or outside the dialog box.
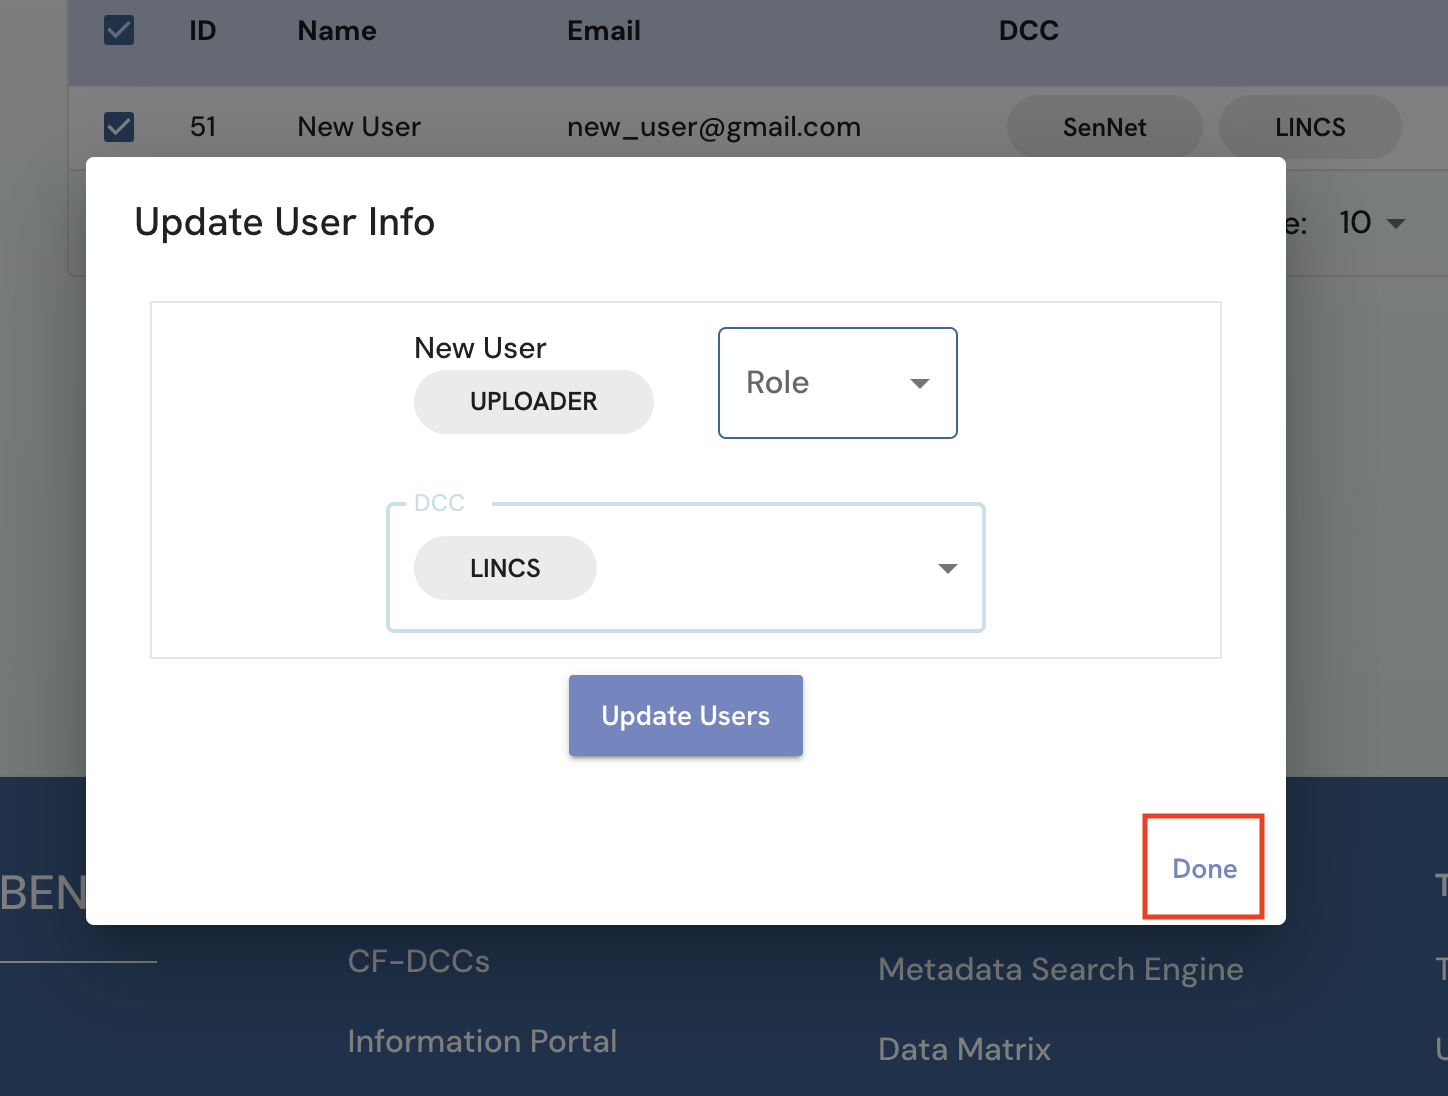 Figure 6: A screenshot of Admin page showing success banner with update of user information
Delete Users
-
Go to the Admin page and select the users to delete.
-
Click on the “Delete Users” button to delete selected users. Please note that the delete operation is irreversible.
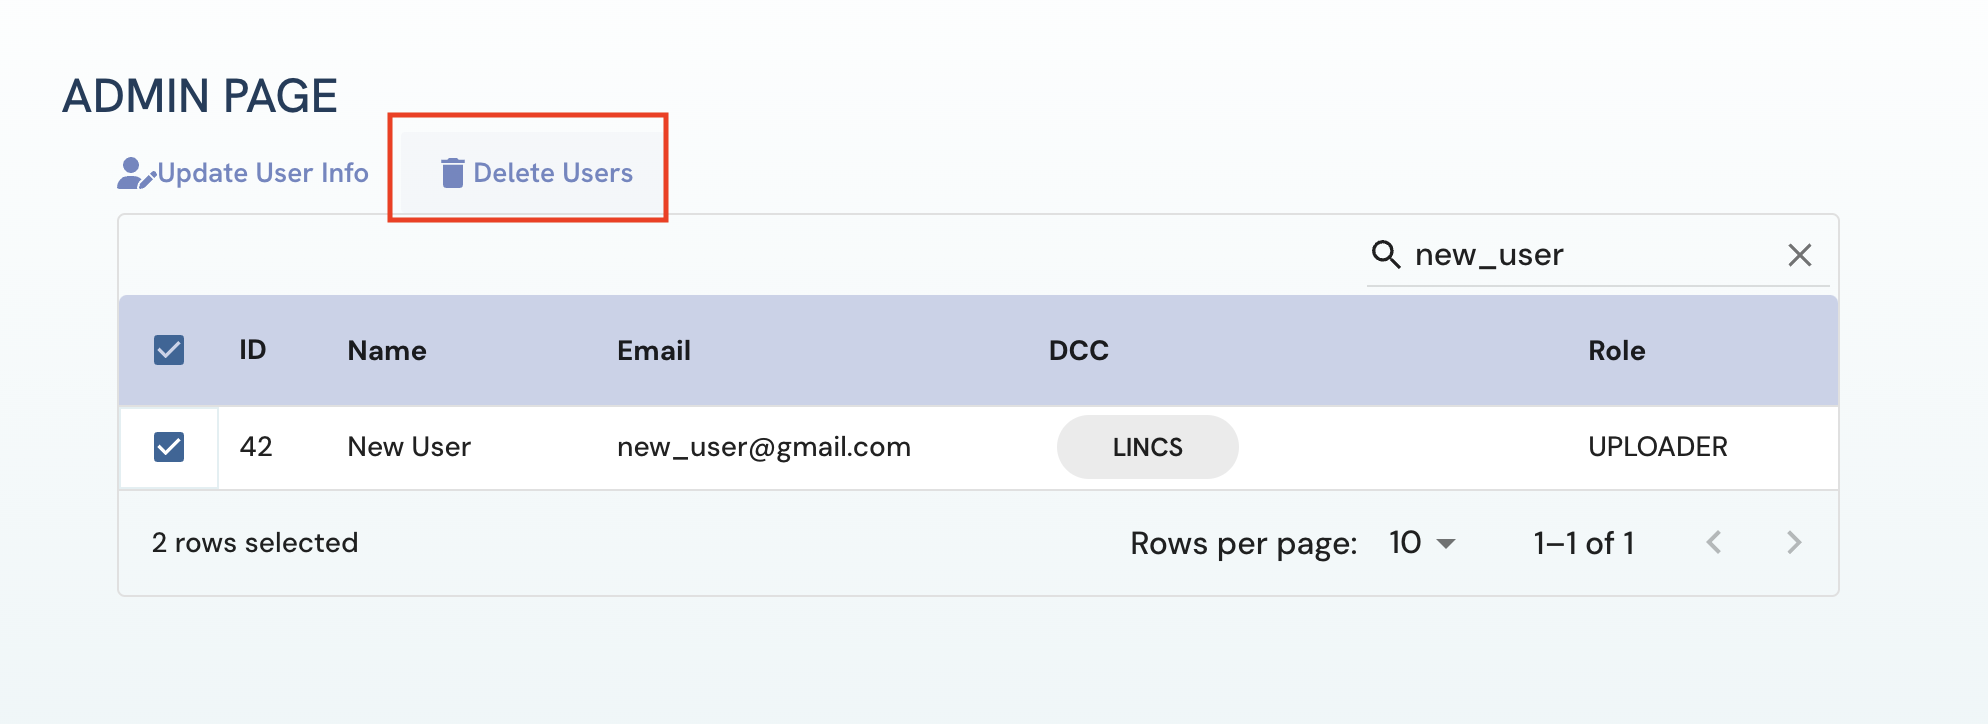 Figure 7: A screenshot of Admin page showing deletion of selected user.
Instructional Video